
Connect your WordPress site and turn on Features
Build Your App · مستندات AppPresser
Connect your WordPress site and turn on Features
لم تُترجم هذه المقالة بعد، لذا تُعرض بالإنجليزية.
Your app journey: step 3 of 9, Connect and set up. New here? Read Start here: build your app with AppPresser first.
What you'll do: Your app gets its posts, pages and products from your WordPress website. On the Connect screen you link your website and add the AppPresser plugins. On the Features screen you turn on extras like the camera.
Before you start
- Create an app. See Create your first app.
- Have your website address ready. It must start with https://.
- Make sure you can log in to your WordPress website as an administrator. An administrator is a user who can add plugins.
Link your website
- Open your app in the builder.
- In the left menu, under General, click Connect.
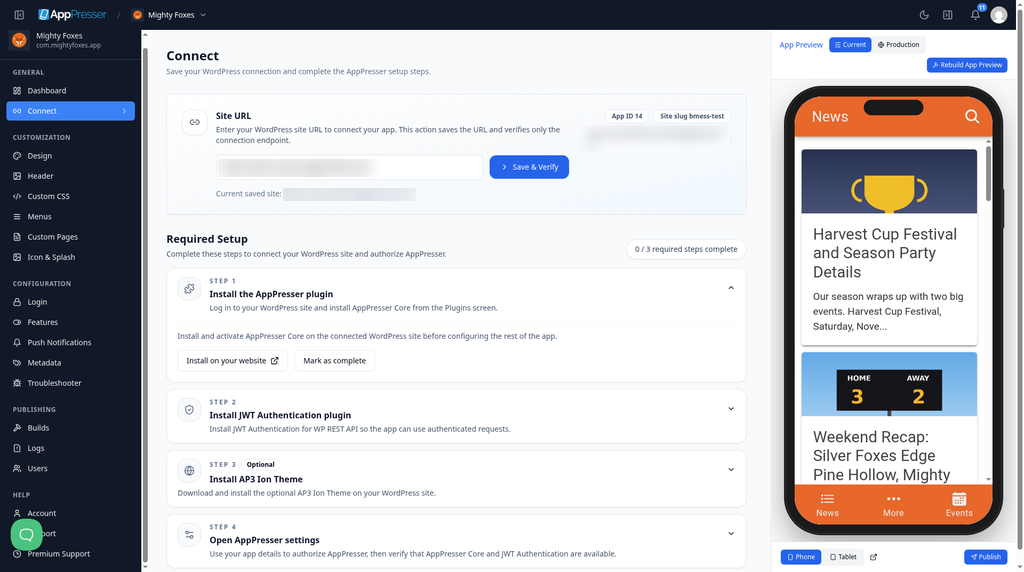
- In Site URL, type your website address, starting with https://.
Click Save & Verify. AppPresser saves the address and checks that it can reach your website. The saved address then shows under the box as Current saved site.
Finish the setup steps
Under Required Setup, a count shows how many required steps are complete, for example 0 / 3 required steps complete. Click each step to open it, then do what it says. Step 3 is optional, so it is not in that count.
- Install the AppPresser plugin. Log in to your WordPress website, then install and activate AppPresser Core from the Plugins screen. The Install on your website button takes you there. When you are done, click Mark as complete.
- Install JWT Authentication plugin. Install and activate JWT Authentication for WP REST API. This plugin lets your app sign people in safely.
- Install AP3 Ion Theme. This step is marked Optional, but it is recommended for most apps. Install the theme on your website, but do not activate it. The app turns it on by itself for pages shown in the app.
- Open AppPresser settings. This step shows your App ID, Site slug and Account email. Click Go to AppPresser settings to open your website and connect AppPresser with those details. Then click Verify setup to check that AppPresser Core and JWT Authentication are working.
Add plugins for your shop, courses or community
If your website has a shop, courses, a community or photo uploads, install and activate the matching AppPresser add-on on your WordPress website. Add only the ones you need:
Swipe sideways to see the rest of this table.
| If your website uses | Add this AppPresser plugin |
|---|---|
| WooCommerce (an online shop) | AppCommerce |
| LearnDash (online courses) | AppLMS |
| BuddyPress or BuddyBoss (a community) | AppCommunity |
| Photo uploads from the app | AppCamera |
In your WordPress admin, open Plugins and activate the add-on.
Turn on Features
- In the left menu, under Configuration, click Features.
- Turn on the switch for each feature you need. Turn on only what you use.
- Click Save Changes.
Some features need a bigger plan. These show an Upgrade label. For example, In-App Purchases needs the Advanced plan. Turn on app features (Features) explains every feature.
Some blocks need a feature:
Swipe sideways to see the rest of this table.
| Feature | Needed by |
|---|---|
| Camera | Let people upload photos (App Camera block), and photo uploads in the Add a photo gallery (Photo Gallery block) |
| Media Player | Show podcasts, audio and video (Podcasts/Media block) |
| In-App Purchases | Sell in-app purchases (In App Purchase Form block) |
| Ads (Advertisements on the Features screen) | Let people choose personalized ads (Ad Settings block) |
| Translations | Let people choose a language (Language Settings block) |
| Push Notifications | Turn on push notifications and send a message |
Check it works
- In the left menu, click Custom Pages.
- Open a page that shows your posts, such as the News page.
- Look at the App Preview on the right. Your posts should show.
- If they do not show, click Rebuild Preview in the App Preview panel. This takes a few minutes.
You're done when your website shows under Current saved site, your posts show in the App Preview and the features you need are on.
Next step
Turn on app features (Features)
Related articles
هل كان هذا مفيدًا؟
تتحدّث النتائج أثناء الكتابة. اضغط الشرطة المائلة للانتقال إلى البحث.
لم تجده؟
يمكن لفريق الدعم المساعدة في الإعداد والبناء وأسئلة المتاجر.