
Get your iOS app signed: certificates, profiles and the AppPresser setup request
Publish and Grow · התיעוד של AppPresser
Get your iOS app signed: certificates, profiles and the AppPresser setup request
מאמר זה טרם תורגם, ולכן הוא מוצג באנגלית.
Your app journey: step 7 of 9, Publish to the stores. New here? Read Start here: build your app with AppPresser first.
What you'll do: Check your iOS setup, ask the AppPresser team to set up your Apple certificates if you need to and get your iOS app ready to build.
Before you start
Have these ready:
- A paid Apple Developer Program membership (99 USD per year, as an Organization or an Individual). If you don't have one, enroll first at developer.apple.com/programs/enroll.
- The email and password of your Apple Account that owns the membership.
- Your phone nearby. Apple uses two-factor authentication, so you'll get sign-in codes. The AppPresser team may also need a code from you later (see the Timezone field below).
- Admin access to App Store Connect, so you can add the AppPresser support team as a user.
- A payment method on your AppPresser account, if you'll ask the AppPresser team to do the setup ($99 per request, see below).
- Your app open on the Builds screen. In the left menu, under Publishing, click Builds.
What this is for
Apple lets an app run on an iPhone only if the app carries a digital "signature" that proves who made it. Think of it like a sealed envelope with your company stamp on it. Without the stamp, iPhones refuse to open the app.
To put that stamp on your app, Apple needs a few files and details from your Apple Developer account. AppPresser checks for them before it builds your iOS app. If any are missing, you can ask the AppPresser team to set them up for you.
This article shows you how to:
- Check whether your iOS setup is ready.
- Understand what the results mean.
- Ask the AppPresser team to set up your certificates.
- Add or replace provisioning profiles.
- Check again, and build.
Why your iOS build can't start yet
Your iOS app can't be built until your certificates and provisioning profiles are in place. Until then, every iOS build on the Builds page (Development, Ad Hoc and App Store) shows Not Validated, and the build won't run. That's normal for a new app, and it doesn't mean anything is wrong with the app you designed.
Android is different. Android builds don't need Apple certificates, so you can build and test your Android app while you wait for the iOS setup.
Once the steps below are done and Validate Setup shows everything in place, your iOS builds can start.
Words you'll see
You don't need to memorize these. Come back here whenever a word is unclear.
Apple Developer account (Apple Developer Program): Your paid membership with Apple that lets you put apps on iPhones and in the App Store. Apple charges 99 USD per year (prices can vary by country). You sign in to it at developer.apple.com.
Apple Account (Apple ID): The email and password you use with Apple. Your Apple Developer membership is attached to one Apple Account.
Organization or Individual: The two ways to join the Apple Developer Program. Organization means a company or other legal business. Individual means a person or sole proprietor. Your app's seller name in the App Store comes from this. The form asks which one you have.
App Store Connect: Apple's website for managing your apps in the App Store: store listings, test versions and submissions. You sign in at appstoreconnect.apple.com with the same Apple Account.
App Store Connect username: The email address of the Apple Account you use to sign in to App Store Connect.
Two-factor authentication: An extra security step. When you sign in, Apple sends a code to your phone or another Apple device, and you type it in. Apple requires it for developer accounts.
App-specific password: A separate password that Apple makes for you, just for one outside service. It lets that service sign in to your Apple account without knowing your real password. You can delete it at any time. You make one at account.apple.com (steps below).
Apple team ID: A 10-character code (letters and numbers, for example AB12CD34EF) that Apple gives your developer membership. It is like an account number for your developer team.
Apple team name: The name of your developer team as Apple shows it. Usually it is your company name or your own name.
Certificate: A digital ID card that proves you (or your company) made the app. There are two kinds:
- Development certificate: used for test versions that run on your own phones.
- Distribution certificate: used for versions you share with testers (Ad Hoc) or send to the App Store.
.p12 file (certificate with its private key)
A single file that bundles your certificate together with its secret "private key". The certificate on its own is like the public half of a signature, and the private key is the half only you should hold. Apps can only be signed when both halves are together, so the .p12 is the file a build service actually needs. A few things to know:
- Apple only lets you download the certificate part (a .cer file). The private key is made on the computer that requested the certificate, so the .p12 has to be exported from that computer (on a Mac, from the Keychain Access app).
- When you export a .p12, you choose a password for it. Anyone uploading the file will also need that password, so keep the two together somewhere safe, like a password manager.
- Treat a .p12 like a key to your app. Don't email it around or post it publicly.
- If the .p12 is lost, you can't re-download it from Apple. You make a new certificate instead.
- You'll see .p12 in two places: your signing certificates (development and distribution) and your push certificate.
Provisioning profile: A permission slip from Apple. It says which app, made by which team, may run on which iPhones. There are three kinds:
- Development profile: for test builds on your own registered phones.
- Ad Hoc profile: for sharing a test version with a small list of registered phones, without the App Store.
- App Store profile: for the version you send to the App Store.
Registered test devices iPhones you've told Apple about (by their device ID) so they can install Development and Ad Hoc builds.
Push certificates: Files that let your app receive push notifications (the pop-up messages you send from AppPresser). They are part of the same Apple setup, which is why the AppPresser form says "Signing and Push Certificates."
Development Build, Ad Hoc Build, App Store Build: The three iOS build types on the Builds page. Development is for your own test phones. Ad Hoc is for a group of registered test phones. App Store is the version you submit to Apple for the App Store.
Validate Setup and Re-Validate: Buttons on the Builds page. They check whether everything Apple needs is in place, before you spend time on a build. They do not build anything, and they do not change anything. Re-Validate is the same check, run again after you've fixed something.
Bitrise: The build service AppPresser uses behind the scenes to turn your app into a file for iPhones. You don't need your own Bitrise account. The $99 setup request mentions it because the AppPresser team configures it for you.
What the "Missing …" messages mean
After you validate, you may see lines like these. In plain words:
Swipe sideways to see the rest of this table.
| Message on screen | What it means |
|---|---|
| Missing APP_DEVELOPMENT_TEAM environment variable. | AppPresser doesn't have your Apple team ID yet. |
| Missing APP_STORE_TEAM_NAME environment variable. | AppPresser doesn't have your Apple team name yet. |
| Missing APP_DEVELOPMENT_PROFILE environment variable. | AppPresser doesn't have a Development provisioning profile on file. |
| Missing APP_ADHOC_PROFILE environment variable. | AppPresser doesn't have an Ad Hoc provisioning profile on file. |
| Missing APP_RELEASE_PROFILE environment variable. | AppPresser doesn't have an App Store provisioning profile on file. |
| Missing valid development certificate. | There is no working development certificate (none yet, or it expired). |
| Missing valid distribution certificate. | There is no working distribution certificate (none yet, or it expired). |
| Missing valid development provisioning profile. | The Development profile is missing or expired. |
| Missing valid Ad Hoc provisioning profile. | The Ad Hoc profile is missing or expired. |
| Missing valid App Store provisioning profile. | The App Store profile is missing or expired. |
| Missing APP_STORE_USERNAME secret for App Store authentication. | AppPresser doesn't have the App Store Connect username it needs to send your app to Apple. |
| Missing APP_SPECIFIC_PW secret for App Store authentication. | AppPresser doesn't have the app-specific password it needs to send your app to Apple. |
An "environment variable" or "secret" is simply a saved setting that the build uses. A "secret" is a saved setting that is kept hidden, like a password.
Step 1: Check your iOS setup (Validate Setup)
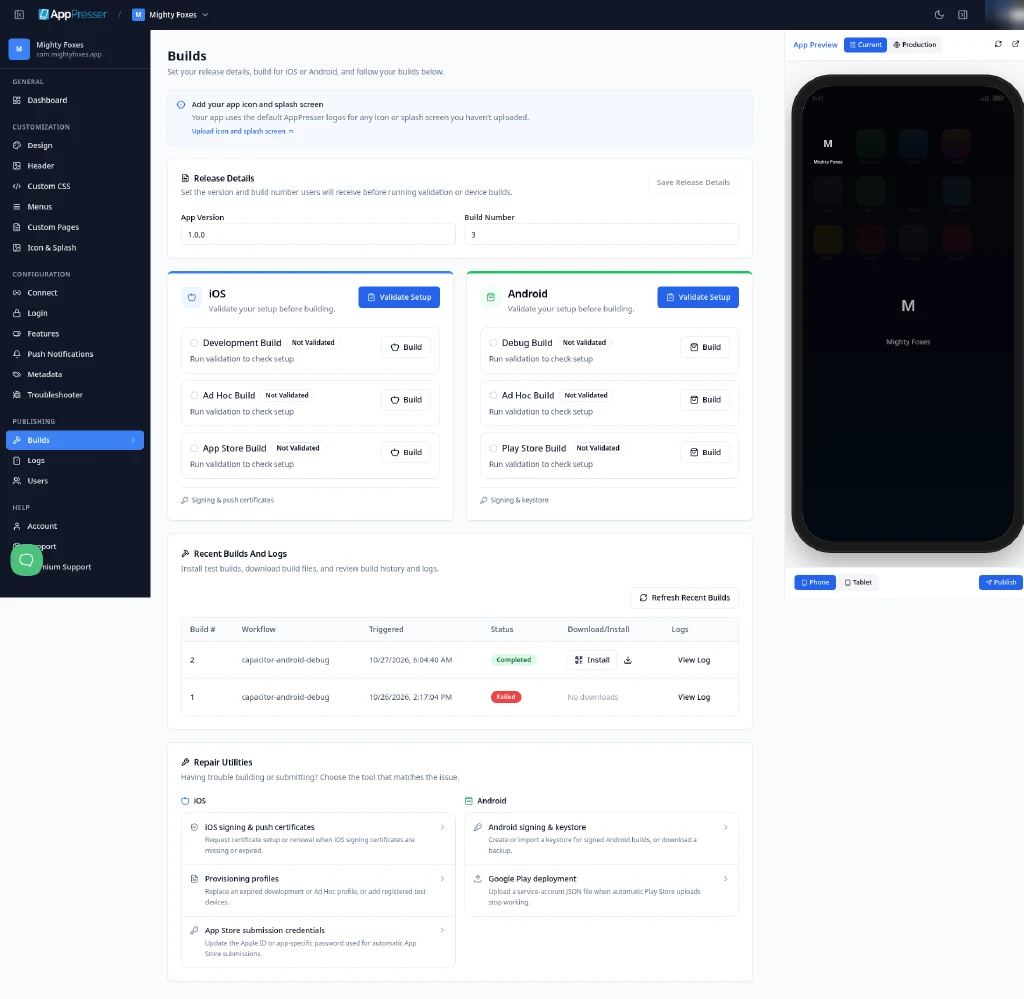
- On the Builds page, find the iOS card. It says "Validate your setup before building."
- Check that each build type (Development Build, Ad Hoc Build and App Store Build) shows Not Validated and "Run validation to check setup."
Click Validate Setup at the top of the iOS card.
- Wait a few seconds while the button says Validating… and the Build buttons are grayed out.
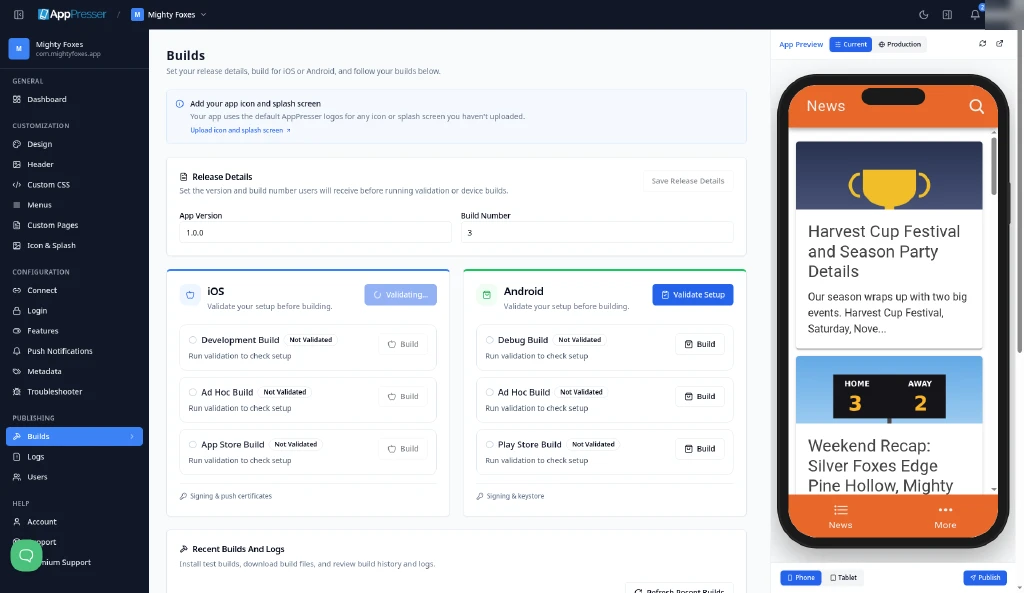
Tip: If you click a Build button before you validate, AppPresser runs the check first instead of starting a build. That is expected. Nothing is built yet.
Step 2: Read the results
When the check finishes:
- If everything is in place, each build type is ready to build.
- If something is missing, the card says "Some checks failed. Review issues before building.", the button changes to Re-Validate and each build type shows a red Issues Found label with a list of problems.
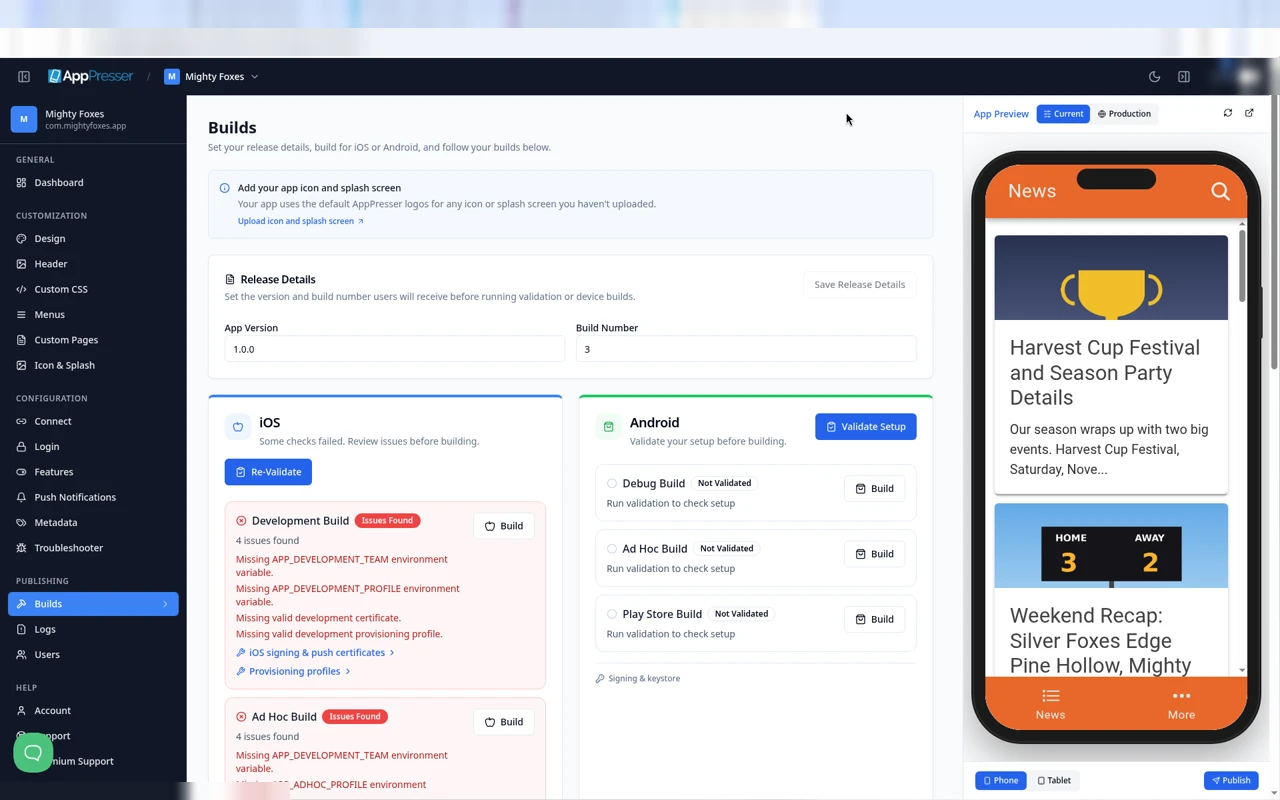
On a brand new app with nothing set up, you'll see:
- Development Build: 4 issues. Team ID, Development profile, development certificate, development provisioning profile.
- Ad Hoc Build: 4 issues. Team ID, Ad Hoc profile, distribution certificate, Ad Hoc provisioning profile.
- App Store Build: 7 issues. Team ID, team name, App Store profile, distribution certificate, App Store provisioning profile, App Store username, app-specific password.
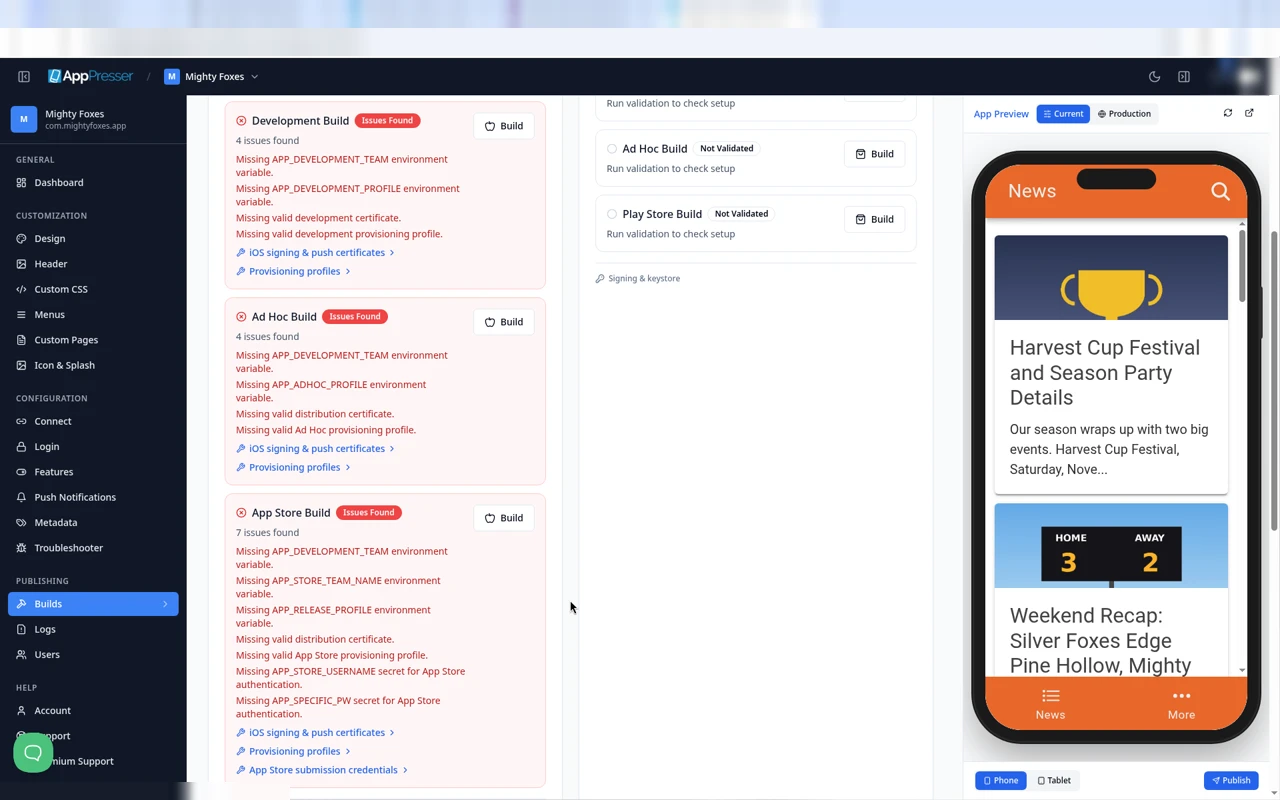
Under each list are links that open the right fix:
- iOS signing & push certificates: ask the AppPresser team to set up certificates (Step 3).
- Provisioning profiles: upload Development or Ad Hoc profiles (Step 4).
- App Store submission credentials (App Store Build only): the Repair Utilities list describes it as "Update the Apple ID or app-specific password used for automatic App Store submissions."
The same three tools are also listed at the bottom of the Builds page under Repair Utilities.
After a failed check, the iOS App Signing and Push Certificates window may open by itself. That is the form in Step 3.
Step 3: Ask the AppPresser team to set up your certificates
The AppPresser team can create your certificates and set up the build service for you. You fill in one form, give the team access to App Store Connect and approve a $99 charge.
3a. Open the form
- Under any iOS build type with issues, click iOS signing & push certificates. You can also scroll to Repair Utilities and click iOS signing & push certificates there.
The iOS App Signing and Push Certificates window opens. A yellow Validation needs attention box repeats what is missing. Under it, the form says the AppPresser team will contact you to handle your setup within 1–2 business days.
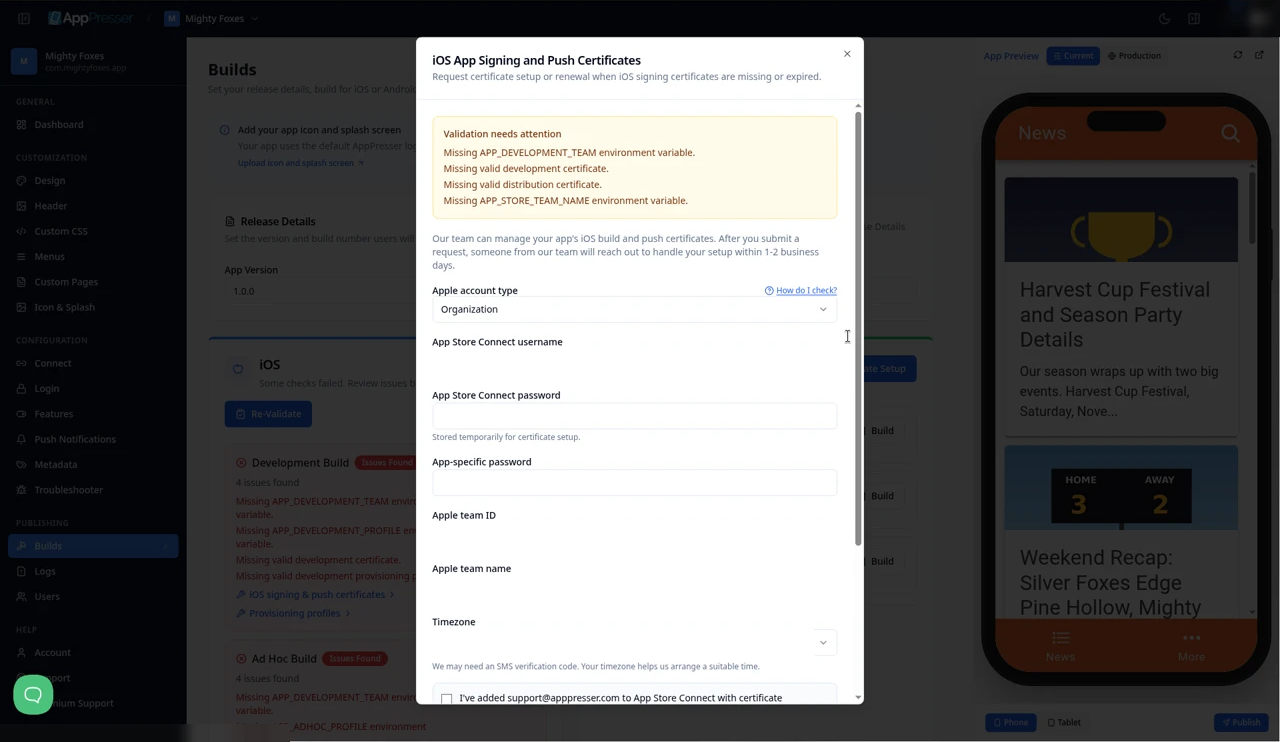
3b. Fill in each field
Apple account type
- Choose Organization or Individual from the list.
- If you are not sure, click How do I check? next to the field. It tells you to sign in to your Apple Developer account, select your app's team if asked, open Membership details and look at Entity Type. Choose Organization for "Company / Organization" or Individual for "Individual / Sole Proprietor".
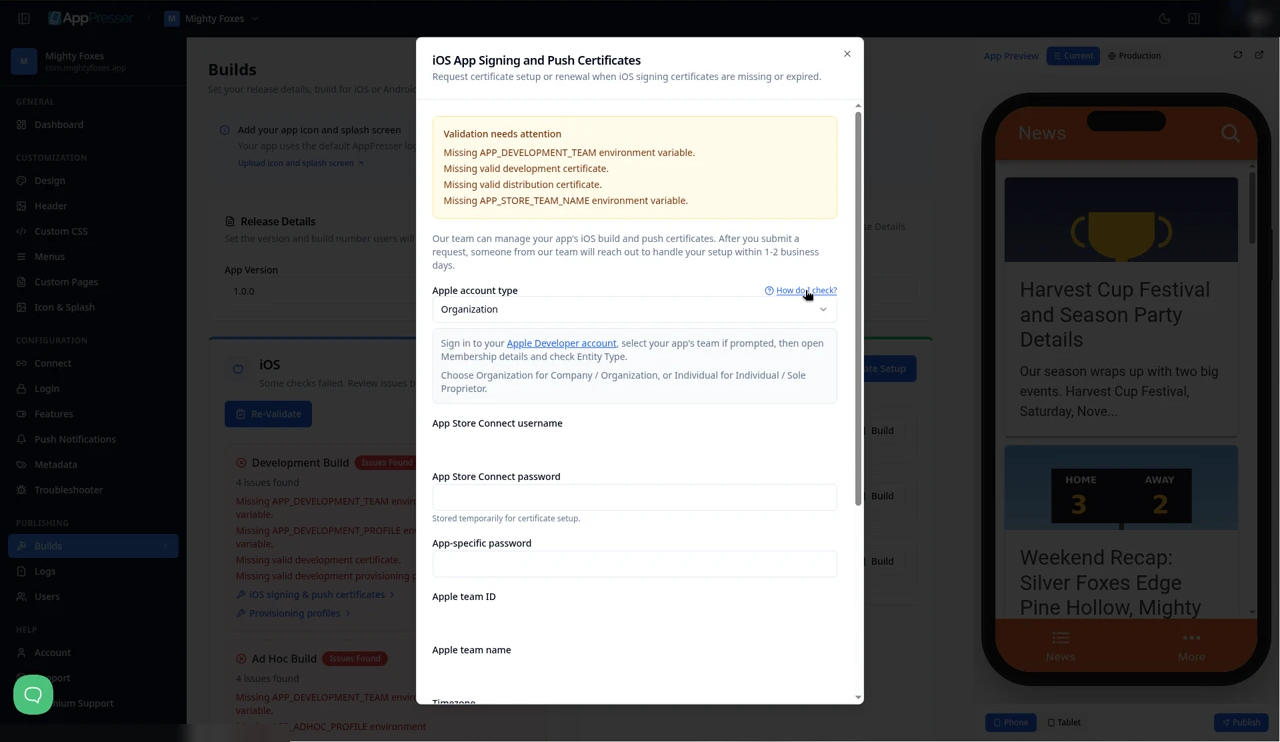
App Store Connect username: Type the email address you use to sign in to App Store Connect.
App Store Connect password: Type the password for that Apple Account. The form notes it is "Stored temporarily for certificate setup."
App-specific password: Make an app-specific password at Apple (steps below), then paste it here.
How to make an app-specific password (Apple's own steps):
- Go to account.apple.com and sign in.
- In Sign-In and Security, select App-Specific Passwords.
- Select Generate an app-specific password, give it a name you'll recognize (for example "AppPresser") and follow the steps.
- Copy the password Apple shows you and paste it into the form.
Good to know: Your Apple account needs two-factor authentication turned on to make an app-specific password. If you change your main Apple password, Apple cancels all app-specific passwords and you need to make a new one.
Apple team ID
- Sign in at developer.apple.com and open your account.
- Click Membership details. If you belong to more than one team, pick the right team first.
- Copy the Team ID (10 letters and numbers) and paste it here.
Apple team name: On the same Membership details page, copy your team name exactly as Apple shows it, and paste it here.
Timezone: Choose your timezone. The form explains: "We may need an SMS verification code. Your timezone helps us arrange a suitable time." Apple may text a code to your phone when the team signs in. If it does, the team will ask you to read it to them.
3c. Give AppPresser access to App Store Connect
The team needs their own access to your App Store Connect account to create the certificates. Giving them a user login is safer than sharing yours, and you can remove it later.
- Sign in at appstoreconnect.apple.com.
- Open Users and Access. (You need the Account Holder, Admin or App Manager role to add people.)
- Under People, click the plus (+) button.
- Enter a first name, last name and the email support@apppresser.com.
- Choose the role and access the AppPresser team needs, including access to Certificates, Identifiers & Profiles.
- Click Next, then Invite. Apple's invitations expire after 3 days, so do this close to when you submit the form.
- Back in the AppPresser form, check "I've added support@apppresser.com to App Store Connect with certificate access."
3d. Approve the $99 charge
- Read the orange box Certificate setup · $99. It says: "Certificate creation or renewal and Bitrise configuration are charged separately for reseller accounts."
- Check "I authorize AppPresser to charge my current payment method $99 for this certificate creation/renewal and Bitrise configuration request."
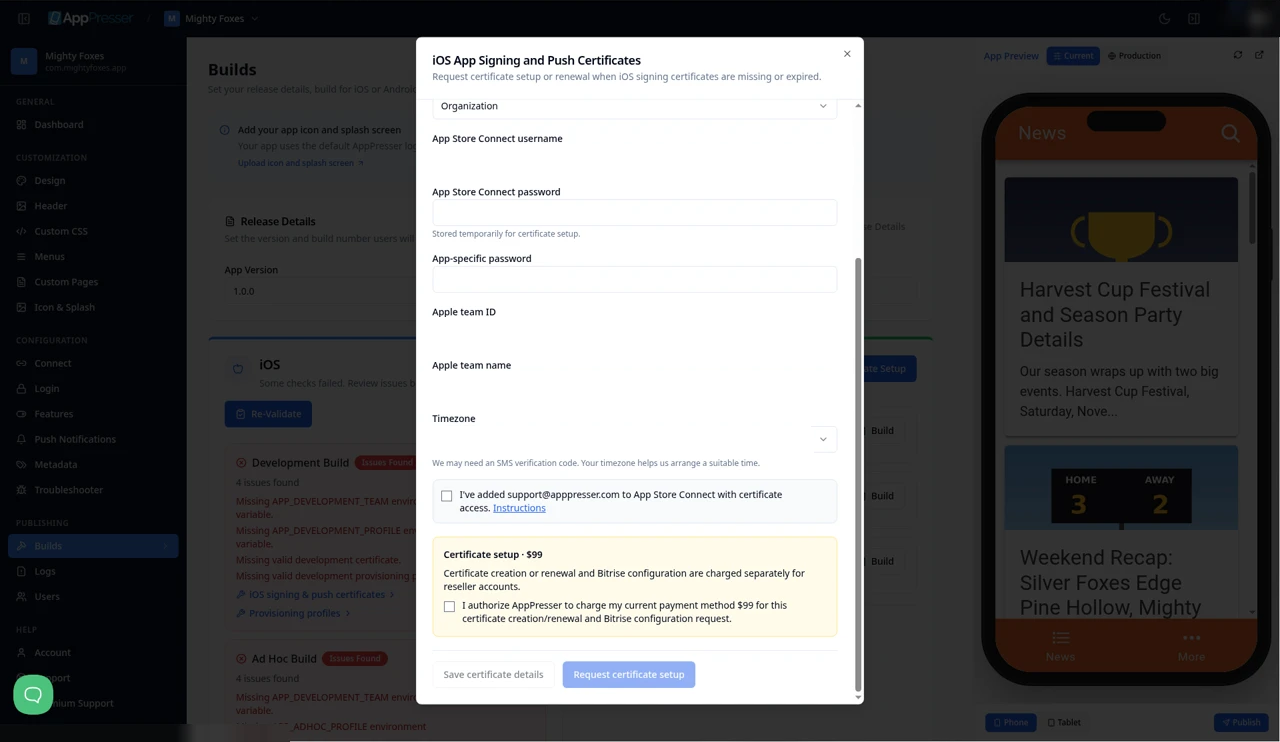
3e. Send the request
- Click Request certificate setup to send it to the AppPresser team.
- Or click Save certificate details to keep what you typed and send it later.
- Wait for the AppPresser team to contact you, within 1 to 2 business days. Keep your phone handy in case they need an Apple code.
Step 4: Add or replace provisioning profiles
Use this if you have your own profile files (they end in .mobileprovision), if a profile expired or if you added new test phones.
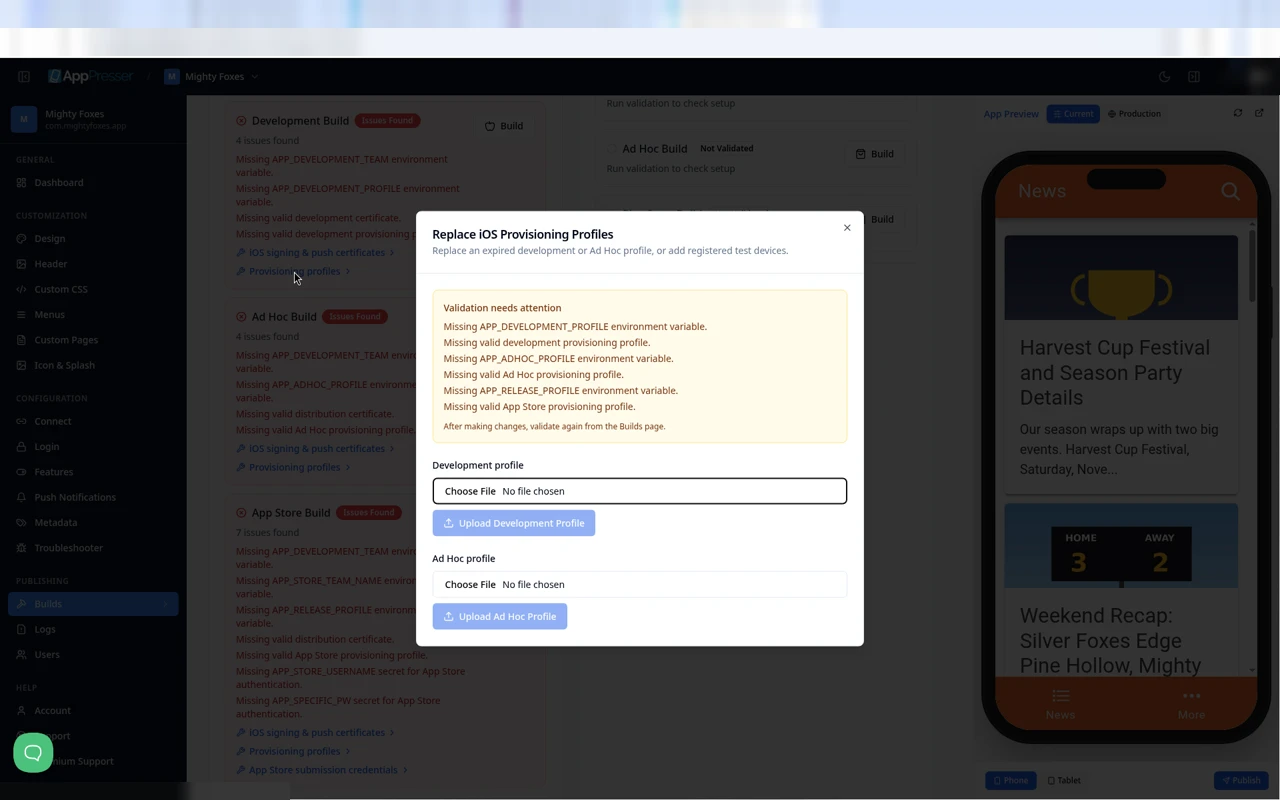
- Under a build type, click Provisioning profiles. (Or in Repair Utilities, click Provisioning profiles.)
- In the Replace iOS Provisioning Profiles window, read the yellow box. It lists which profiles are missing.
- For a Development profile: under Development profile, click Choose File, pick the file, then click Upload Development Profile.
- For an Ad Hoc profile: under Ad Hoc profile, click Choose File, pick the file, then click Upload Ad Hoc Profile.
The upload buttons stay gray until you choose a file.
Step 5: After setup, check again and build
- When the AppPresser team tells you your setup is done (or after you upload profiles), open Builds again.
- On the iOS card, click Re-Validate.
- Check that the issues are gone for the build type you want.
- Click Build on that row (for example Development Build for your own test phone).
- Follow the build under Recent Builds And Logs.
What if something is missing?
Swipe sideways to see the rest of this table.
| What you see | What it means | What to do |
|---|---|---|
| Missing APP_DEVELOPMENT_TEAM | No Apple team ID on file | Request certificate setup (Step 3) and enter your Team ID |
| Missing APP_STORE_TEAM_NAME | No Apple team name on file | Request certificate setup (Step 3) and enter your team name |
| Missing valid development certificate | No working development certificate | Request certificate setup (Step 3) |
| Missing valid distribution certificate | No working distribution certificate (needed for Ad Hoc and App Store) | Request certificate setup (Step 3) |
| Missing APP_DEVELOPMENT_PROFILE or valid development provisioning profile | No Development profile, or it expired | Upload one (Step 4), or include it in your setup request |
| Missing APP_ADHOC_PROFILE or valid Ad Hoc provisioning profile | No Ad Hoc profile, or it expired, or a new test phone isn't on it | Upload one (Step 4), or include it in your setup request |
| Missing APP_RELEASE_PROFILE or valid App Store provisioning profile | No App Store profile | Include it in your setup request (Step 3). There's no upload slot for it yet |
| Missing APP_STORE_USERNAME secret | No App Store Connect username for sending your app to Apple | Use App Store submission credentials under the App Store Build |
| Missing APP_SPECIFIC_PW secret | No app-specific password for sending your app to Apple | Make one at account.apple.com, then use App Store submission credentials |
| You clicked Build and it says Validating… | AppPresser checks your setup before any build | Wait for the results, then follow this article |
| Your app-specific password stopped working | You changed your main Apple password, which cancels app-specific passwords | Make a new app-specific password and update it |
You're done when Re-Validate shows Ready for the iOS build you want.
Next step
Make your own iOS certificates and profiles (step by step)
Related articles
האם זה עזר?
התוצאות מתעדכנות תוך כדי הקלדה. הקישו על לוכסן (/) כדי לעבור לחיפוש.
לא מצאתם?
צוות התמיכה שלנו יכול לעזור בהגדרה, בבנייה ובשאלות על החנויות.