
Make your own iOS certificates and profiles (step by step)
Publish and Grow · AppPresser Docs
Make your own iOS certificates and profiles (step by step)
এই নিবন্ধটি এখনও অনুবাদ করা হয়নি, তাই এটি ইংরেজিতে দেখানো হচ্ছে।
Your app journey: step 7 of 9, Publish to the stores. New here? Read Start here: build your app with AppPresser first.
What you'll do: Make your own Apple certificates and profiles, add them to AppPresser and send your app to TestFlight. Use this guide if you want to do the Apple setup yourself.
New to iOS signing? Read Get your iOS app signed: certificates, profiles and the AppPresser setup request first. It explains words like "certificate" and "provisioning profile" and covers the $99 option where the AppPresser team does all of this for you.
Before you start
Have these ready:
- A Mac with the Keychain Access app (it comes with every Mac). You'll make the certificate requests and the .p12 files on it. Use the same Mac for every step.
- A paid Apple Developer Program membership. Sign in at developer.apple.com, and open Certificates, Identifiers & Profiles.
- The right role on the team. The Account Holder or an Admin can make all of these items.
- The Apple agreements accepted. When Apple updates its Program License Agreement, a banner appears in your developer account, and Apple won't let you continue until it's accepted. Only the Account Holder can accept it. If you see that banner, ask the Account Holder to sign in and accept it first.
- Your app's bundle ID. This is the unique name of your app in reverse-domain style, for example com.example.myapp.
- Your existing distribution .p12 and its password, if your team already has a distribution certificate.
- A password manager, to save each .p12 password as you create it.
- At least one registered iPhone or iPad. Both the Development profile (Step 7) and the Ad Hoc profile (Step 7b) need one. Step 7 shows how to register a device if you don't have any yet.
What this is for
This article is the "Do it yourself" path. Instead of paying the AppPresser team to set up your iOS signing, you make the files yourself on the Apple Developer website. It takes about 30 minutes the first time.
When you're done, you'll have:
- An App ID for your app, with push notifications turned on.
- A push certificate for your app, saved as a .p12 file with a password.
- A development certificate, saved as a .p12 file with a password.
- A distribution certificate saved as a .p12 file with a password. (You may already have one. See "Reuse your distribution certificate" below.)
- An App Store provisioning profile (a .mobileprovision file).
- A Development provisioning profile (a .mobileprovision file).
- An Ad Hoc provisioning profile (a .mobileprovision file). Your test (Development) build needs it too. See Step 7b.
The three certificates in plain English
Think of a certificate as a digital ID card for your company. Apple uses three kinds for an app:
Swipe sideways to see the rest of this table.
| Certificate | What it's for | How many you need |
|---|---|---|
| Development | Signs test builds so they can be installed on your own registered iPhones and iPads. | One per person is plenty. It works for all your apps on the team. |
| Distribution | Signs the version you send to TestFlight (Apple's beta testing app) and the App Store. | One for the whole team. Reuse it for every app. |
| Push (Apple Push Notification service) | Lets push notifications (the pop-up messages you send from AppPresser) reach this one app. | One per app. Every app needs its own. |
Reuse your distribution certificate
Apple lets a team have only a few distribution certificates at once. The good news: one distribution certificate can sign every app on your team. If your team already has one, and you have its .p12 file and password, reuse it instead of making a new one.
If you make a new distribution certificate every time you build an app, you'll hit Apple's limit, and you'll have to revoke (cancel) an old one. Revoking a certificate can break other apps that still use it.
A push certificate is per app
Each push certificate is made for one bundle ID (for example com.example.myapp). If you have three apps, you need three push certificates. They don't count against the distribution limit.
What a .p12 file is
When you make a certificate, Apple gives you a .cer file. That's only half of what you need. The other half is a secret private key that was made on your own computer when you created the request (the CSR, see Step 2).
A .p12 file bundles the two halves together:
- It's exported from the computer that made the request. On a Mac, you export it from the Keychain Access app.
- When you export it, you choose a password for it. Anyone who uploads the .p12 also needs that password.
- Keep the .p12 and its password together in your password manager. You'll reuse them for your next app (distribution and development) or when you renew.
- Treat it like a key to your app. Don't post it publicly or send it around by email.
- If you lose the .p12, Apple can't give it back to you. You make a new certificate instead.
Step 1: Register your App ID
The App ID tells Apple about your app and which features (like push notifications) it uses.
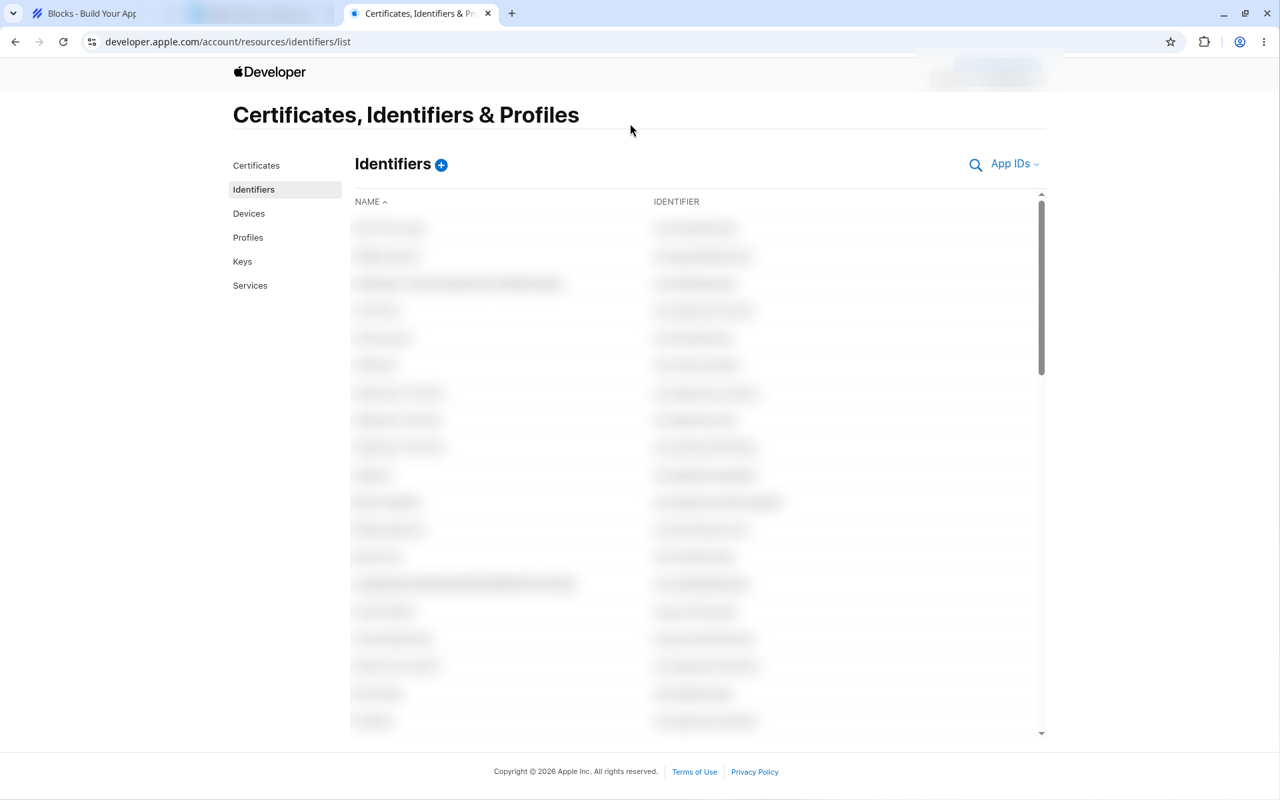
- In Certificates, Identifiers & Profiles, click Identifiers in the left menu.
Click the blue plus (+) next to Identifiers.
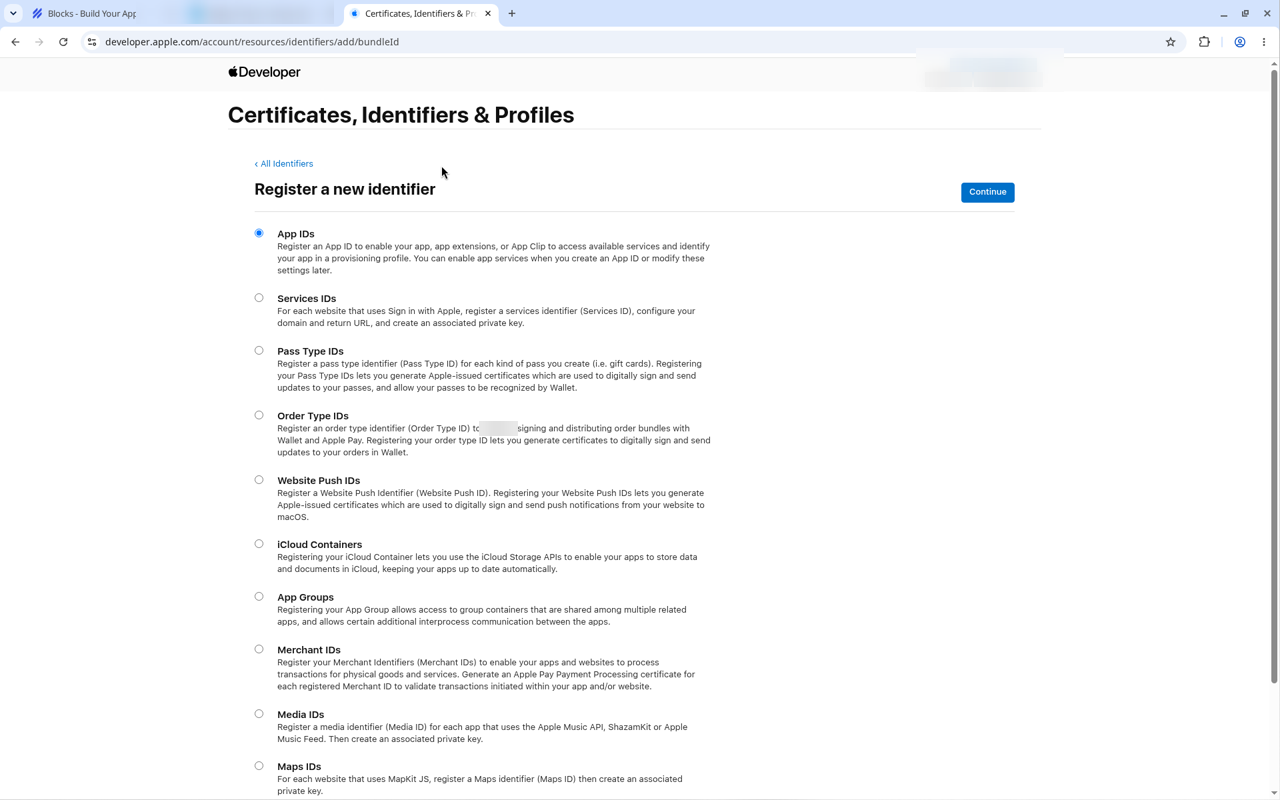
Choose App IDs, then click Continue.
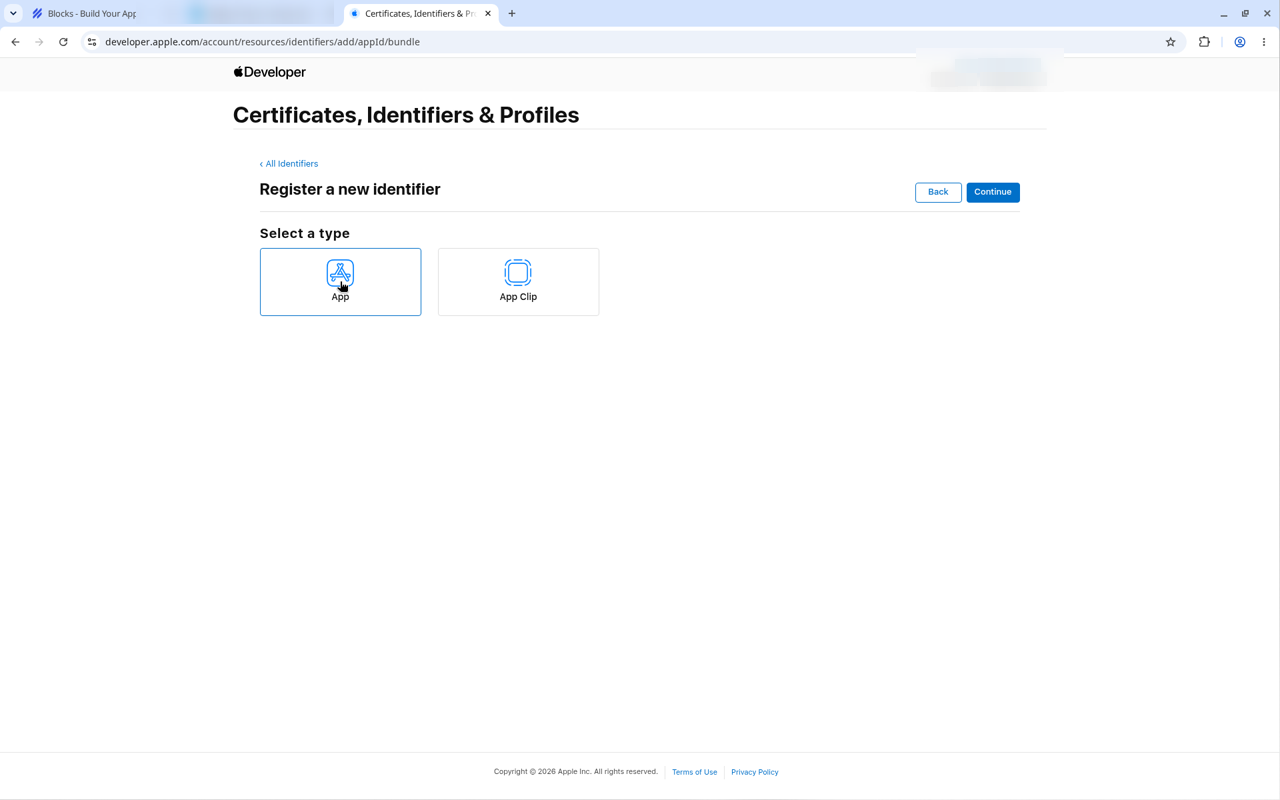
Choose App (not App Clip), then click Continue.
- In Description, type your app's name, for example My Example App. Apple doesn't allow special characters like @, & or * here.
Under Bundle ID, keep Explicit selected and type your bundle ID, for example com.example.myapp. (You'll also see your App ID Prefix, which is your Team ID. It's filled in for you.)
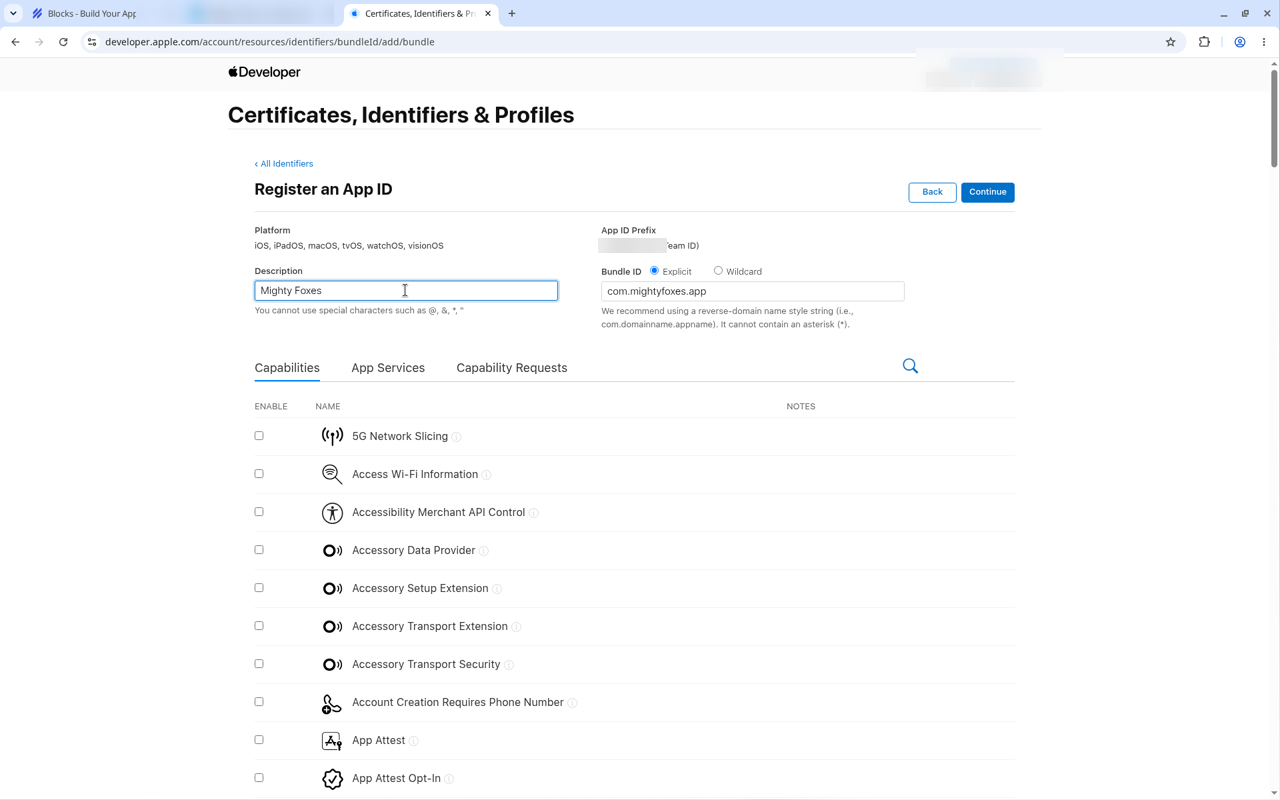
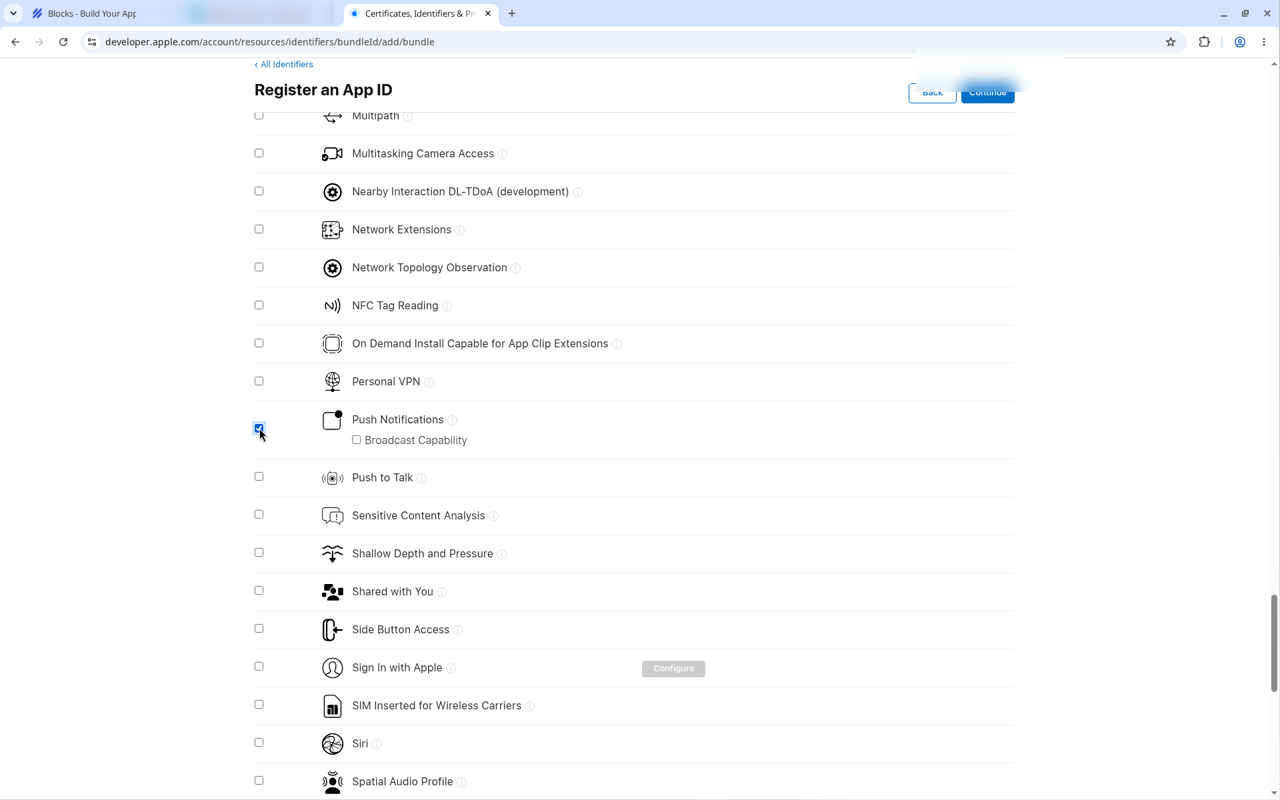
Scroll down the Capabilities list and check Push Notifications.
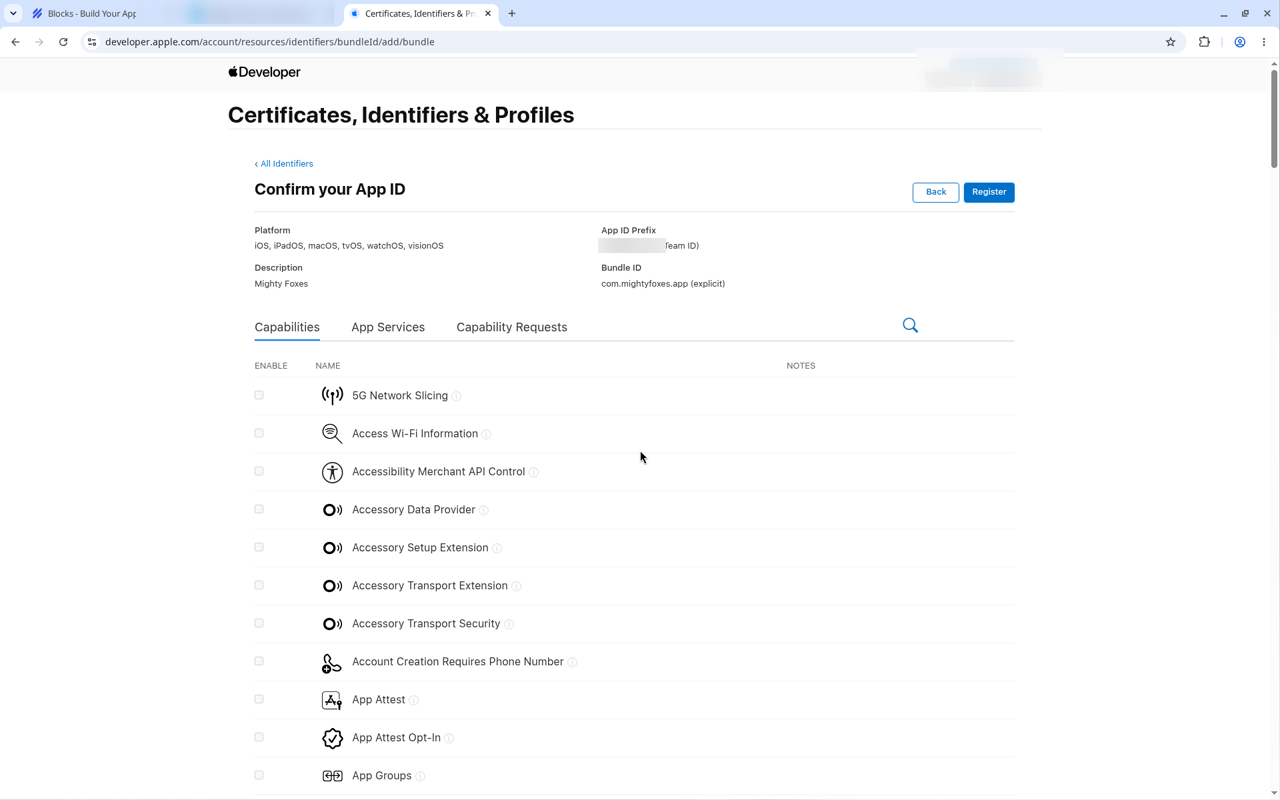
Click Continue, check the summary on the Confirm your App ID page, then click Register.
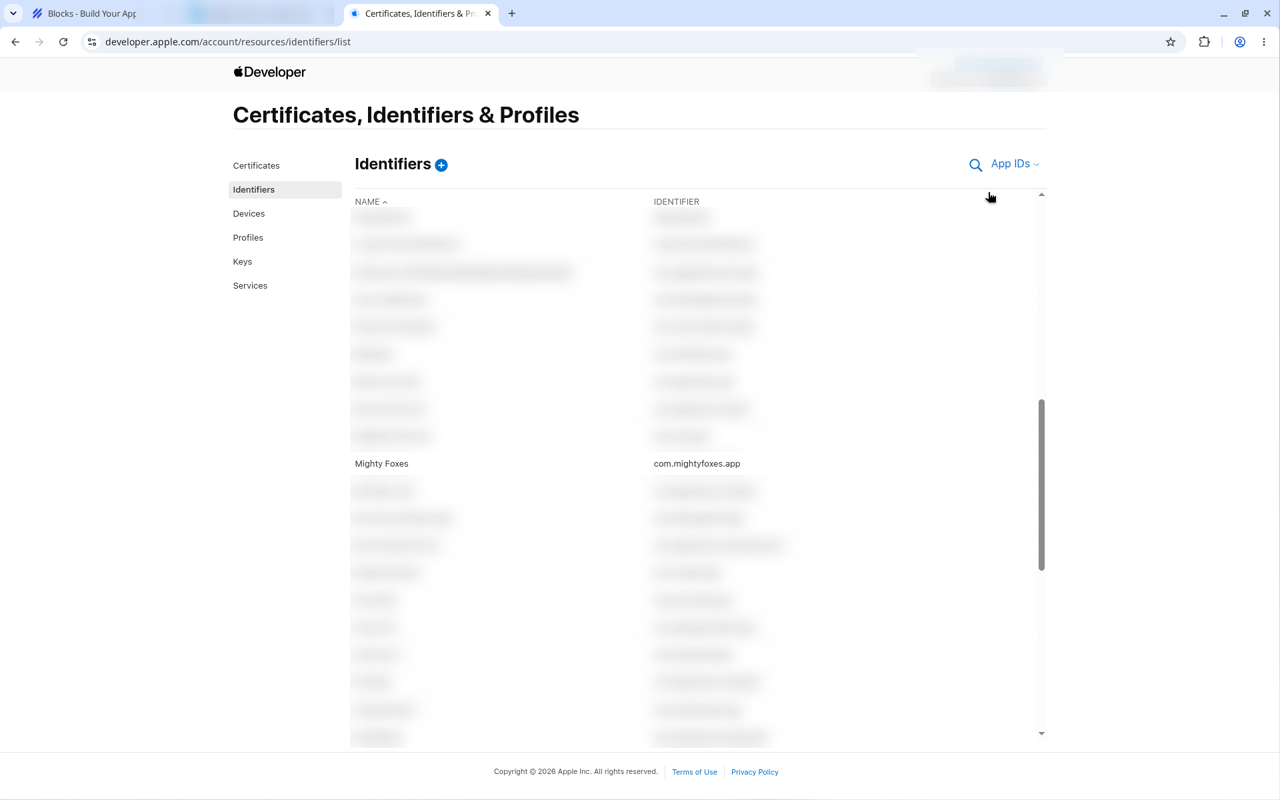
- Your app now shows in the Identifiers list.
Step 2: Make a certificate request (CSR) on your Mac
Apple needs a Certificate Signing Request (CSR) file for each new certificate. Making it also creates the private key on your Mac, which is why the .p12 must later be exported from the same Mac.
- On your Mac, open Keychain Access (in Applications > Utilities, or search for it with Spotlight).
- In the menu bar, choose Keychain Access > Certificate Assistant > Request a Certificate From a Certificate Authority.
- Enter your email address and a common name (for example your company name and the app, like "My Example App Push").
- Leave the CA Email Address empty, choose Saved to disk and click Continue.
- Save the .certSigningRequest file somewhere easy to find, like your Desktop.
Make one CSR for the push certificate and one for the development certificate, and name them so you can tell them apart (for example myapp-push.certSigningRequest and myapp-development.certSigningRequest).
Step 3: Create the push certificate for your app
In Certificates, Identifiers & Profiles, click Certificates, then click the blue plus (+).
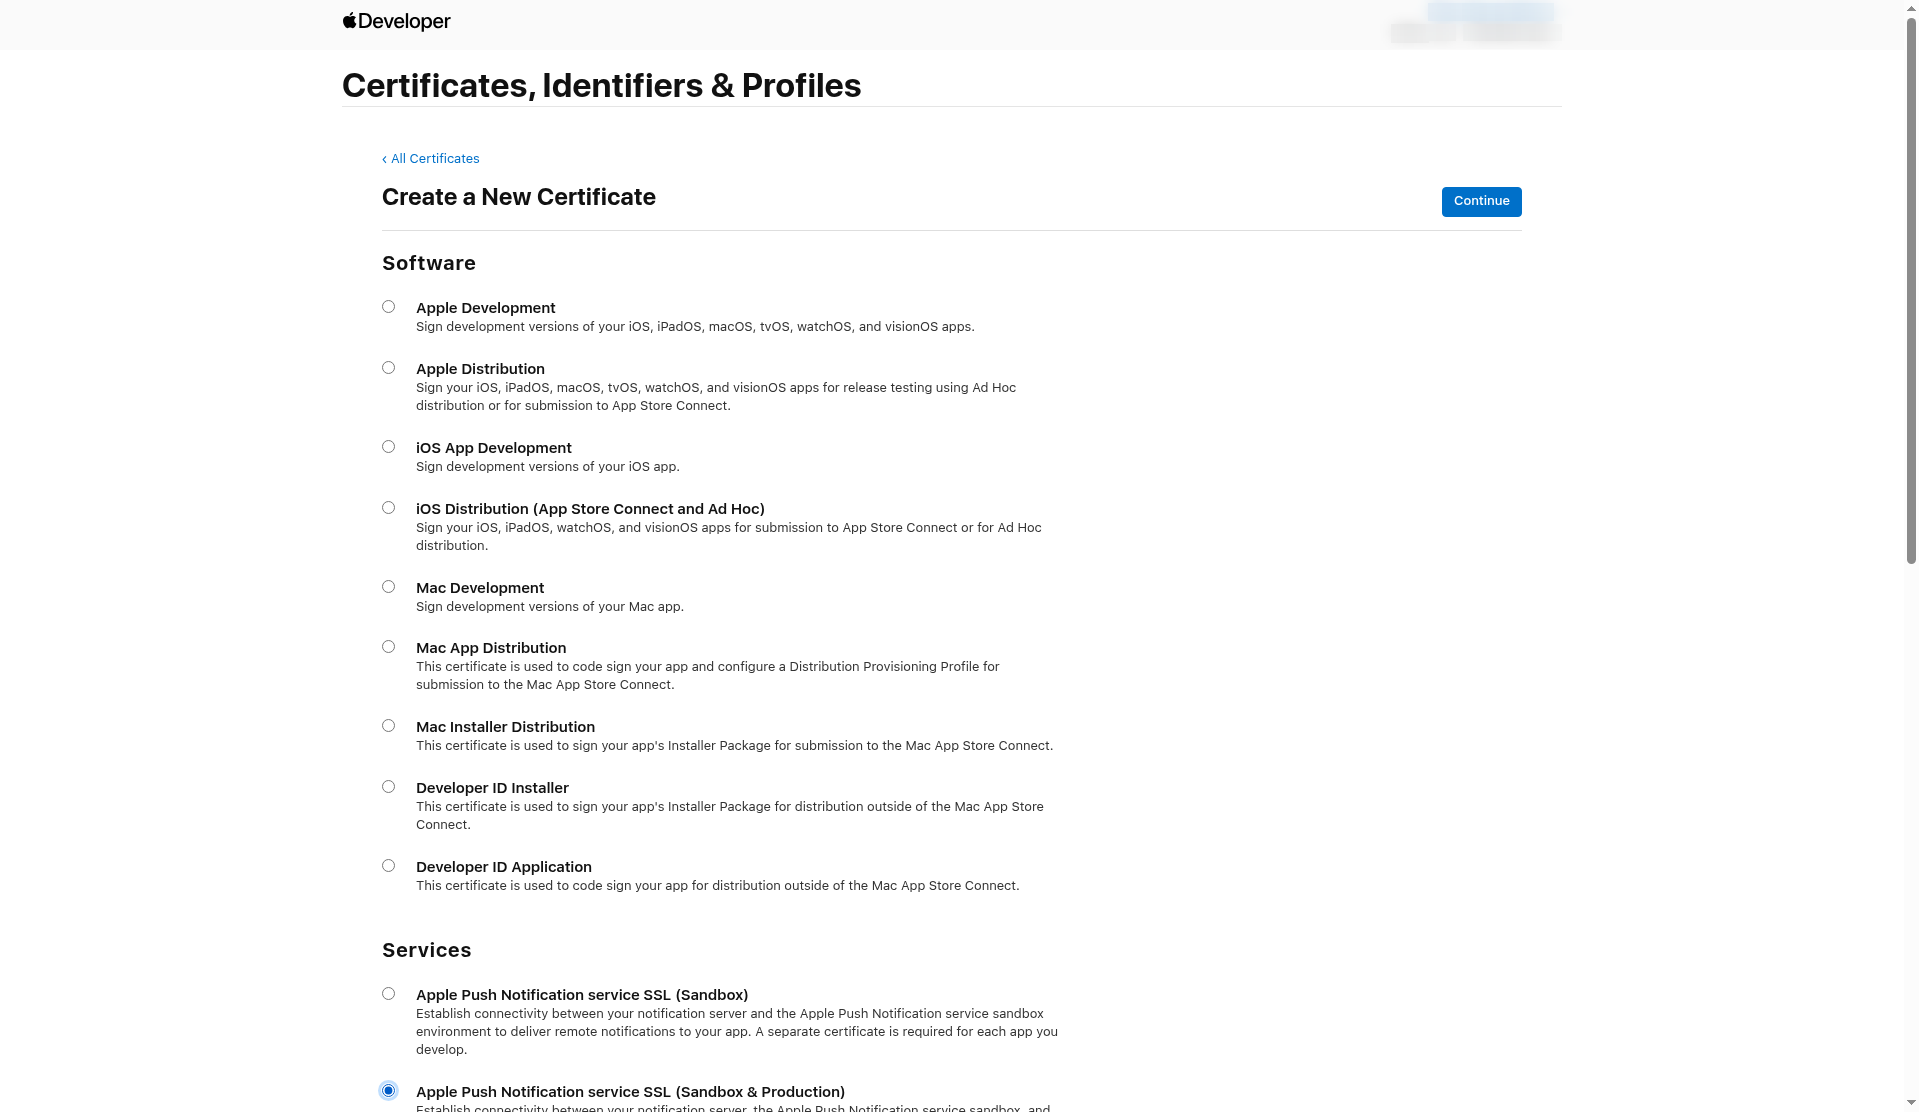
Under Services, choose Apple Push Notification service SSL (Sandbox & Production), then click Continue. (Sandbox & Production works for both test builds and App Store builds.)
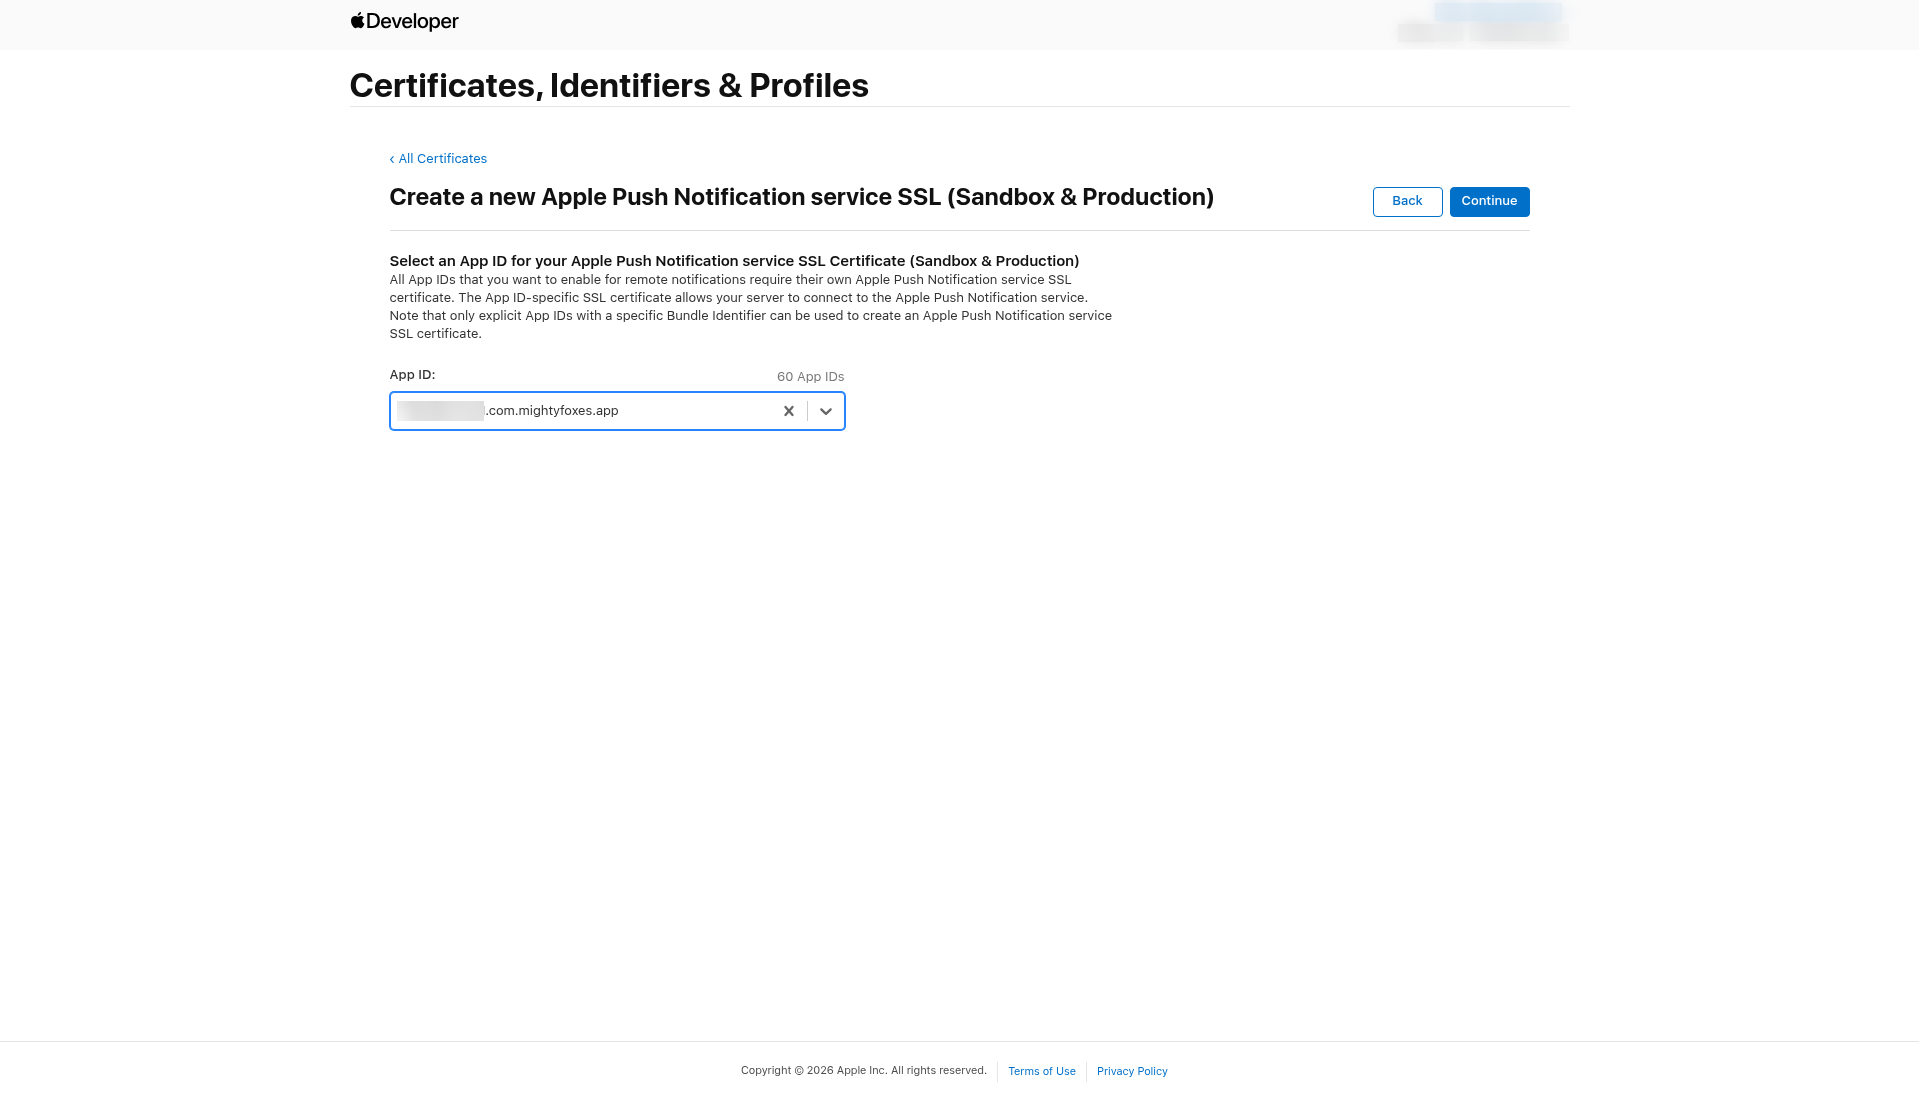
In the App ID list, choose your app (it shows your Team ID followed by your bundle ID), then click Continue.
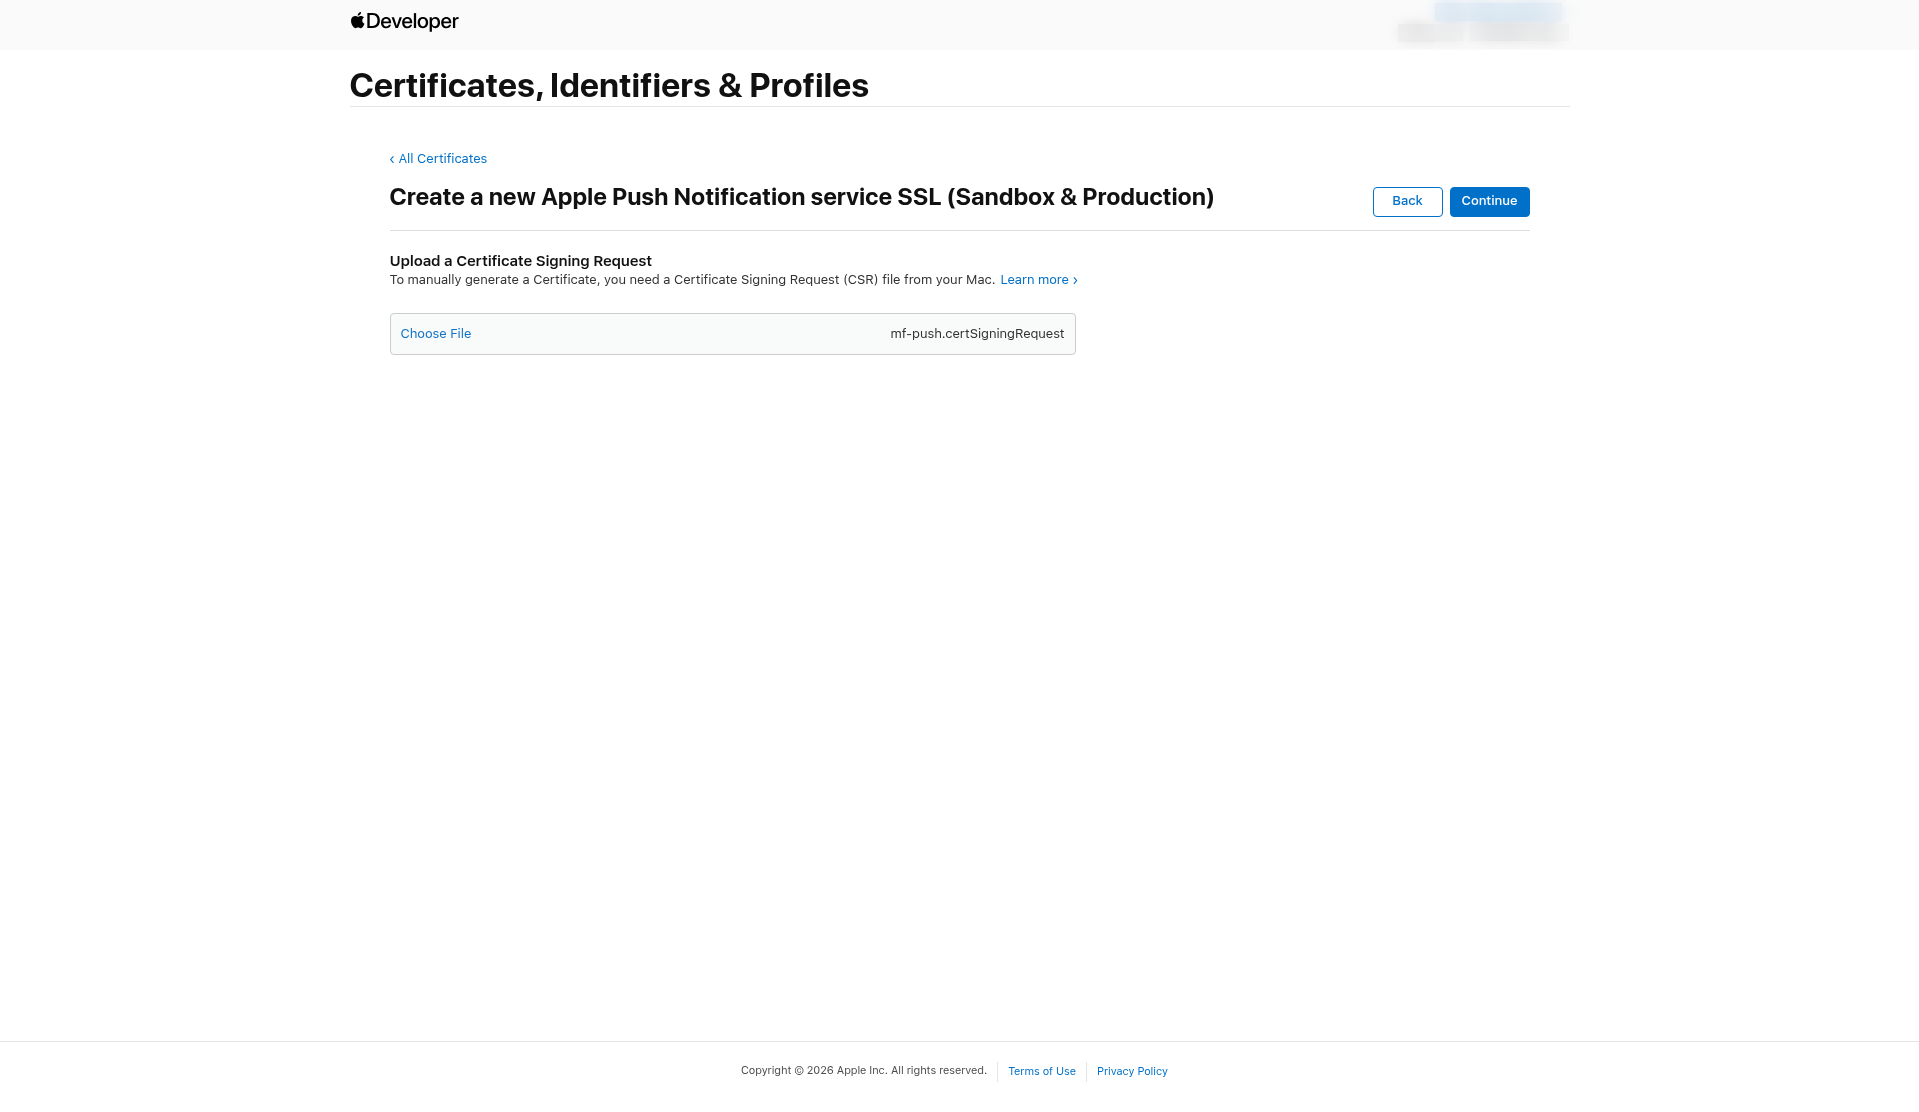
Under Upload a Certificate Signing Request, click Choose File, pick your push CSR and click Continue.
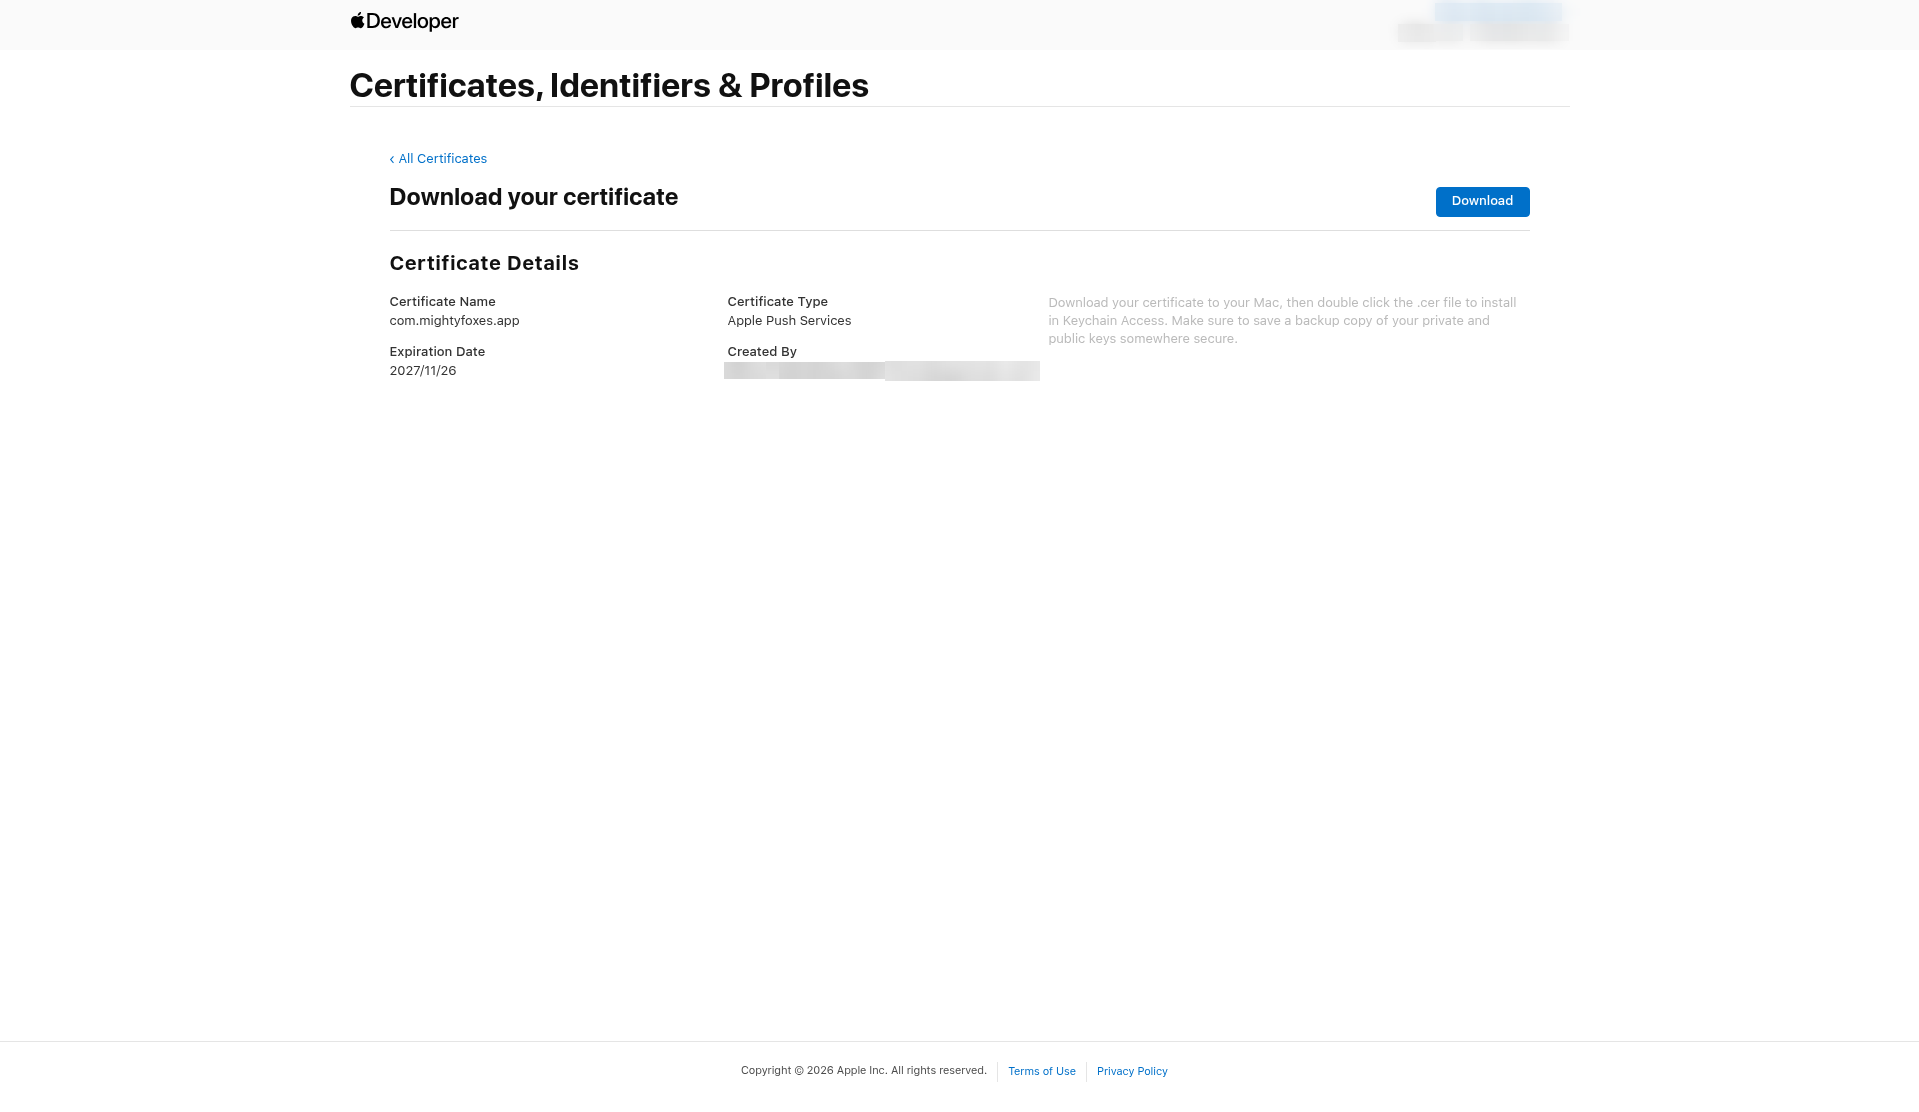
On Download your certificate, check the details: the name is your bundle ID, the type is Apple Push Services, and there's an expiration date about 13 months away. Click Download. You get a file called aps.cer.
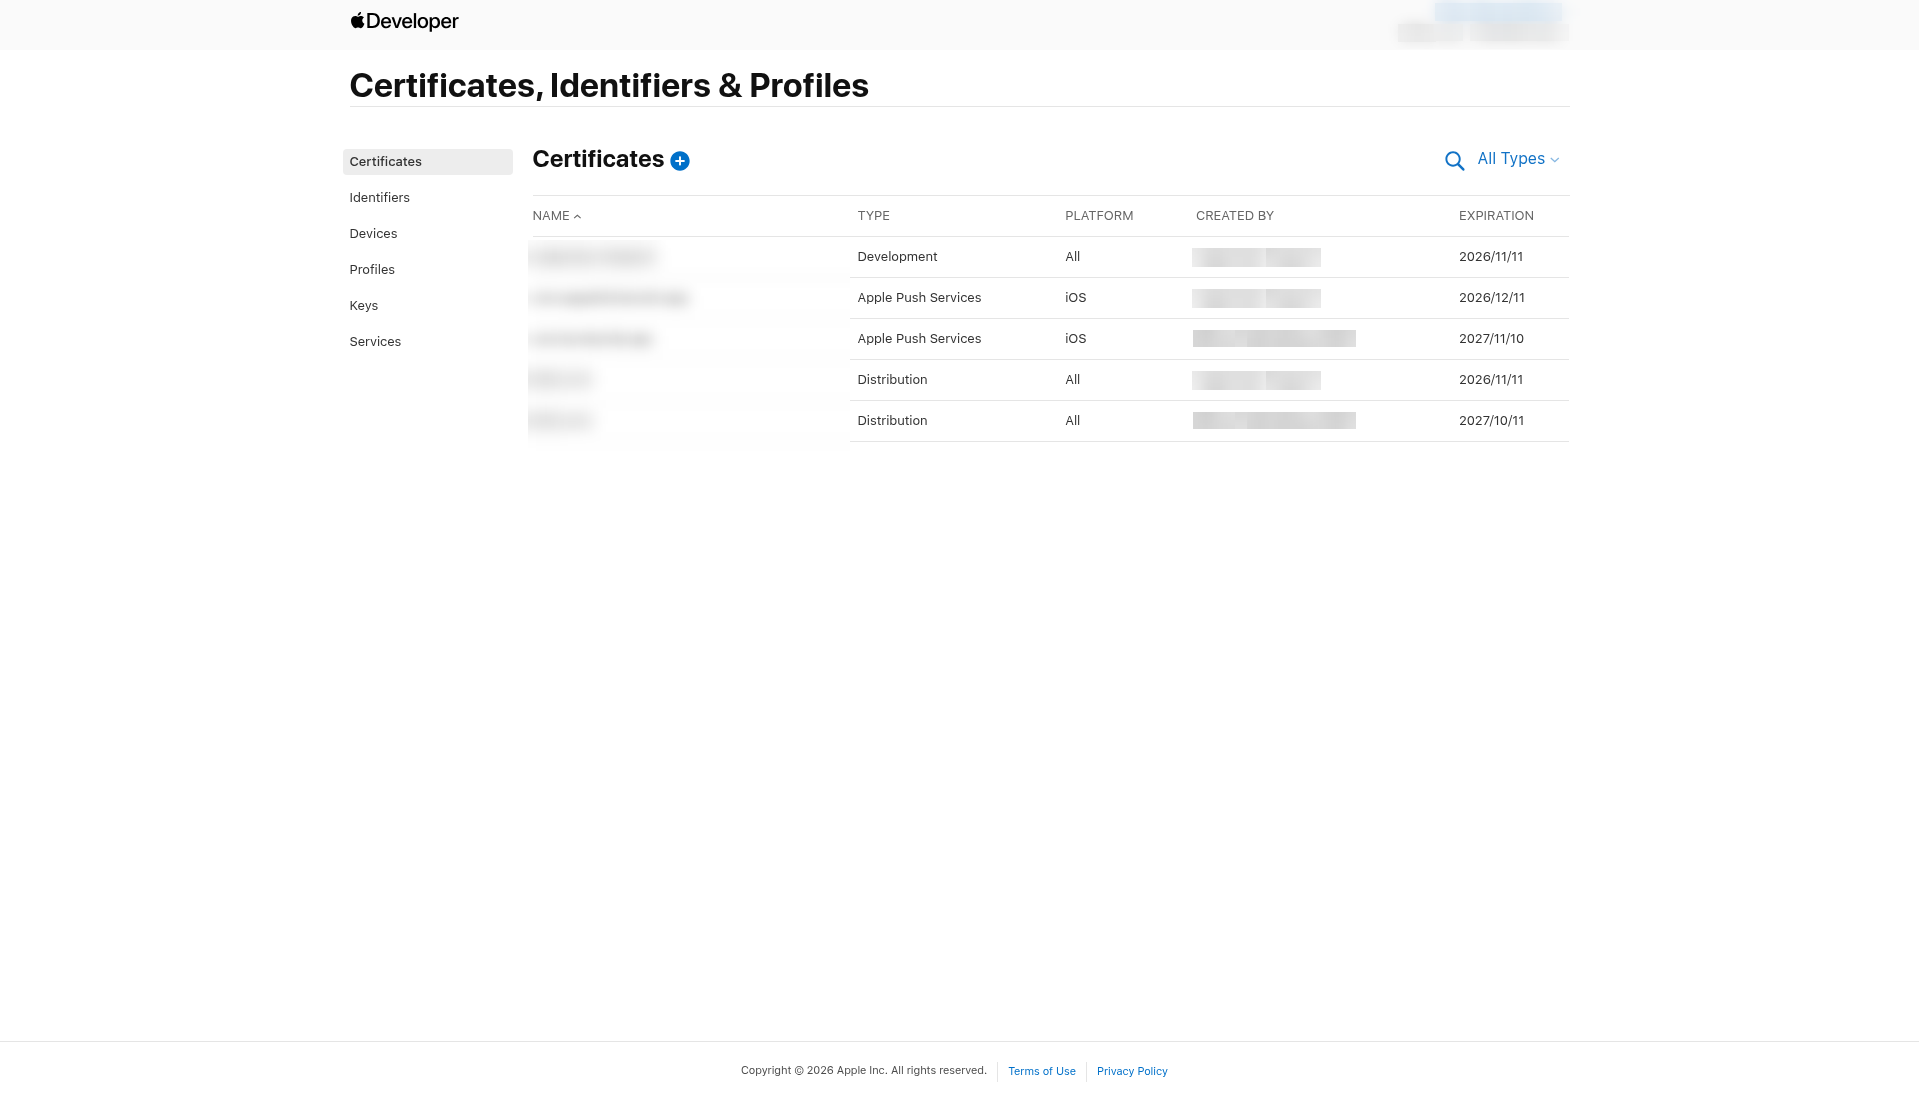
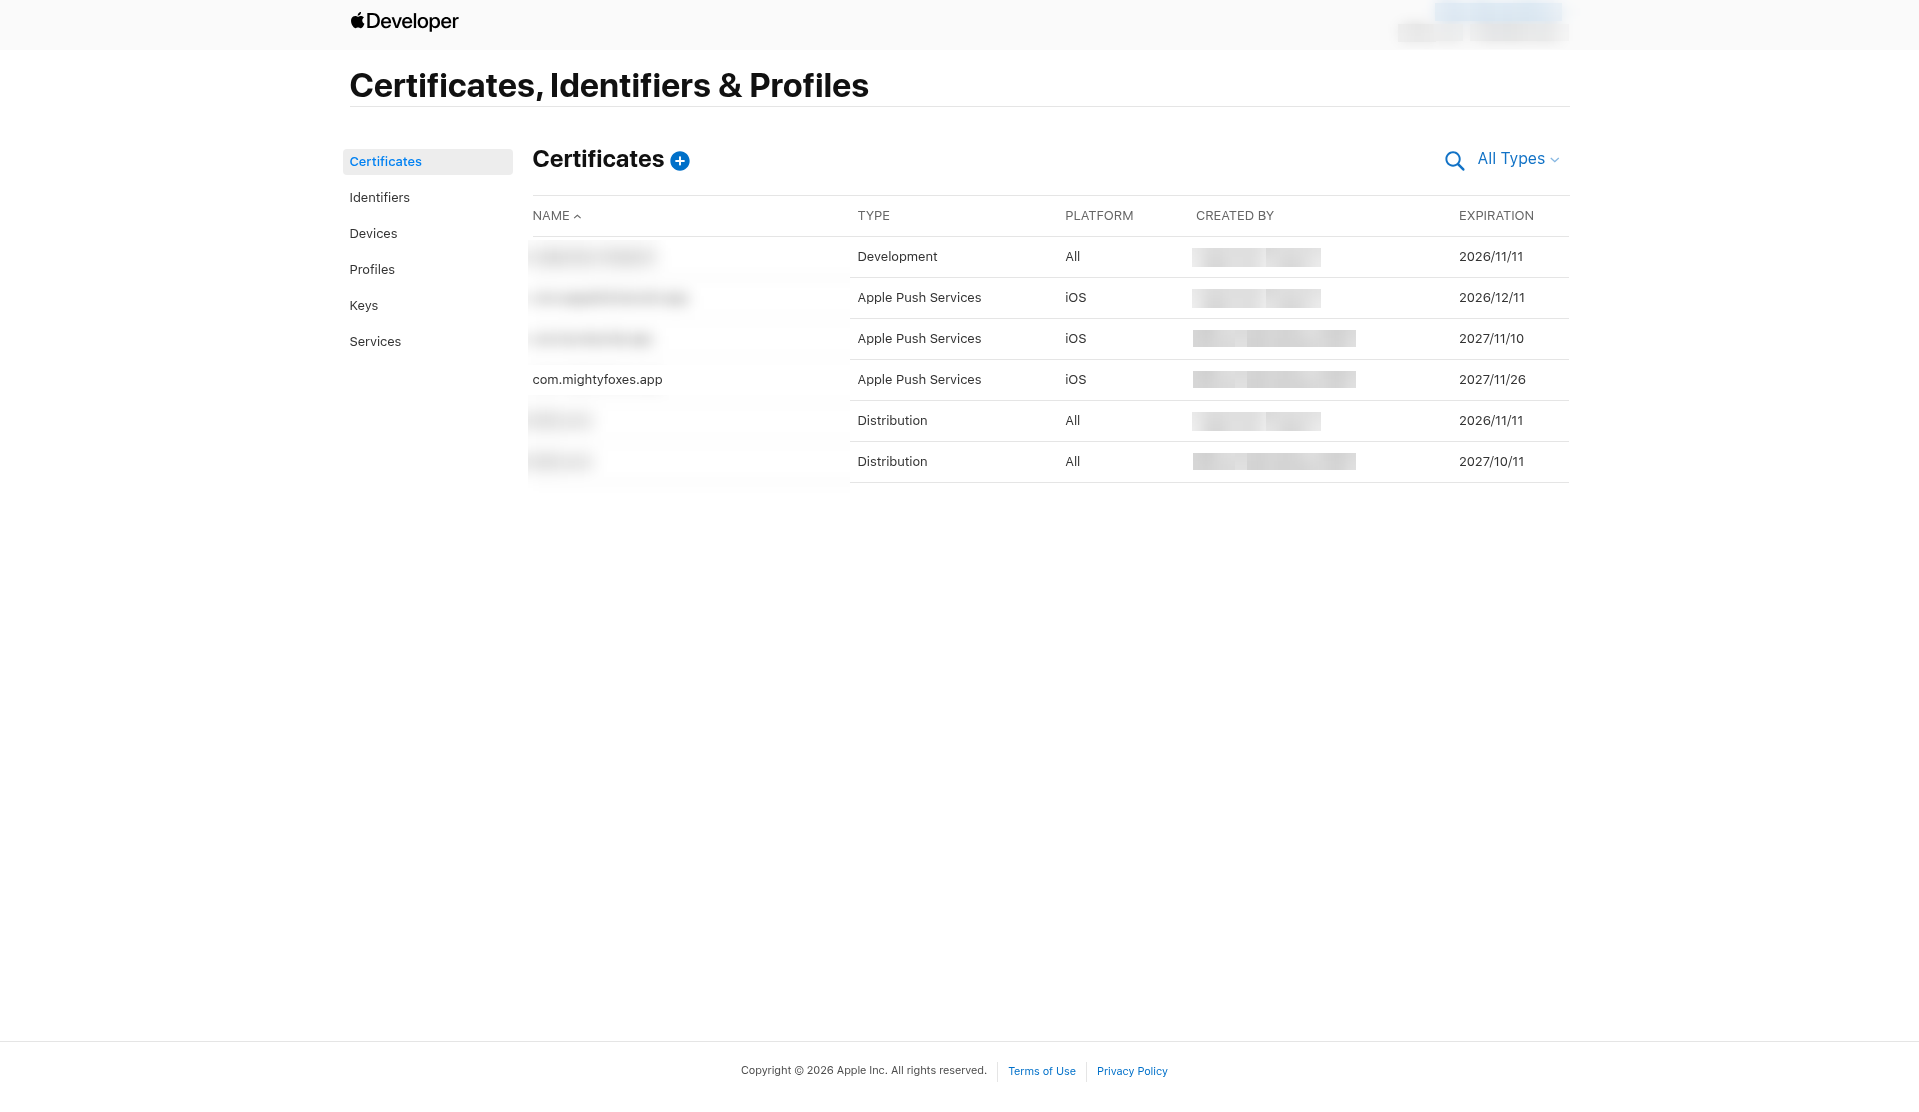
Back in the Certificates list, your new push certificate shows with the type Apple Push Services.
- Turn it into a .p12 (Step 8). Save the .p12 and its password in your password manager, labeled with the app name and "push".
Step 4: Create a development certificate
Skip this step if you already have a development certificate that hasn't expired and you have its .p12 and password.
- In Certificates, click the blue plus (+) again.
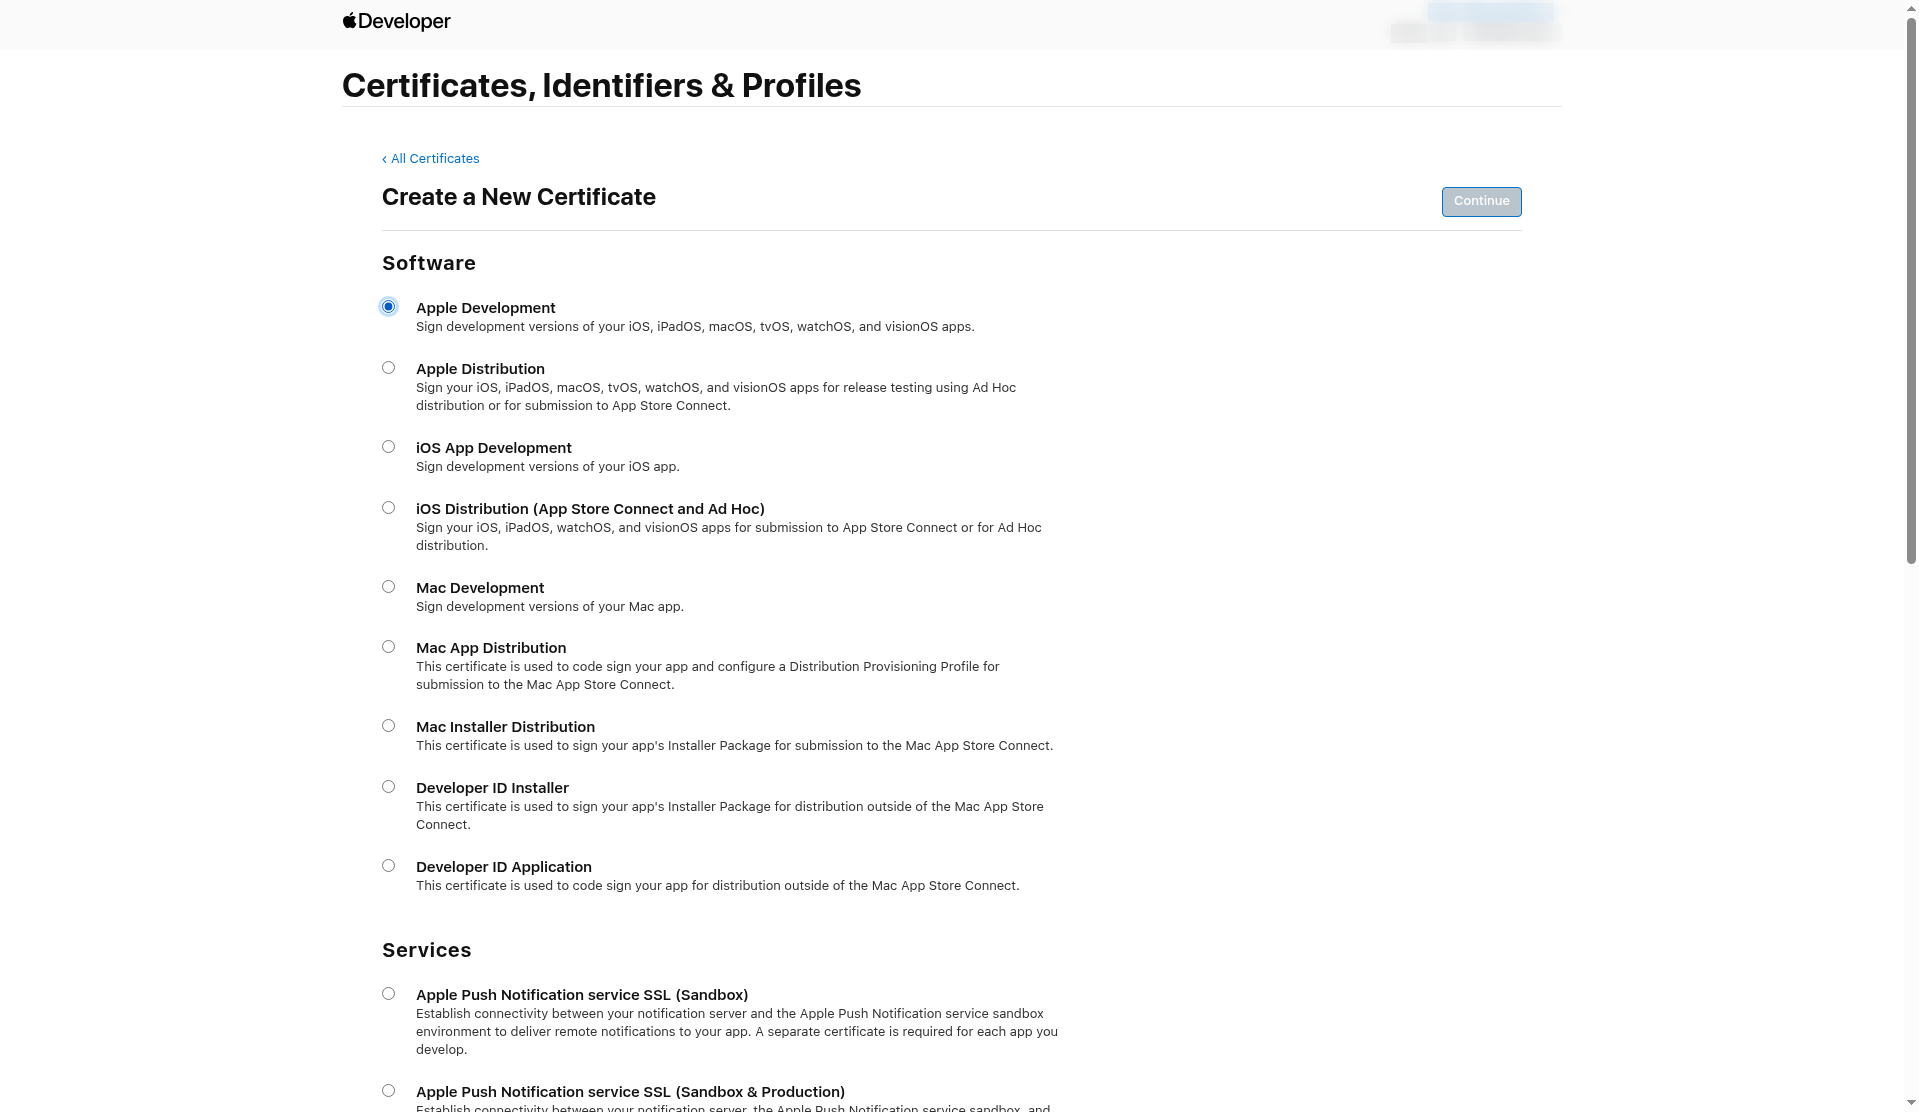
Under Software, choose Apple Development, then click Continue.
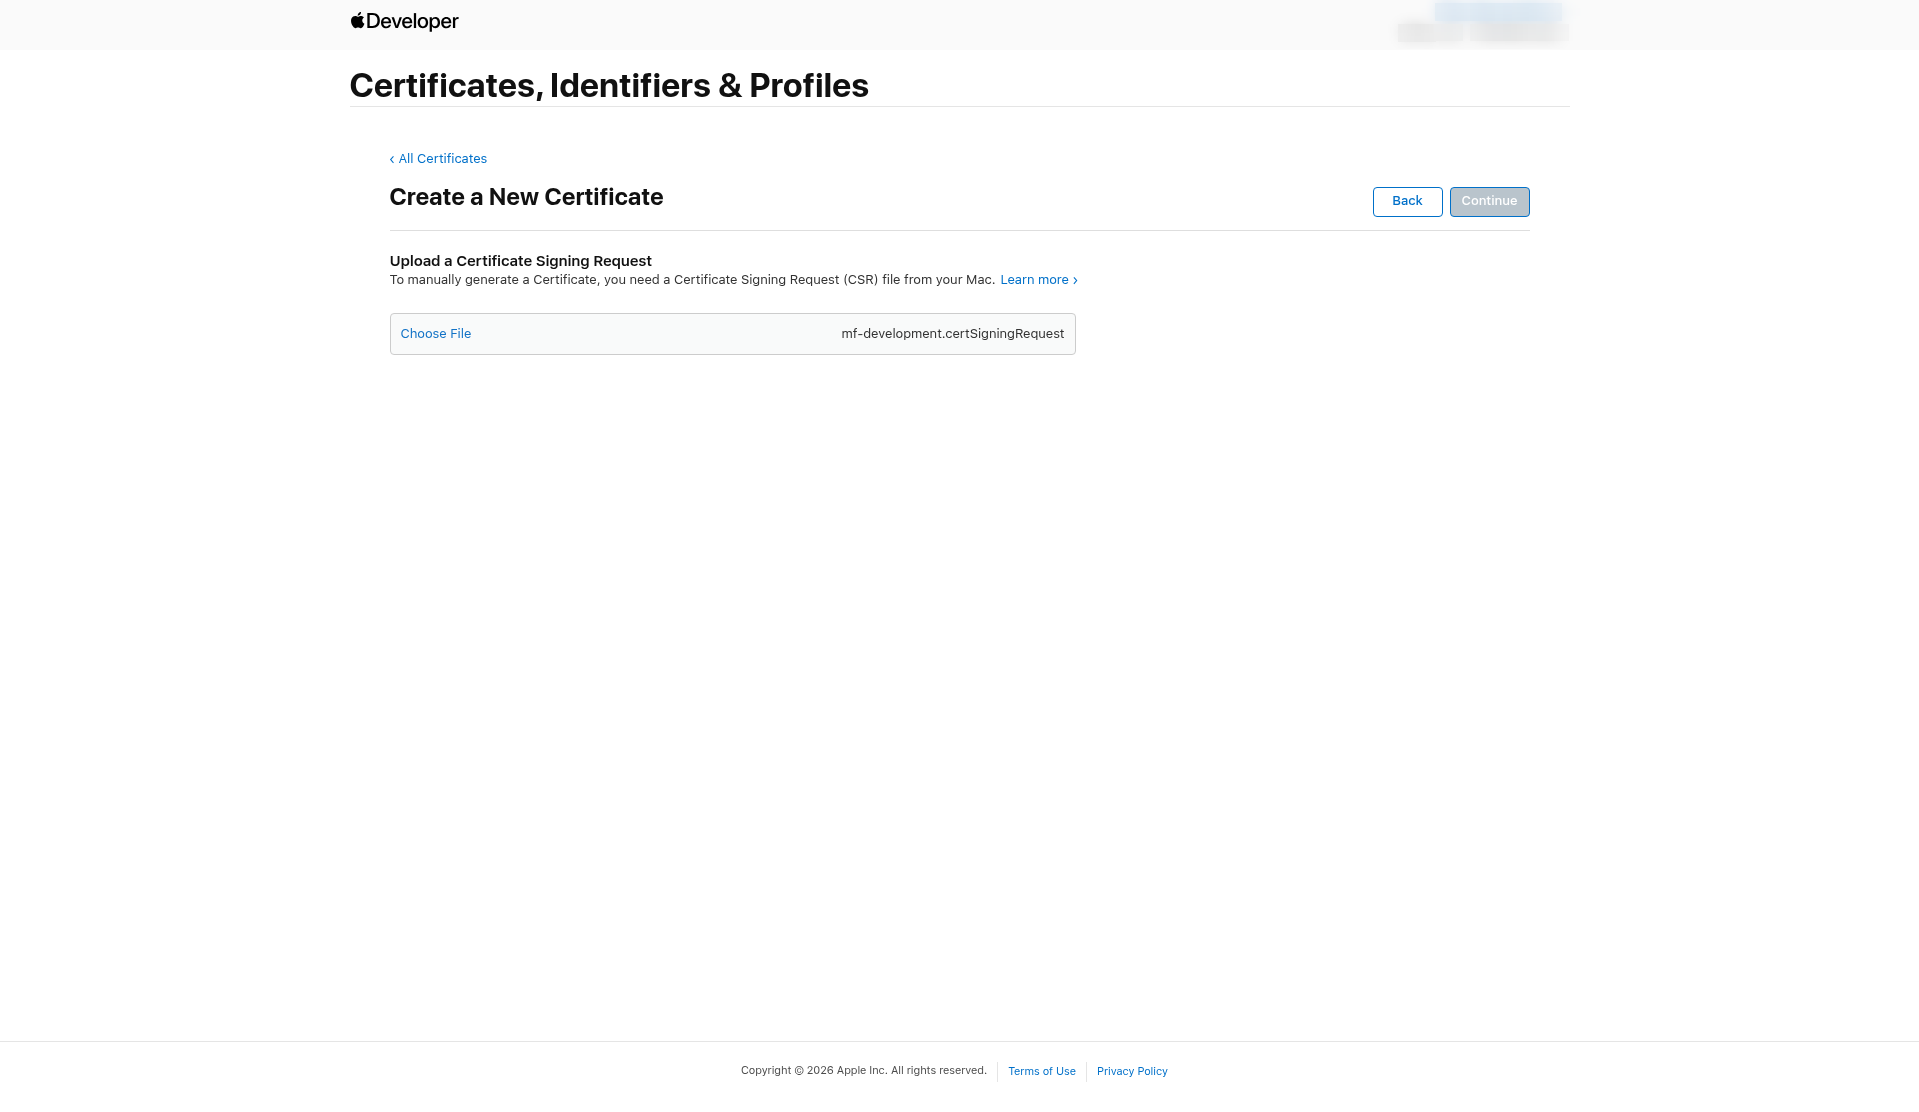
Click Choose File, pick your development CSR and click Continue.
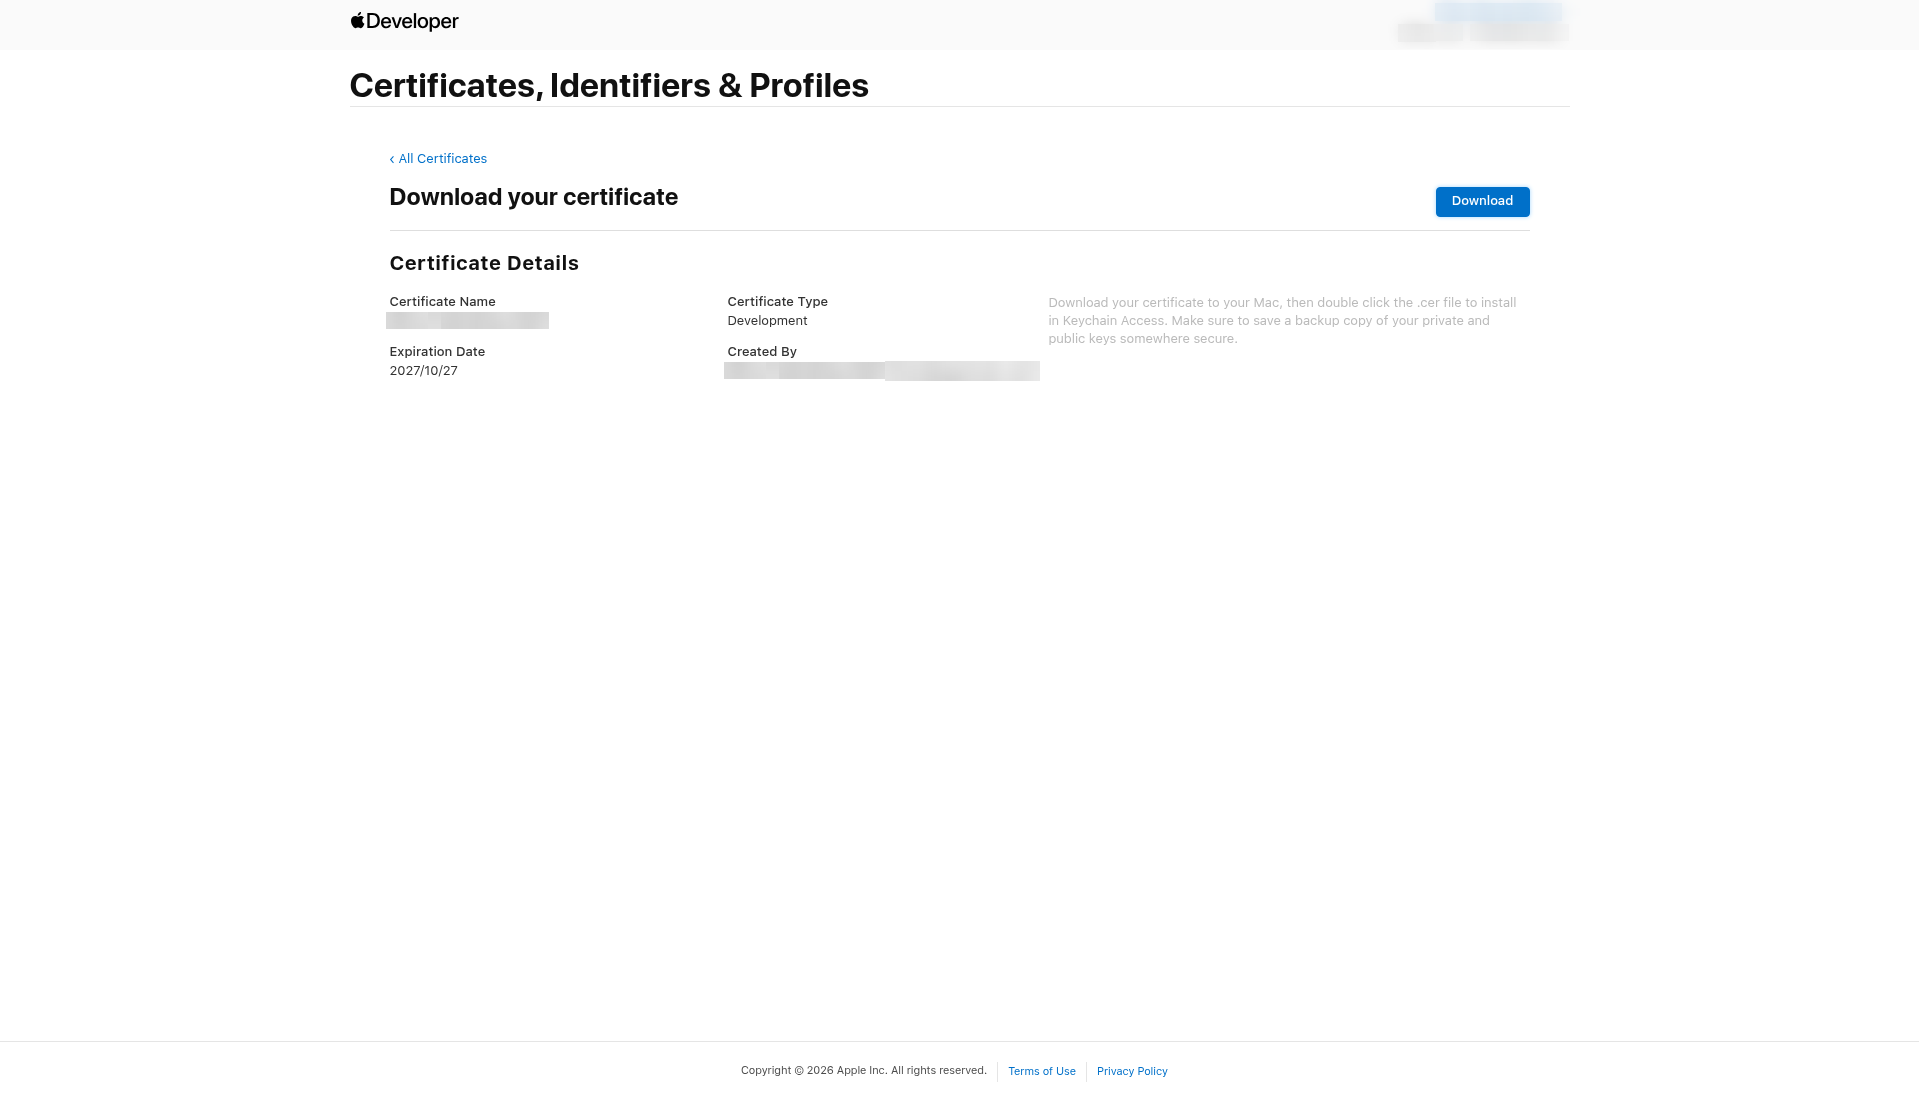
On Download your certificate, check that the type is Development, then click Download. You get a file called development.cer. It expires one year after you create it.
The Certificates list now shows the new certificate with the type Development.
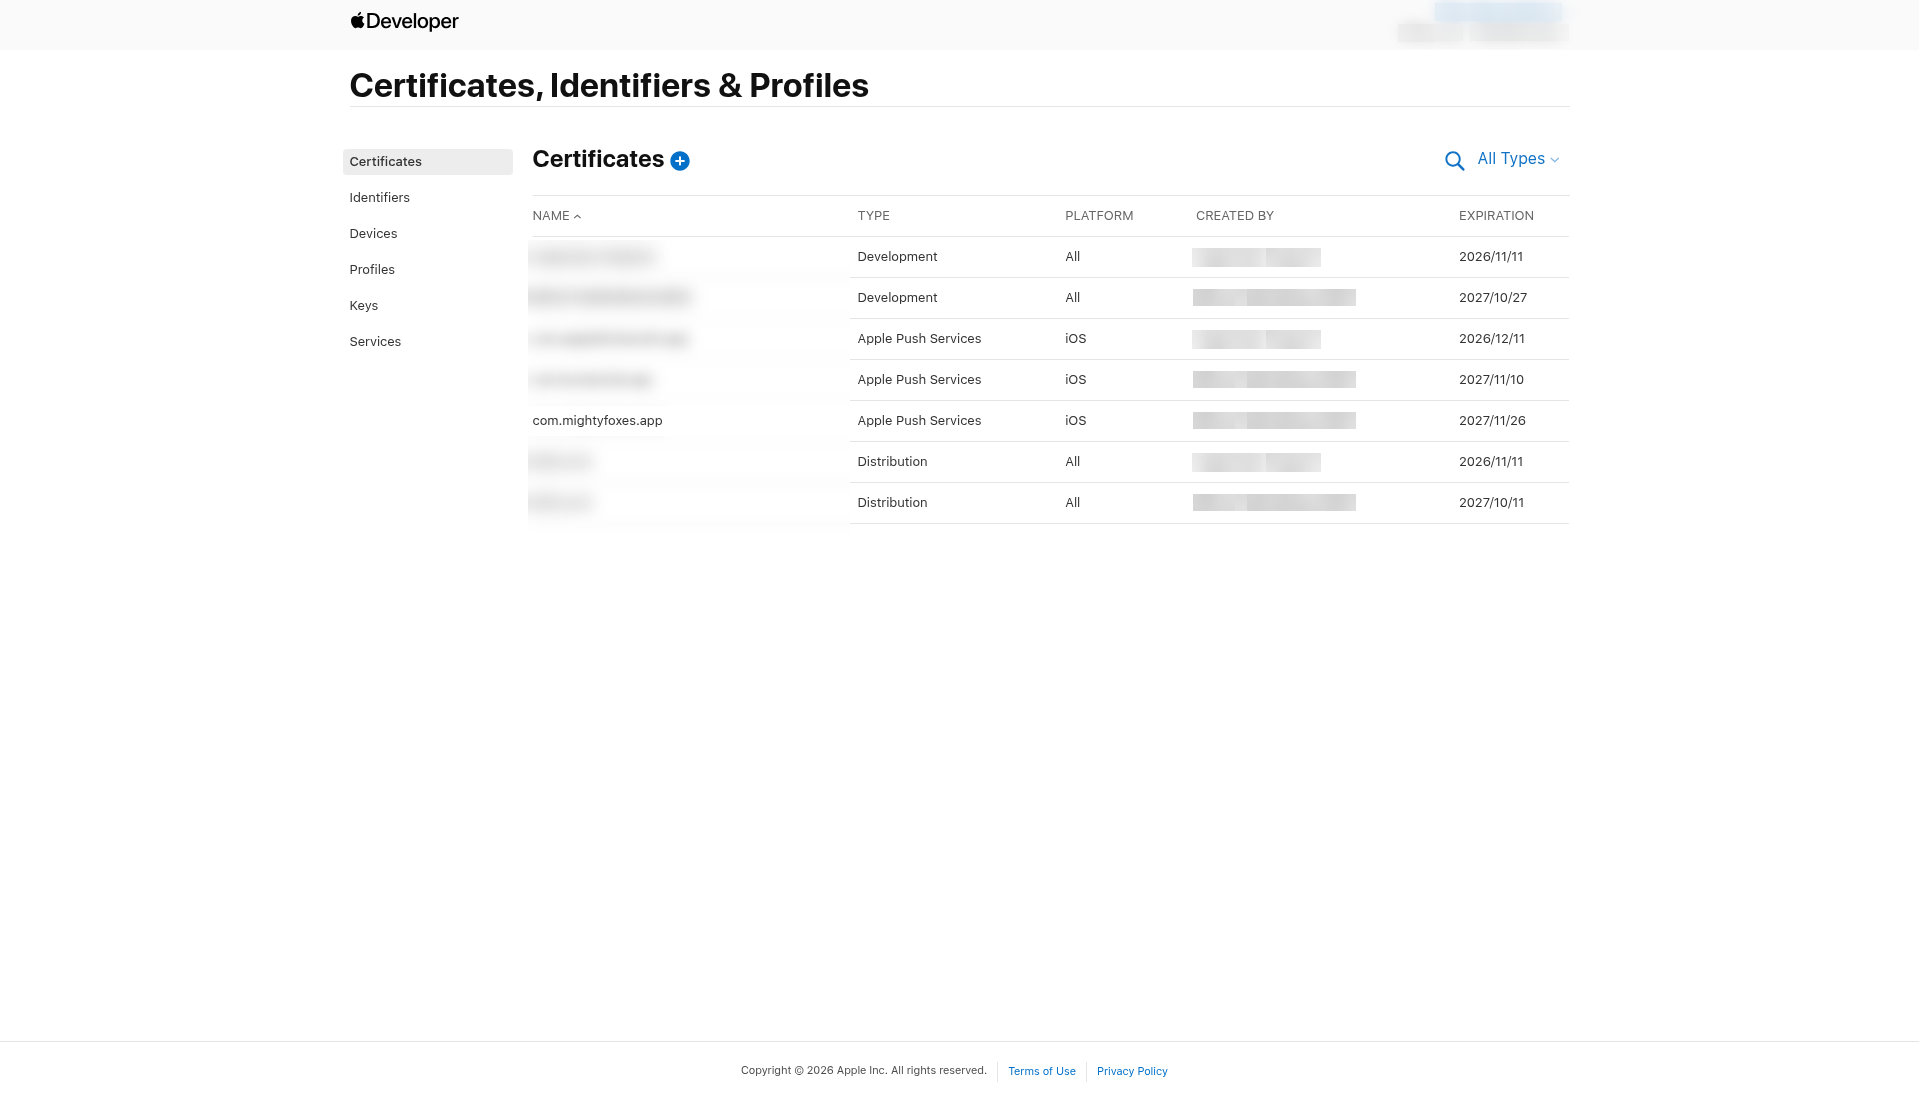
- Turn it into a .p12 (Step 8) and save it with its password. You can reuse this development certificate for your other apps on the same team.
Step 5: Reuse your distribution certificate (don't make a new one)
- In Certificates, look for rows with the type Distribution and check the Expiration column.
- If one hasn't expired and you have its .p12 and password, use it. You don't need to do anything else in this step.
- If you have no usable distribution certificate, click the plus (+), choose Apple Distribution, upload a new CSR, download distribution.cer and turn it into a .p12 (Step 8).
Tip: Distribution certificates are usually named after your team, so two of them can look the same. Tell them apart by their expiration date. Write the expiration date next to the .p12 in your password manager so you can match them later.
Step 6: Create the App Store provisioning profile
The App Store profile lets your distribution certificate sign this app for TestFlight and the App Store.
- In Certificates, Identifiers & Profiles, click Profiles, then click the blue plus (+).
Under Distribution, choose App Store Connect, then click Continue.
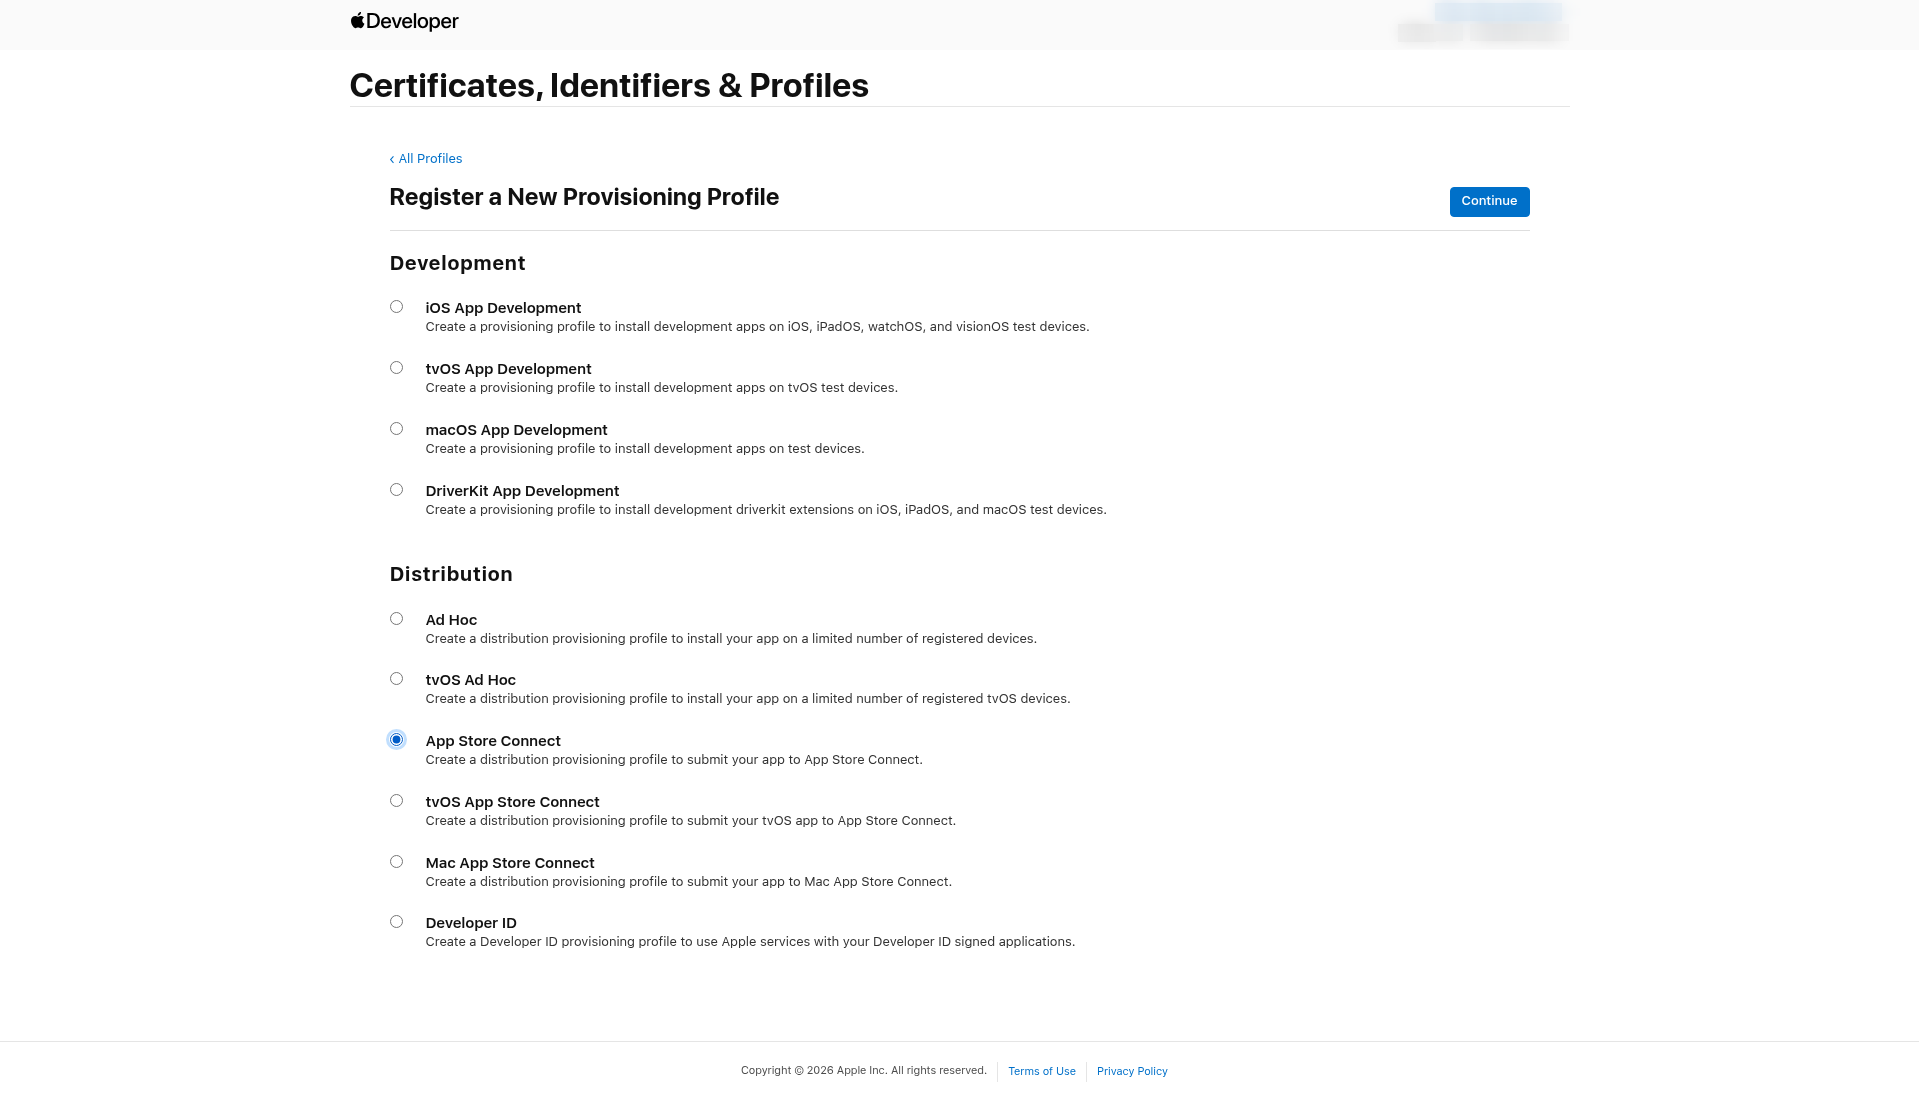
In the App ID list, choose your app, then click Continue.
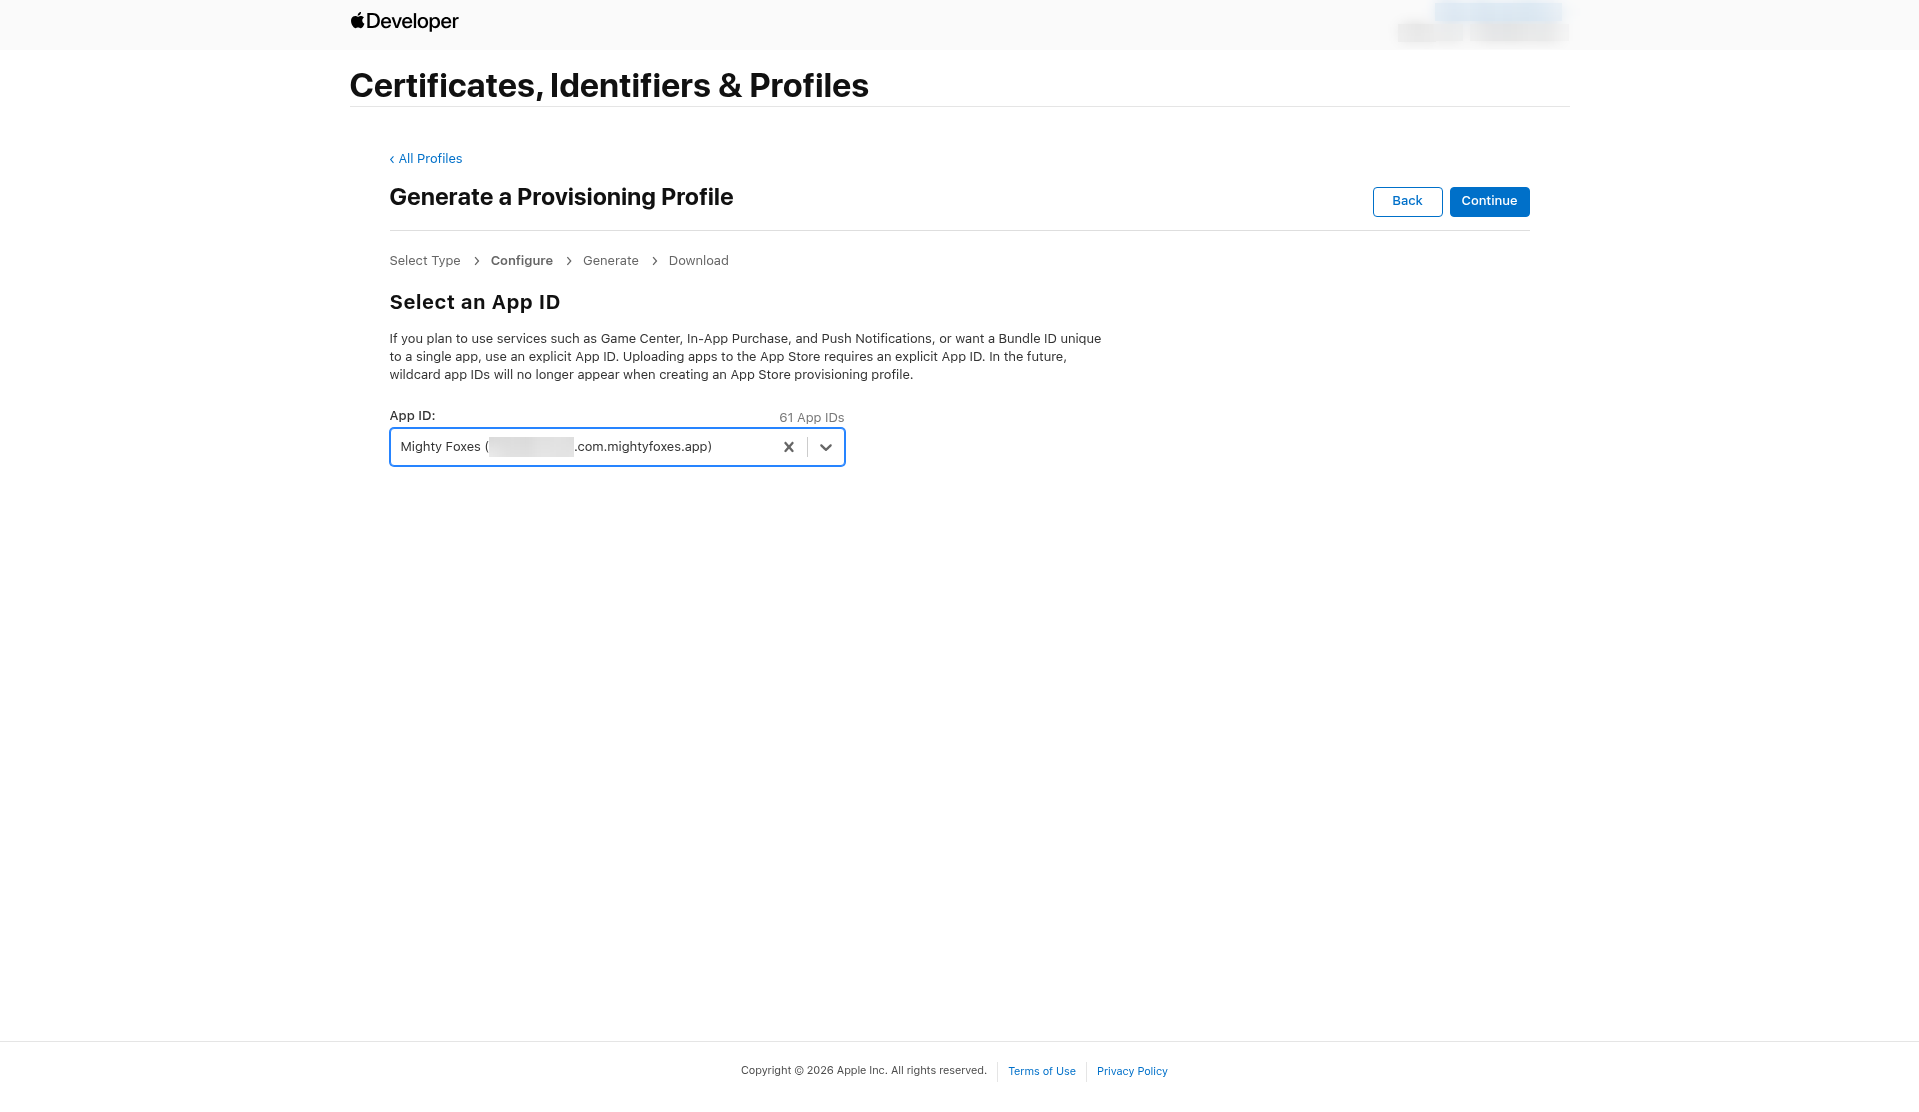
Under Select Certificates, choose your distribution certificate. If the names look identical, pick the one whose date matches the .p12 you're reusing. Then click Continue.
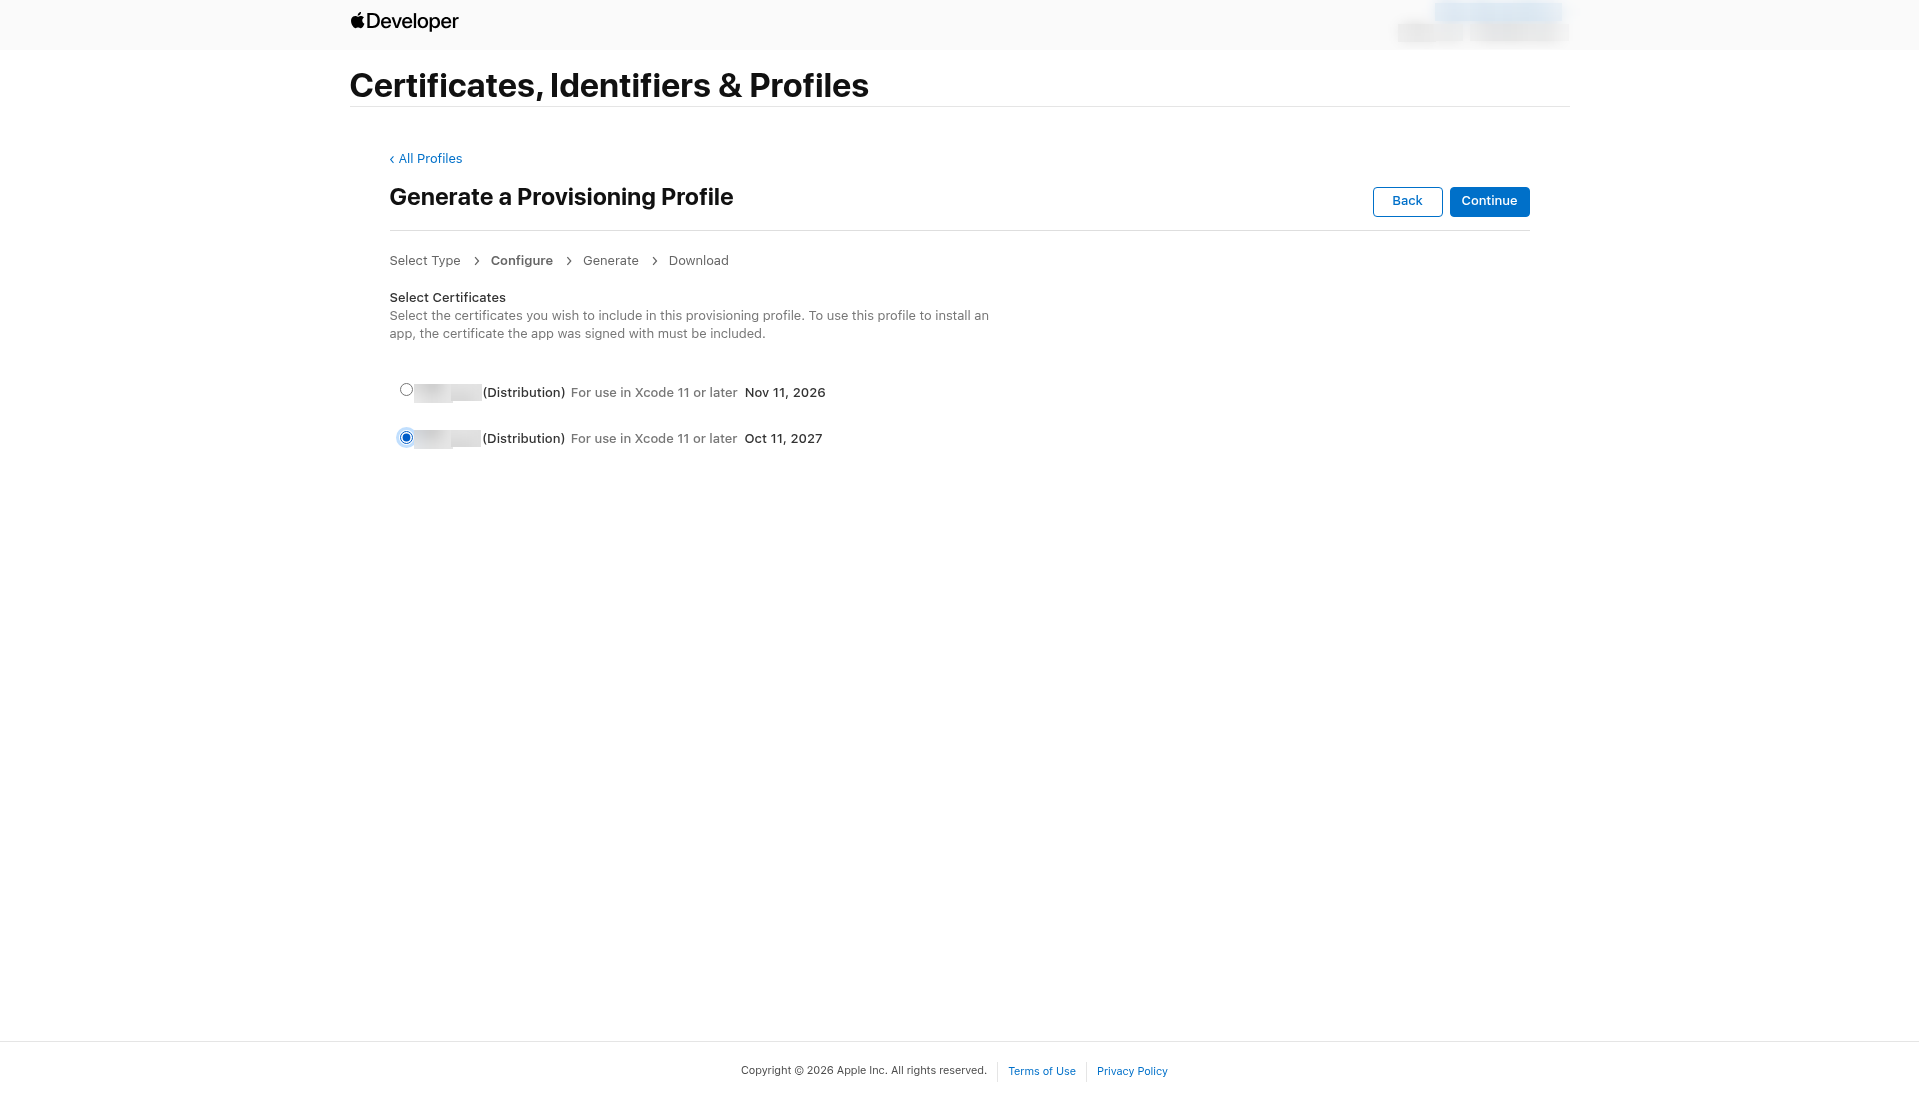
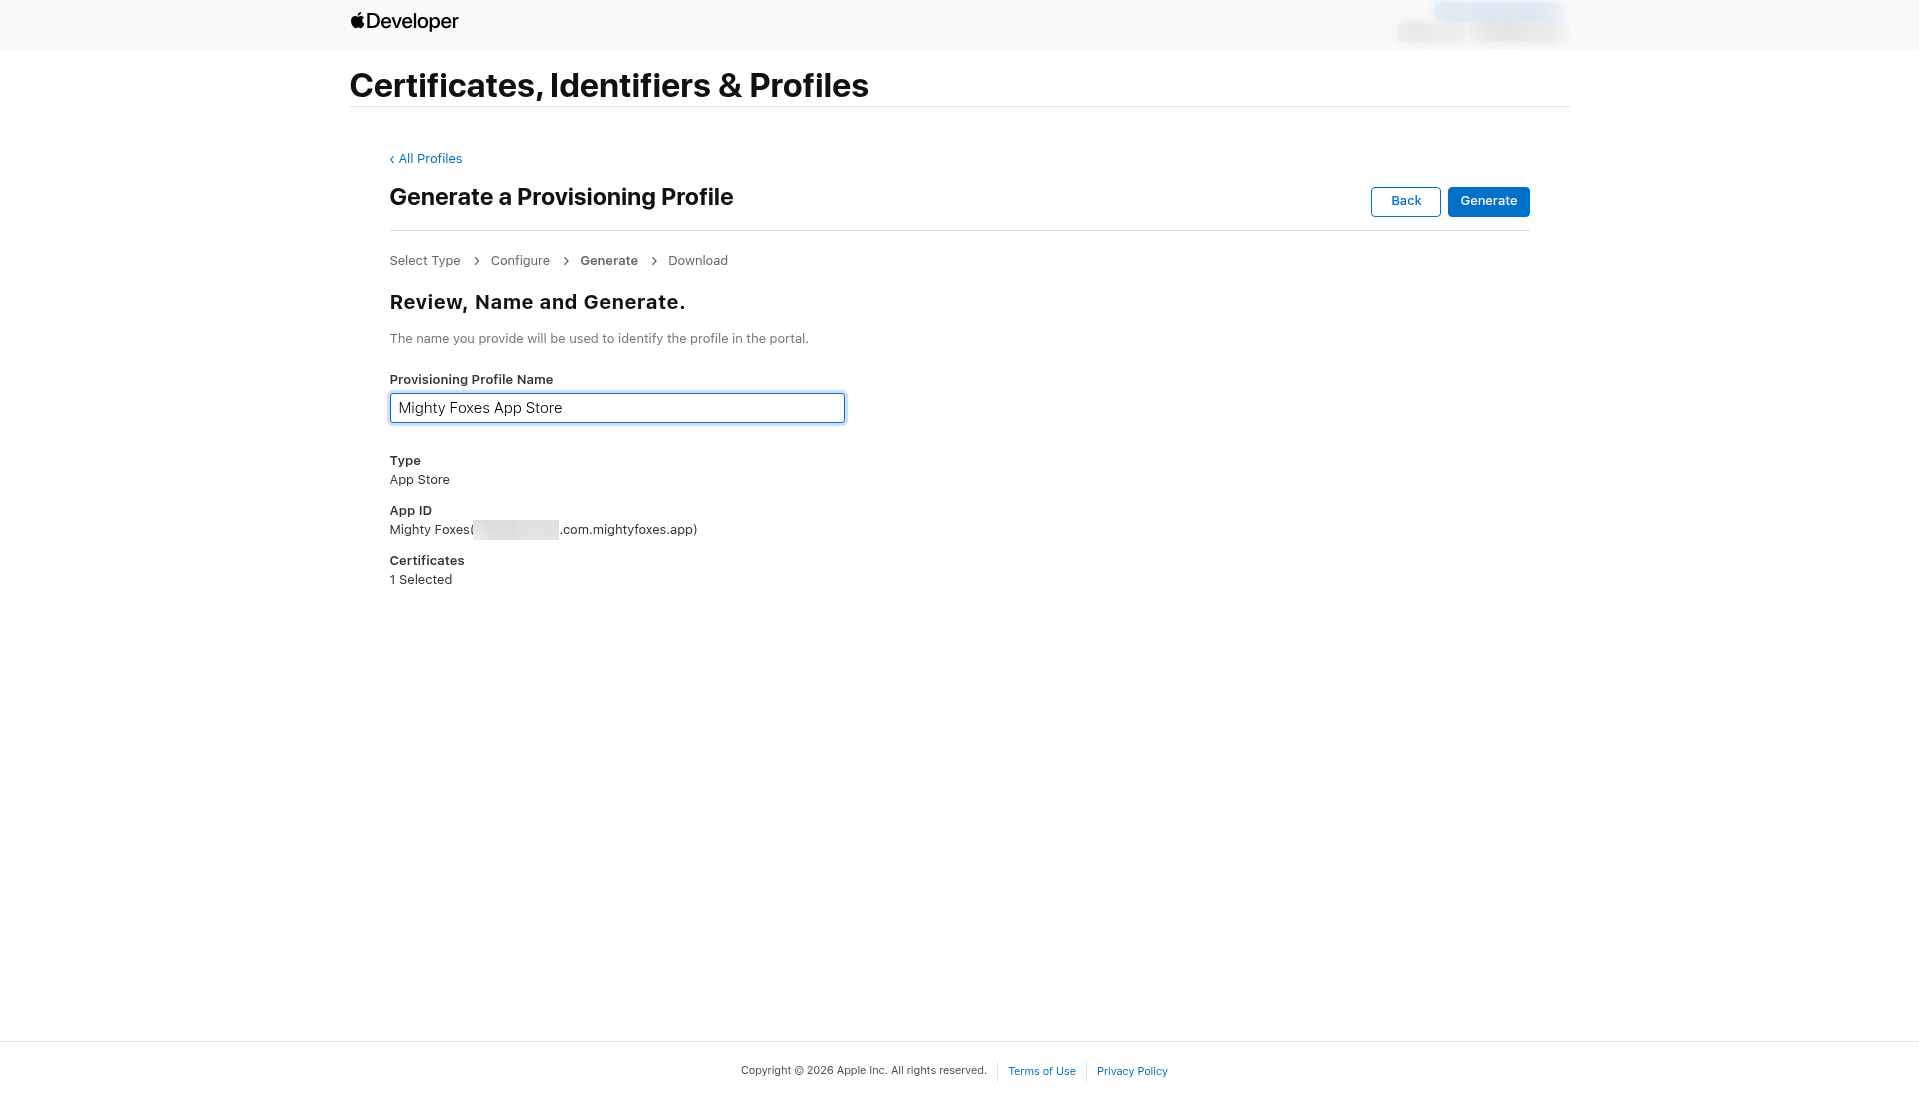
- Under Provisioning Profile Name, type a name that includes the exact word AppStore, written as one word with no space, for example "My Example App AppStore". Check the summary (Type: App Store, your App ID, 1 certificate selected), then click Generate.
Important: AppPresser recognizes an App Store profile only if its name contains AppStore with no space. A name like "My Example App App Store" fails validation with "Missing valid App Store provisioning profile", even though the profile itself is fine.
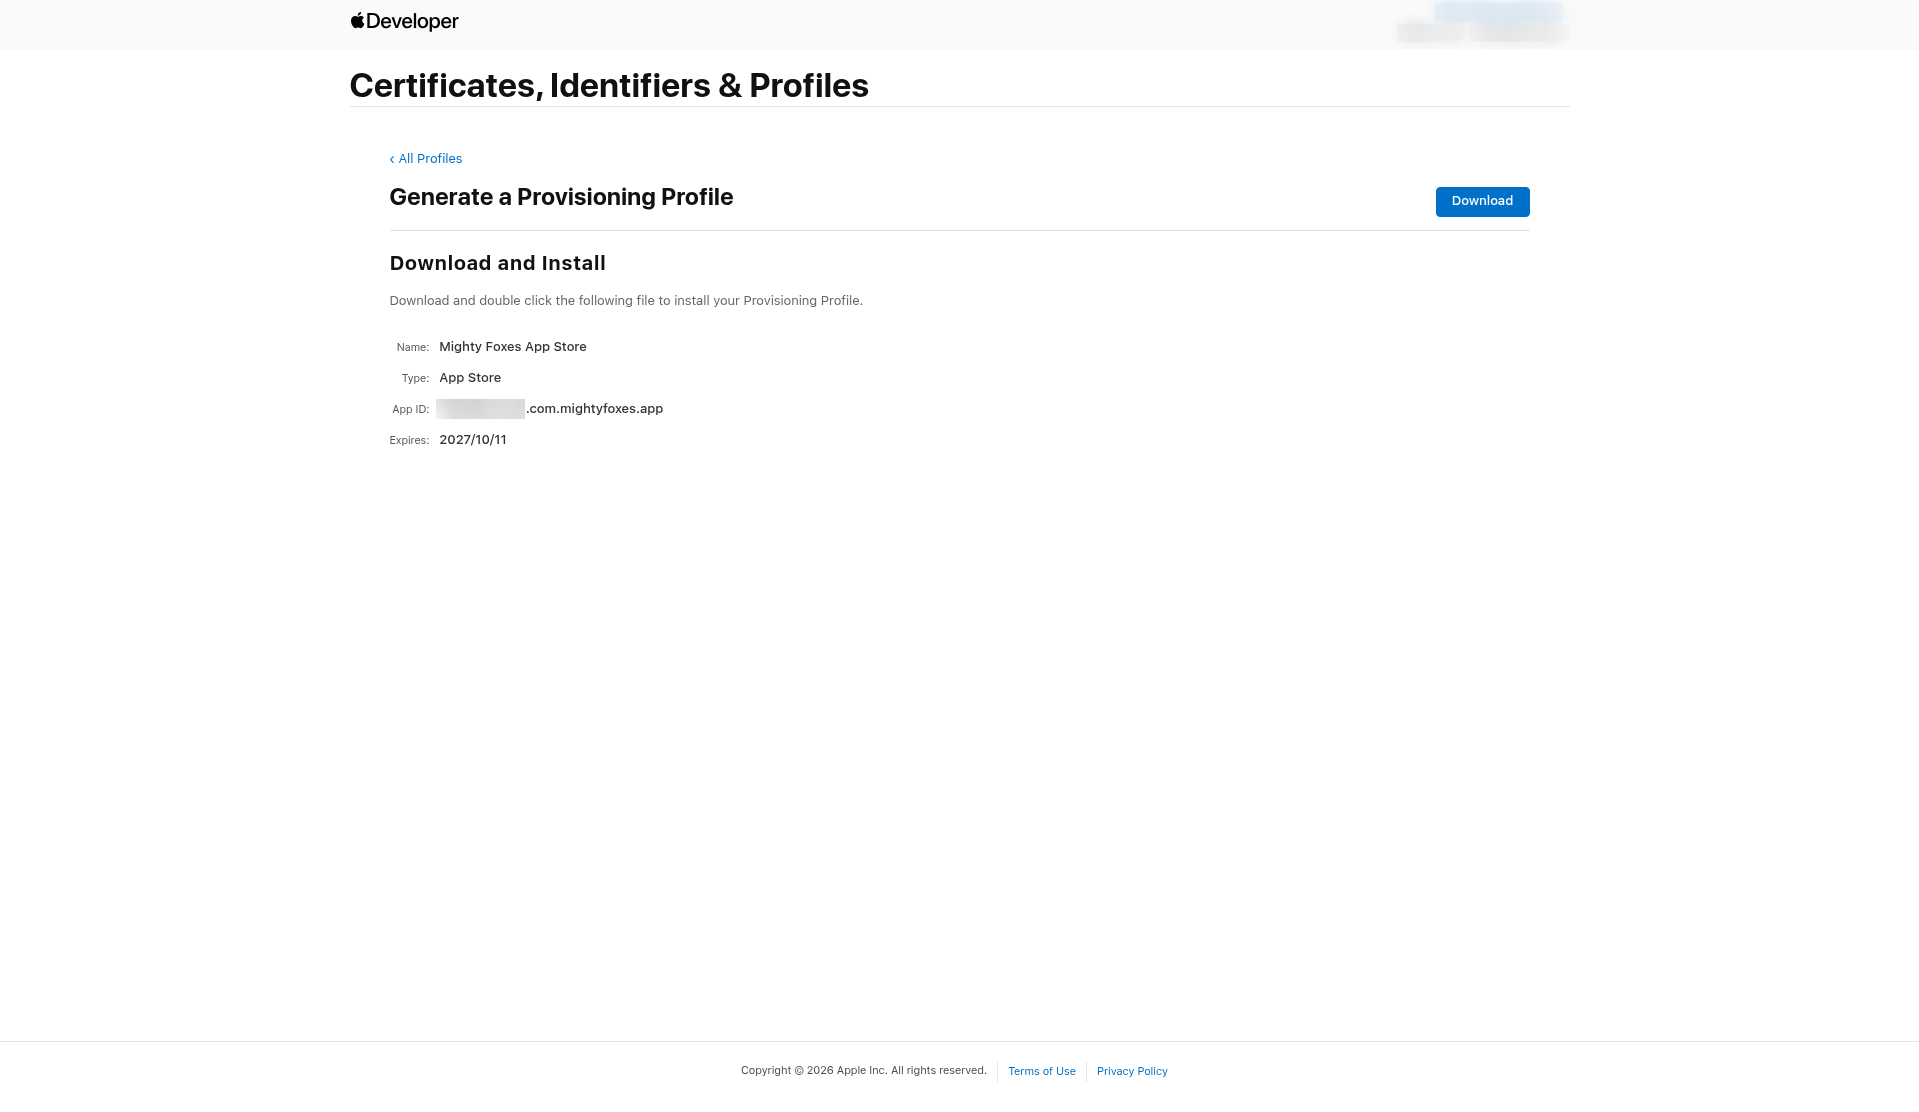
- Click Download. You get a .mobileprovision file. The page shows when it expires. A profile can't outlast its certificate, so it expires when your distribution certificate does.
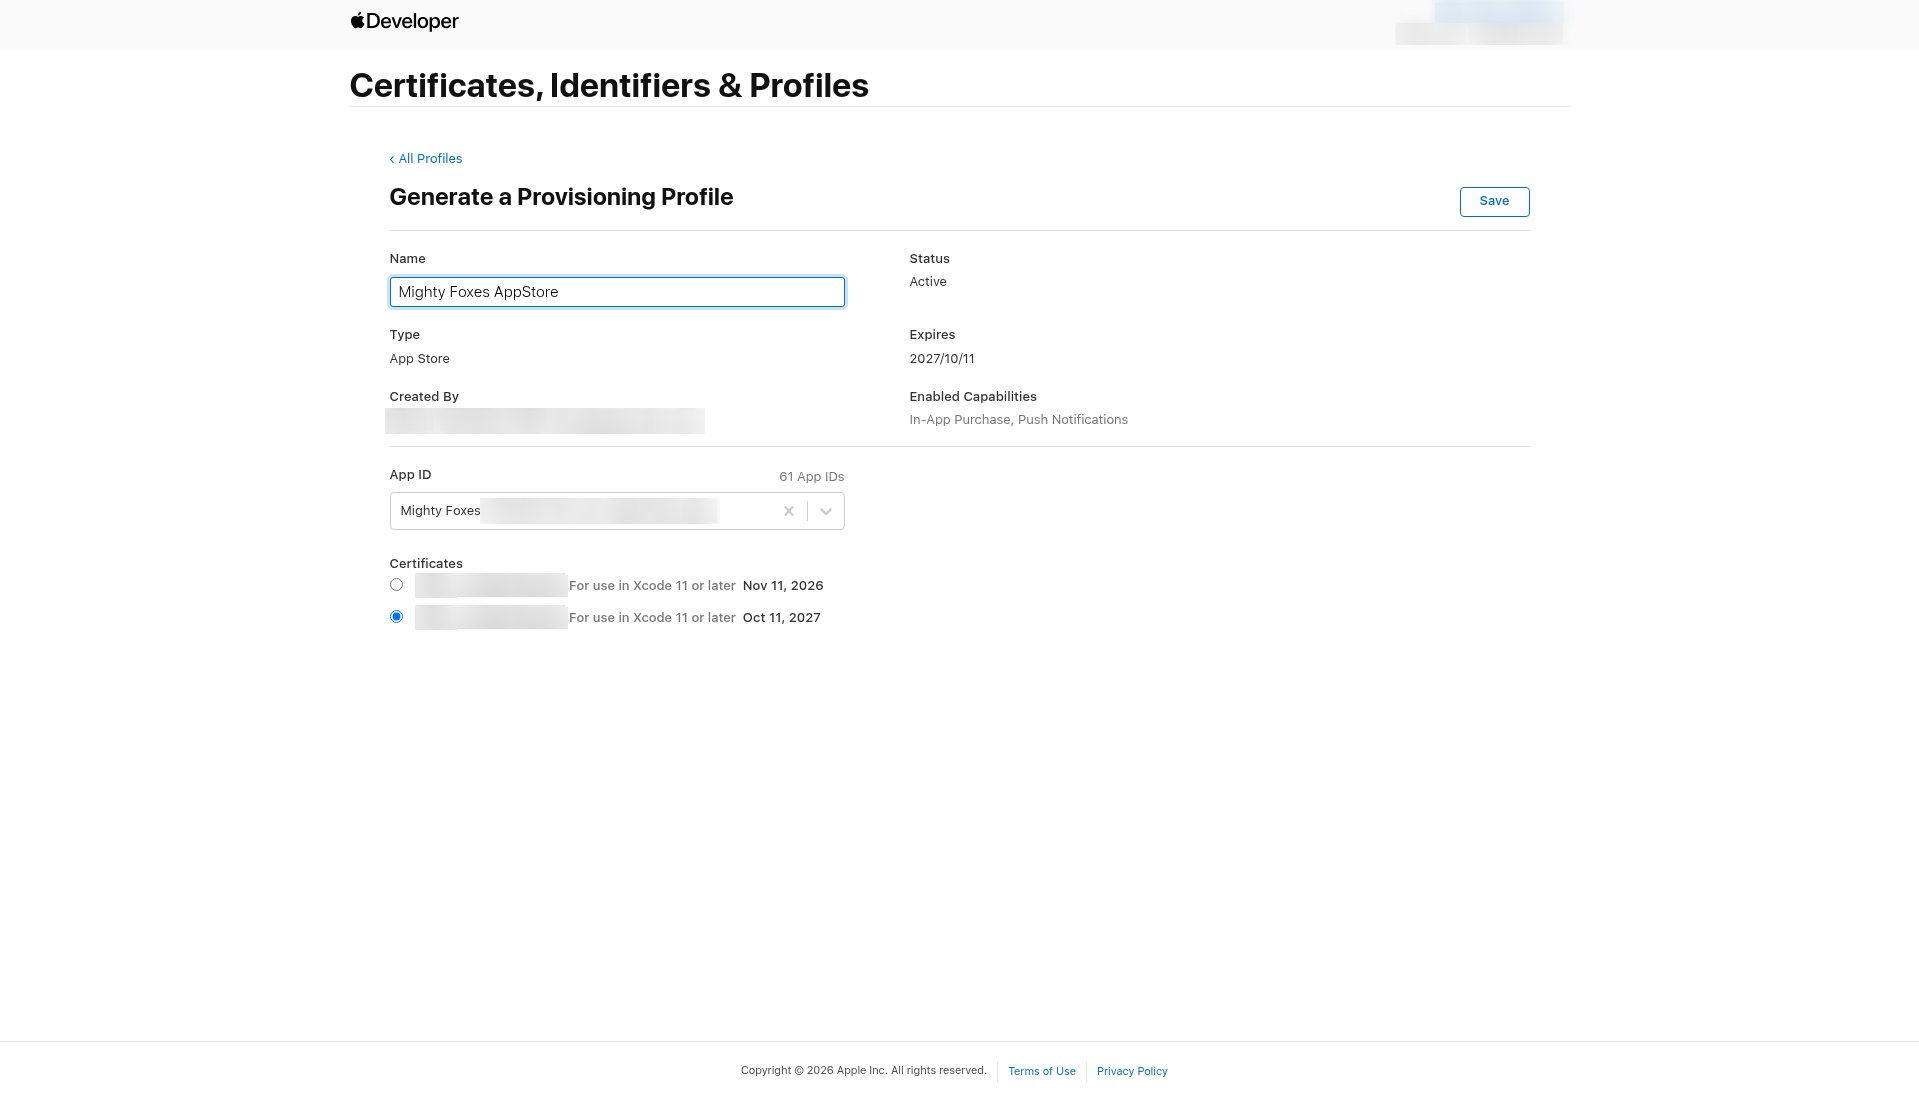
Already made your App Store profile with a different name? You can rename it:
- Click Profiles, then click your App Store profile.
- Click Edit, change the Name so it contains AppStore (for example "My Example App AppStore") and keep the same App ID and distribution certificate.
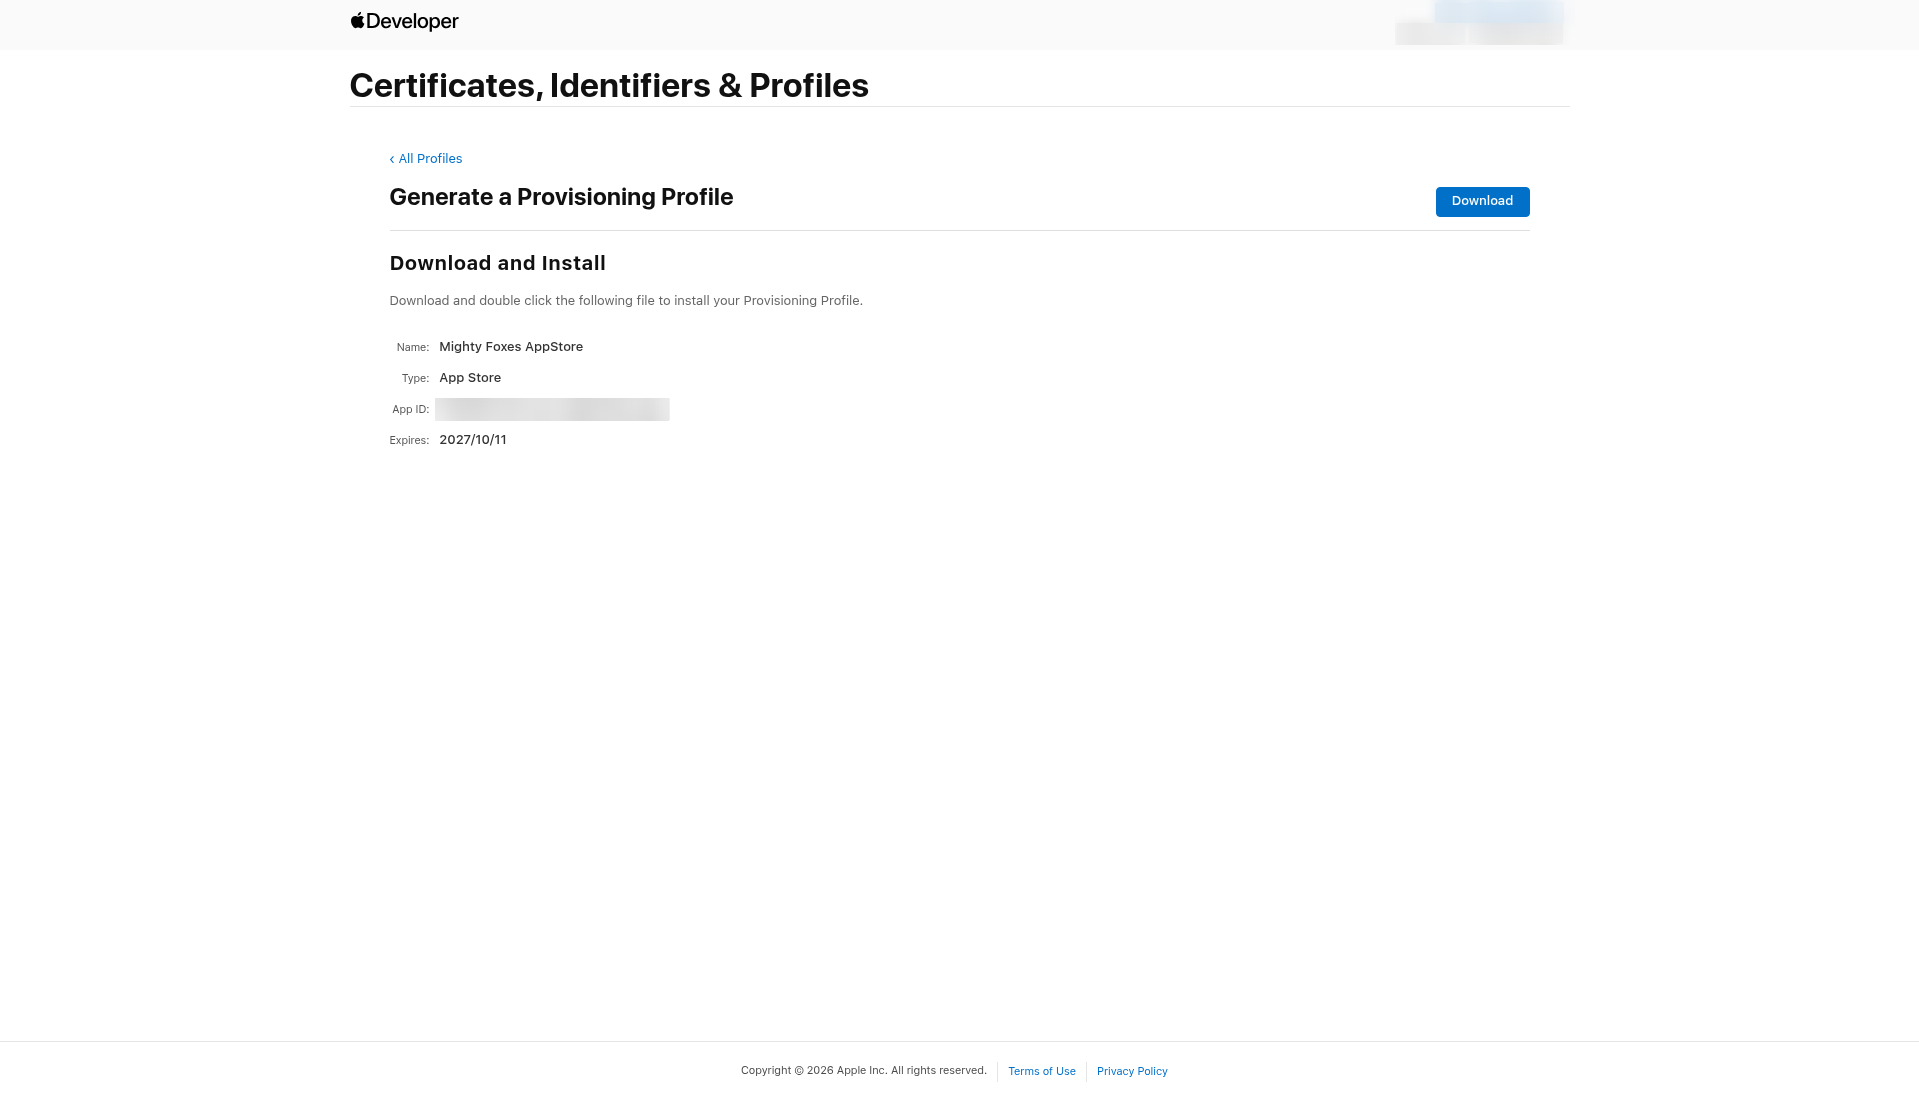
- Click Save, then Download the new file. Renaming creates a new version of the profile with a new UUID, so the old .mobileprovision file no longer counts. Use the new file everywhere from now on.
Step 7: Create the Development provisioning profile
The Development profile lets test builds run on specific iPhones and iPads. It only works on devices that are registered in your Apple Developer account.
First check your devices:
- Click Devices in the left menu and make sure the phones you will test on are in the list. Each device is listed by name and a long device ID.
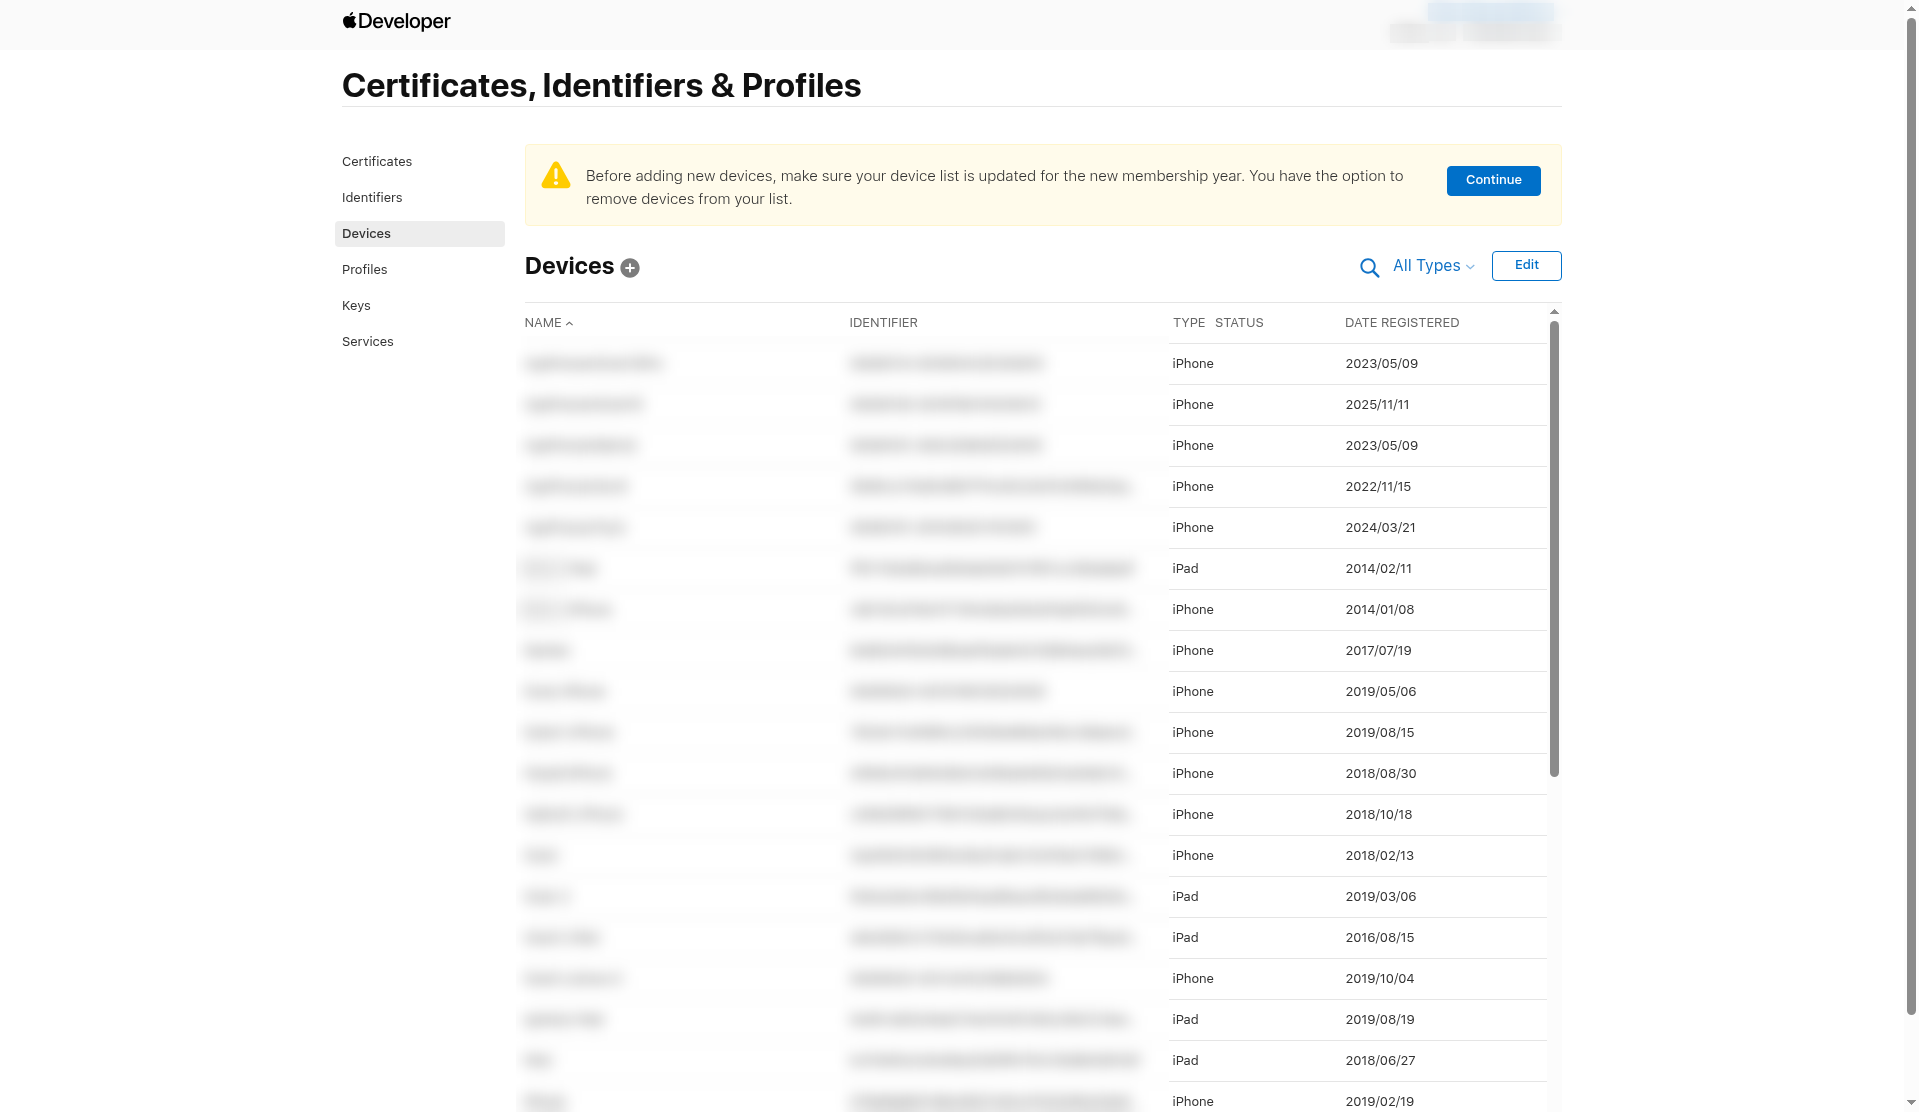
Good to know: At the start of each membership year, Apple shows a banner asking you to review your device list. You can remove old devices then.
No devices yet? Register one. A "registered device" is simply an iPhone or iPad you've told Apple you want to install test builds on, for example your own phone and your team's phones. Apple knows each phone by its UDID, a long code unique to that device. To register one:
- Find the phone's UDID. Plug the iPhone into your Mac with a cable, open Finder and click the iPhone in the left sidebar. Under the phone's name, click the gray line of details (model, storage, serial number) until it shows UDID. Right-click it and choose Copy UDID.
- In Certificates, Identifiers & Profiles, click Devices, then the blue plus (+).
- Choose the platform iOS (this covers iPhone and iPad), type a Device Name you'll recognize (for example "My iPhone"), and paste the UDID into Device ID (UDID).
- Click Continue, then Register.
Repeat for each phone you want to test on.
Then make the profile:
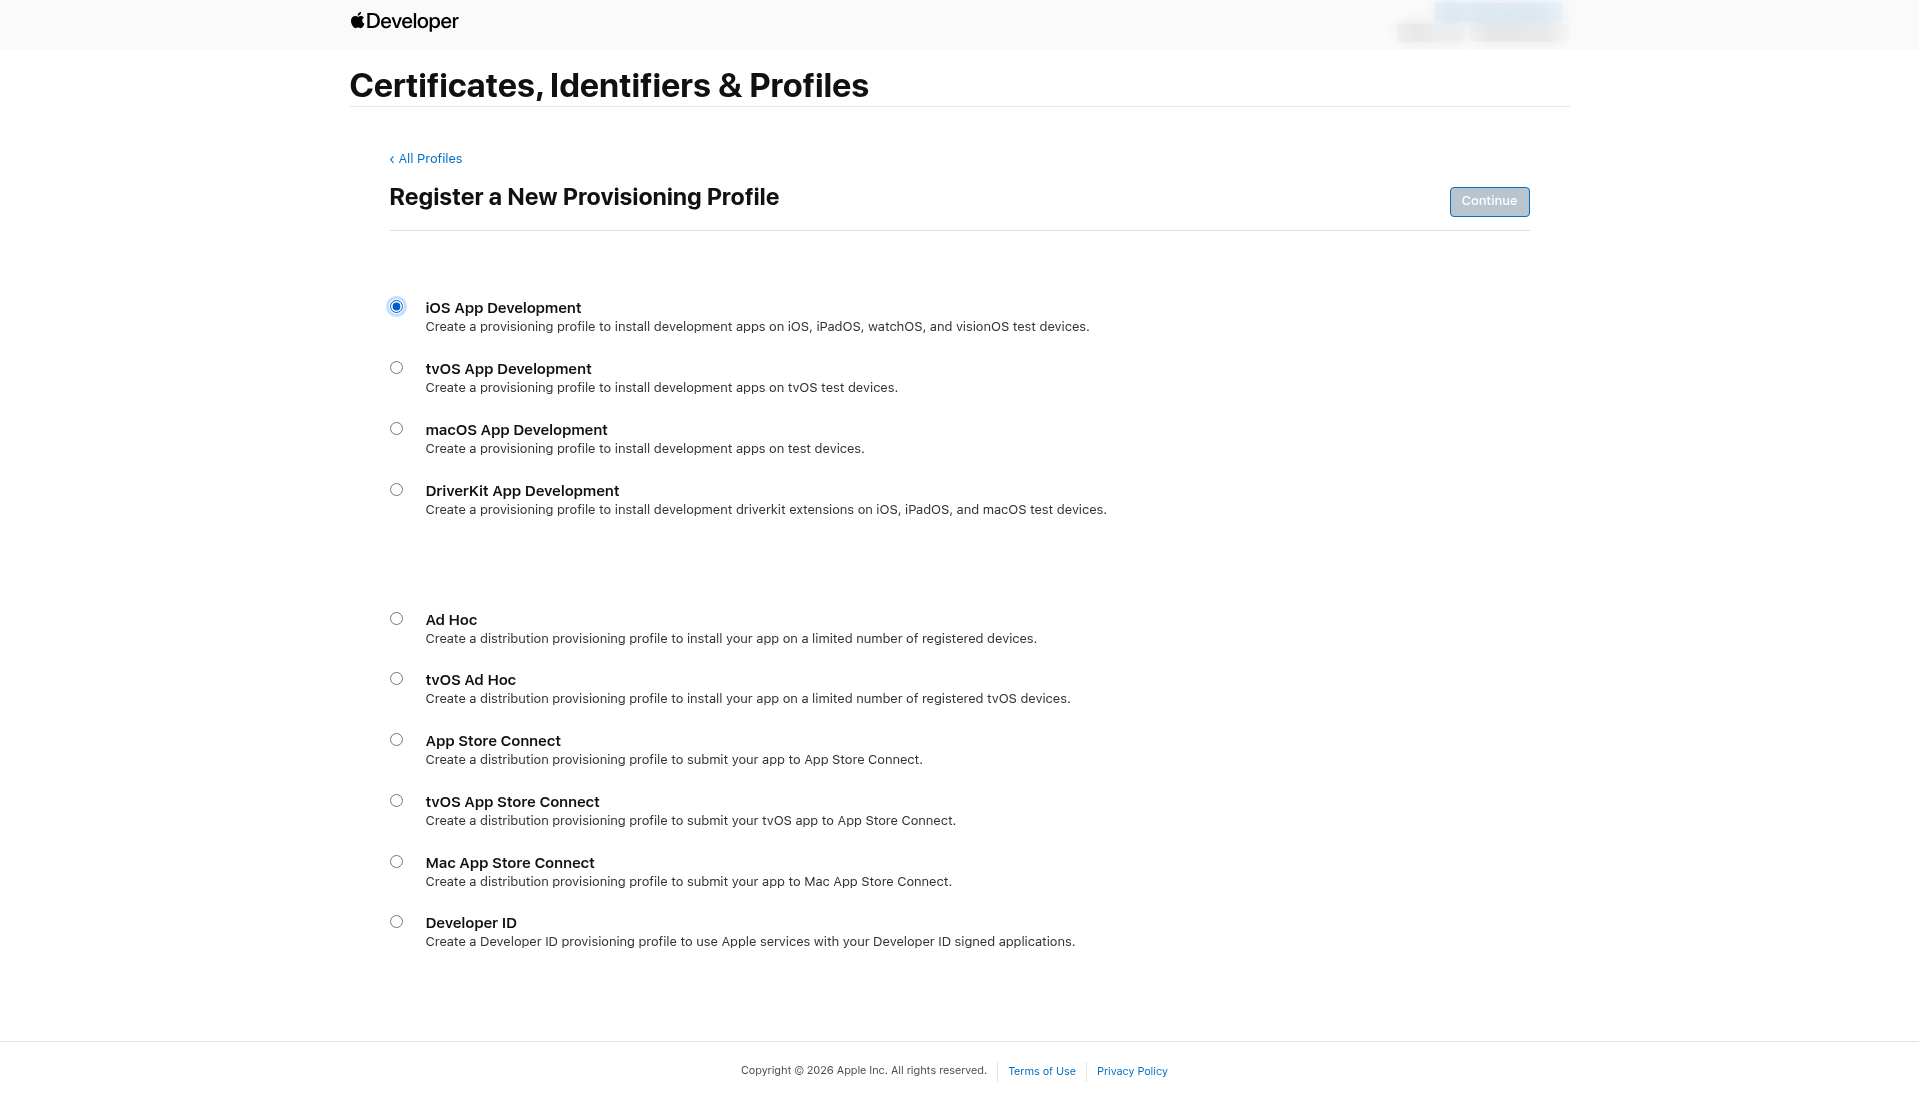
- Click Profiles, then the blue plus (+).
Under Development, choose iOS App Development, then click Continue.
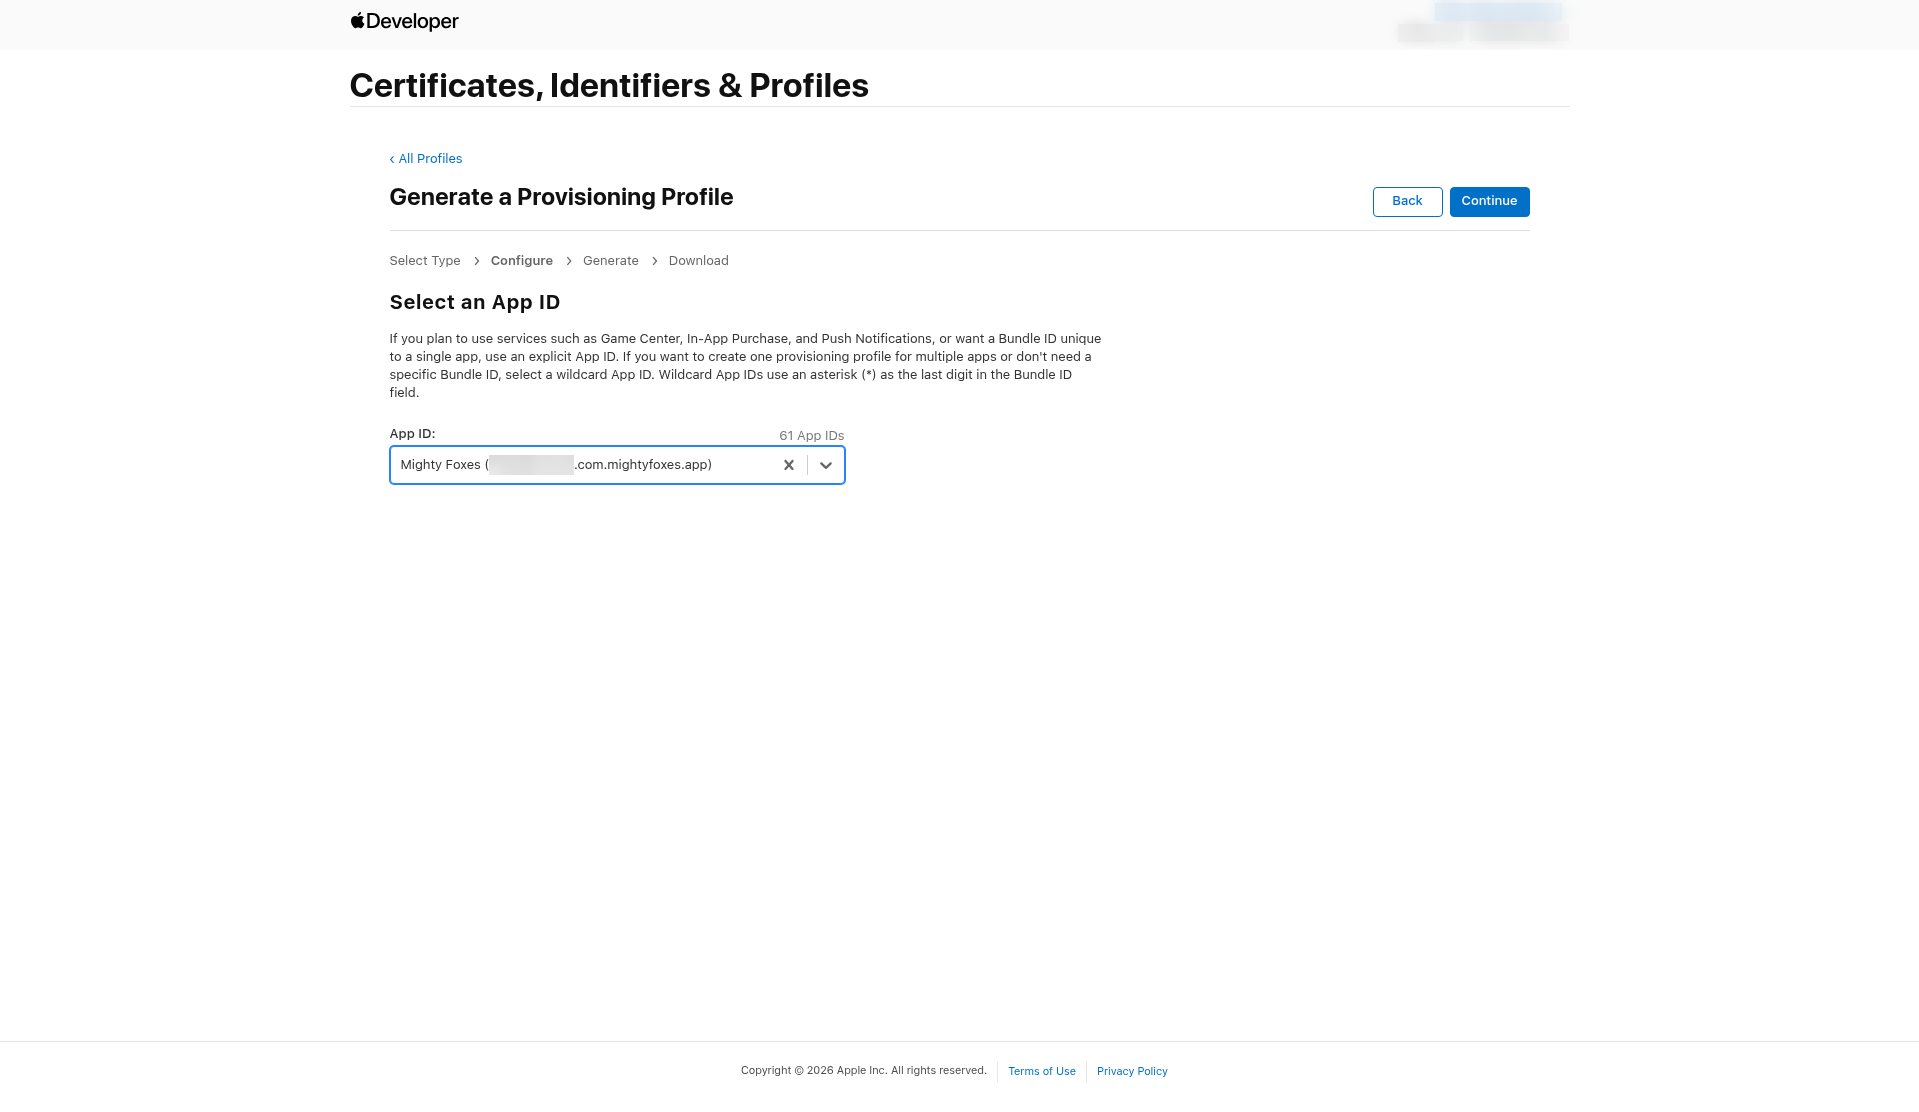
In the App ID list, choose your app, then click Continue.
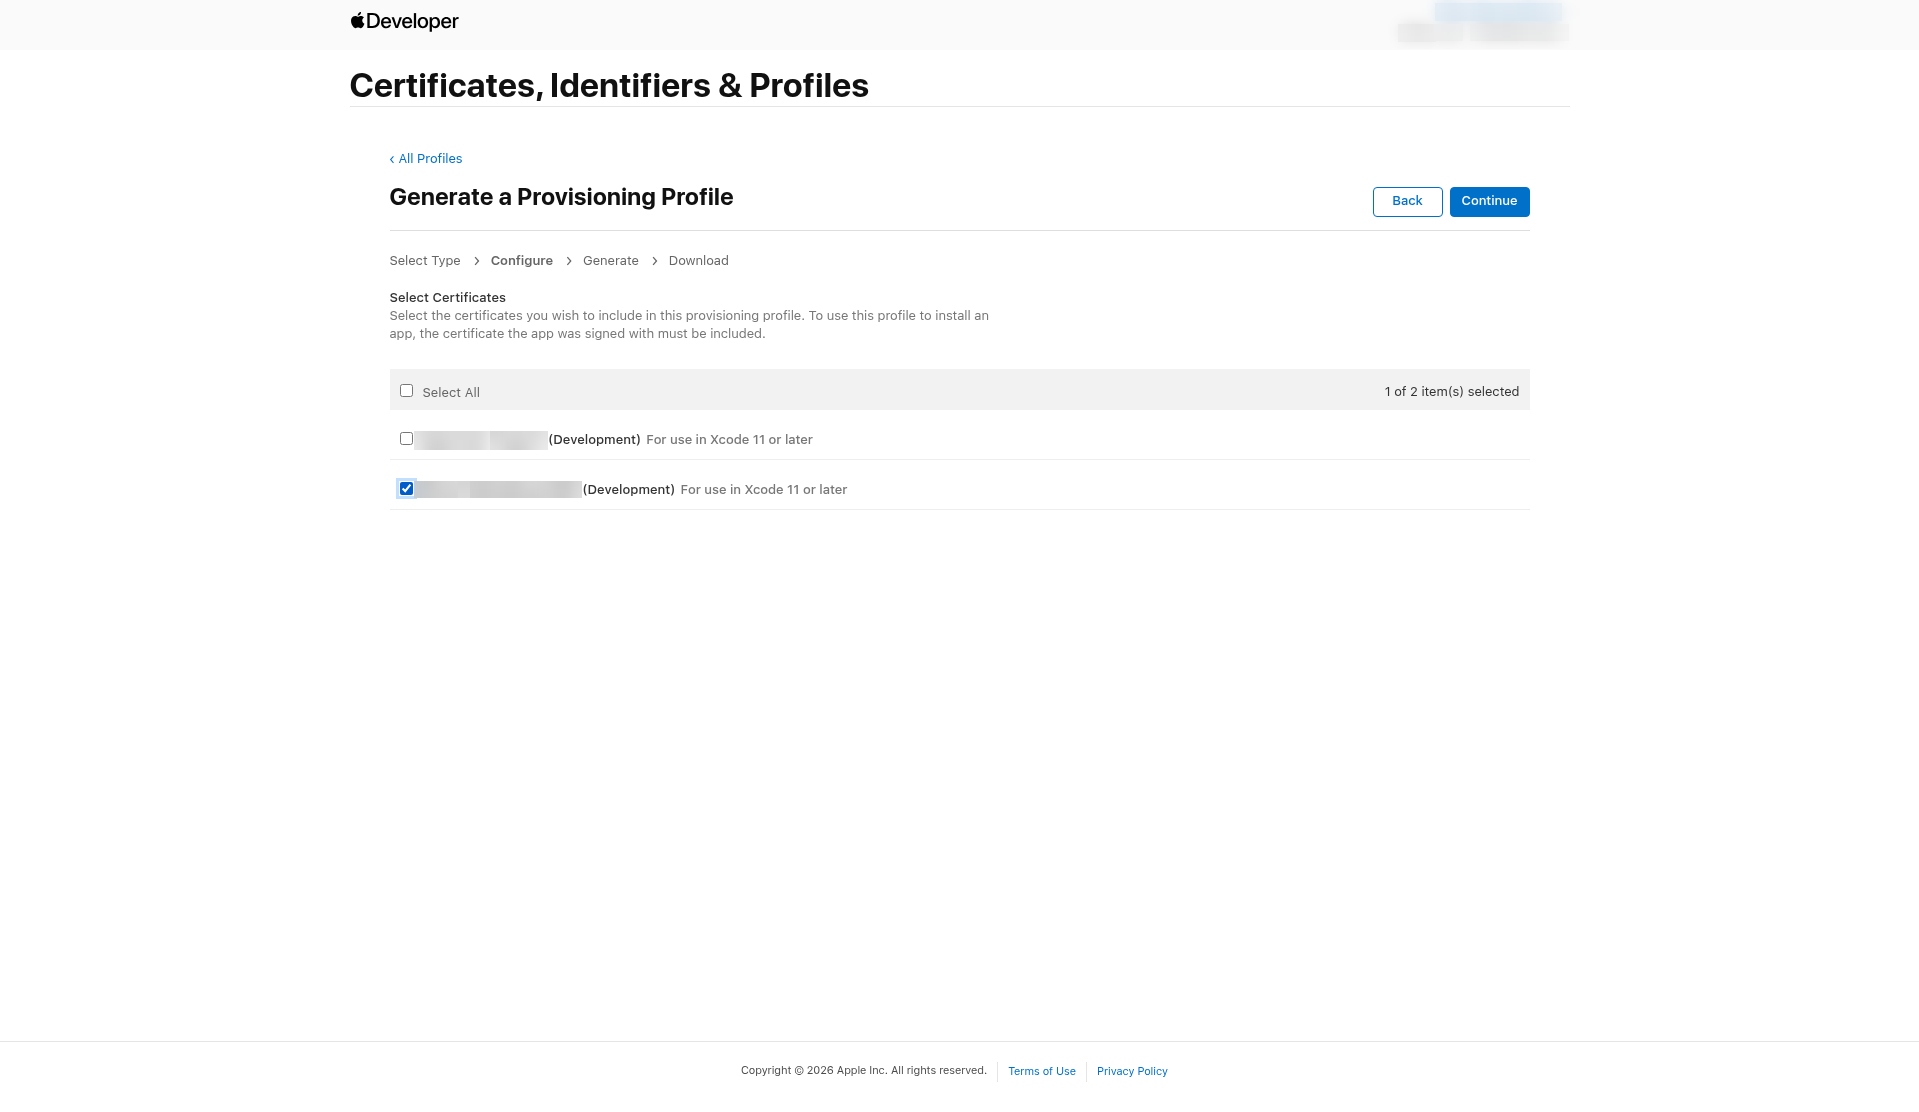
Under Select Certificates, check the development certificate you made in Step 4 (or the one whose .p12 you have), then click Continue. Certificates are named after the person who made them, so two can look alike. If you're not sure which is which, check the dates in the Certificates list first.
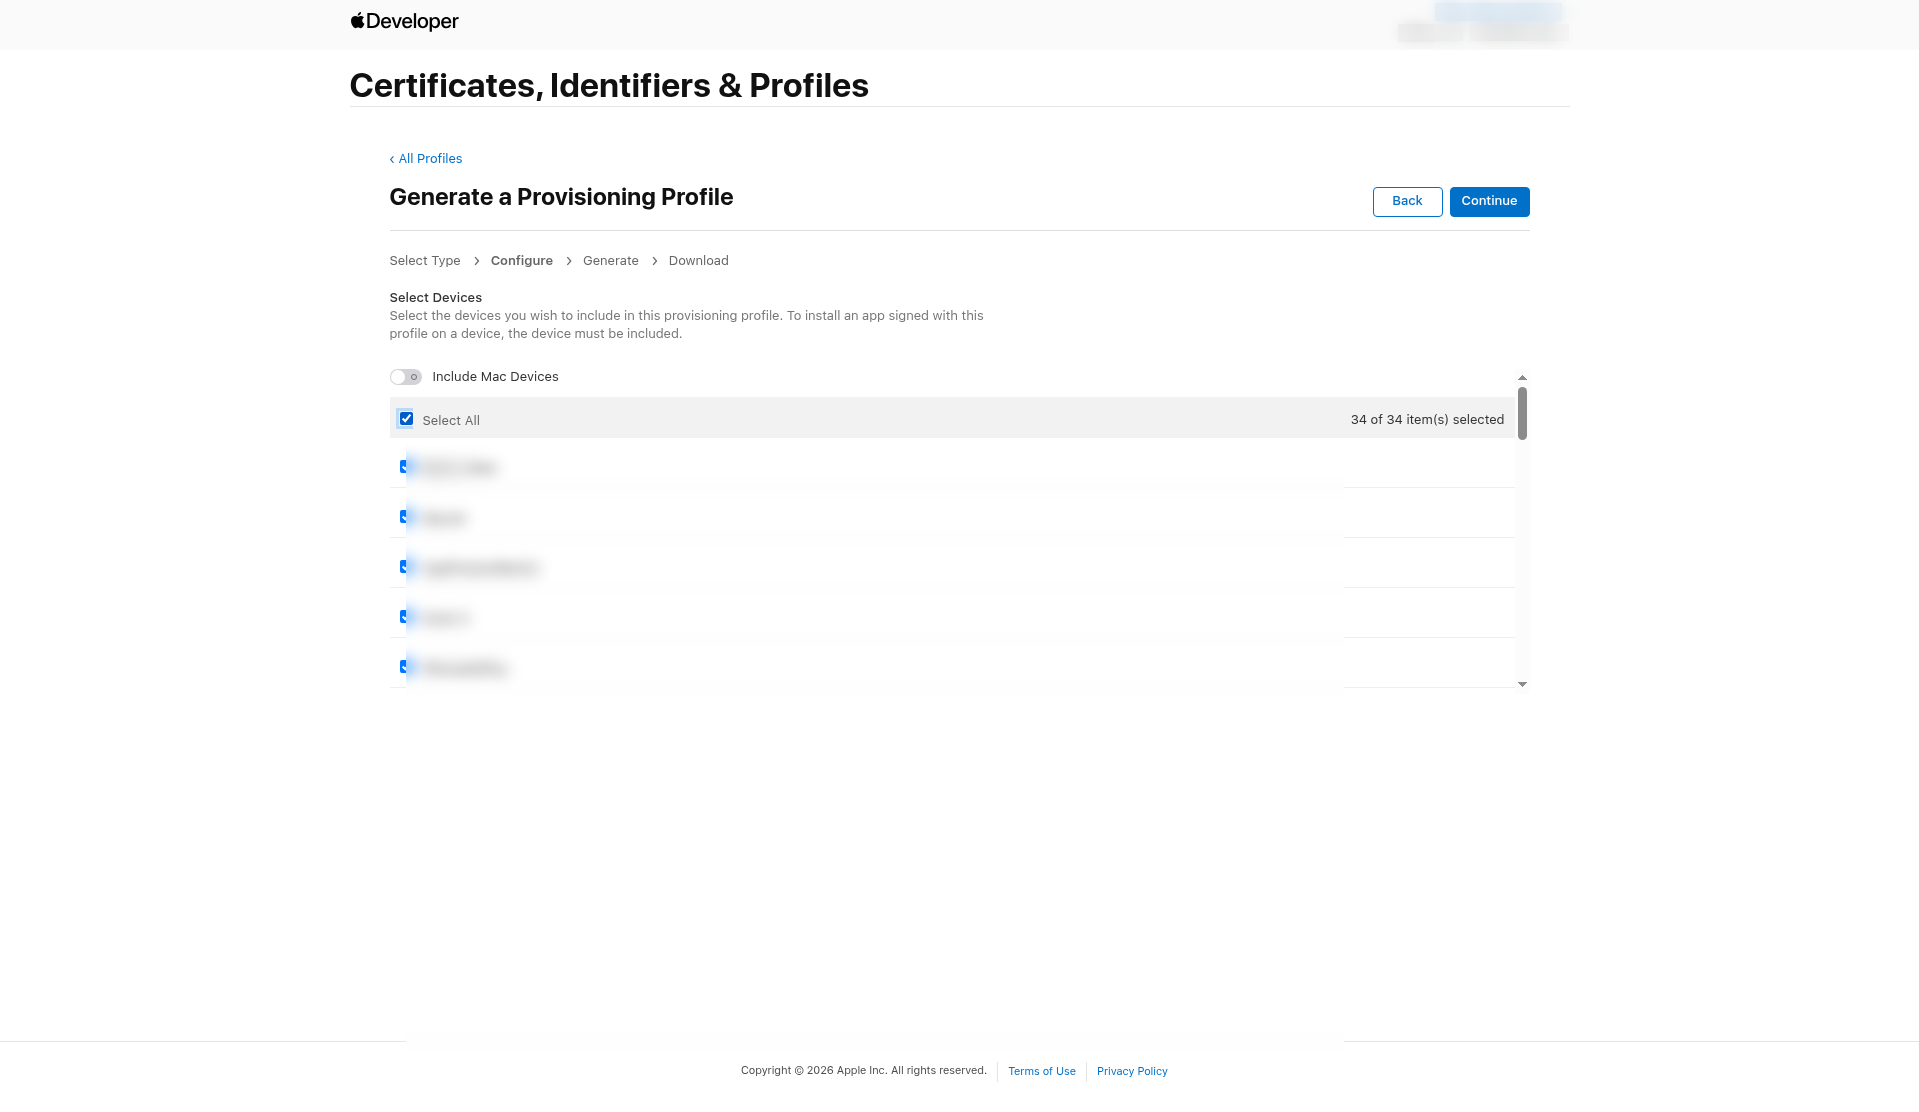
Under Select Devices, check Select All to include every registered device, or check only the ones you will test on. Leave Include Mac Devices off. Then click Continue.
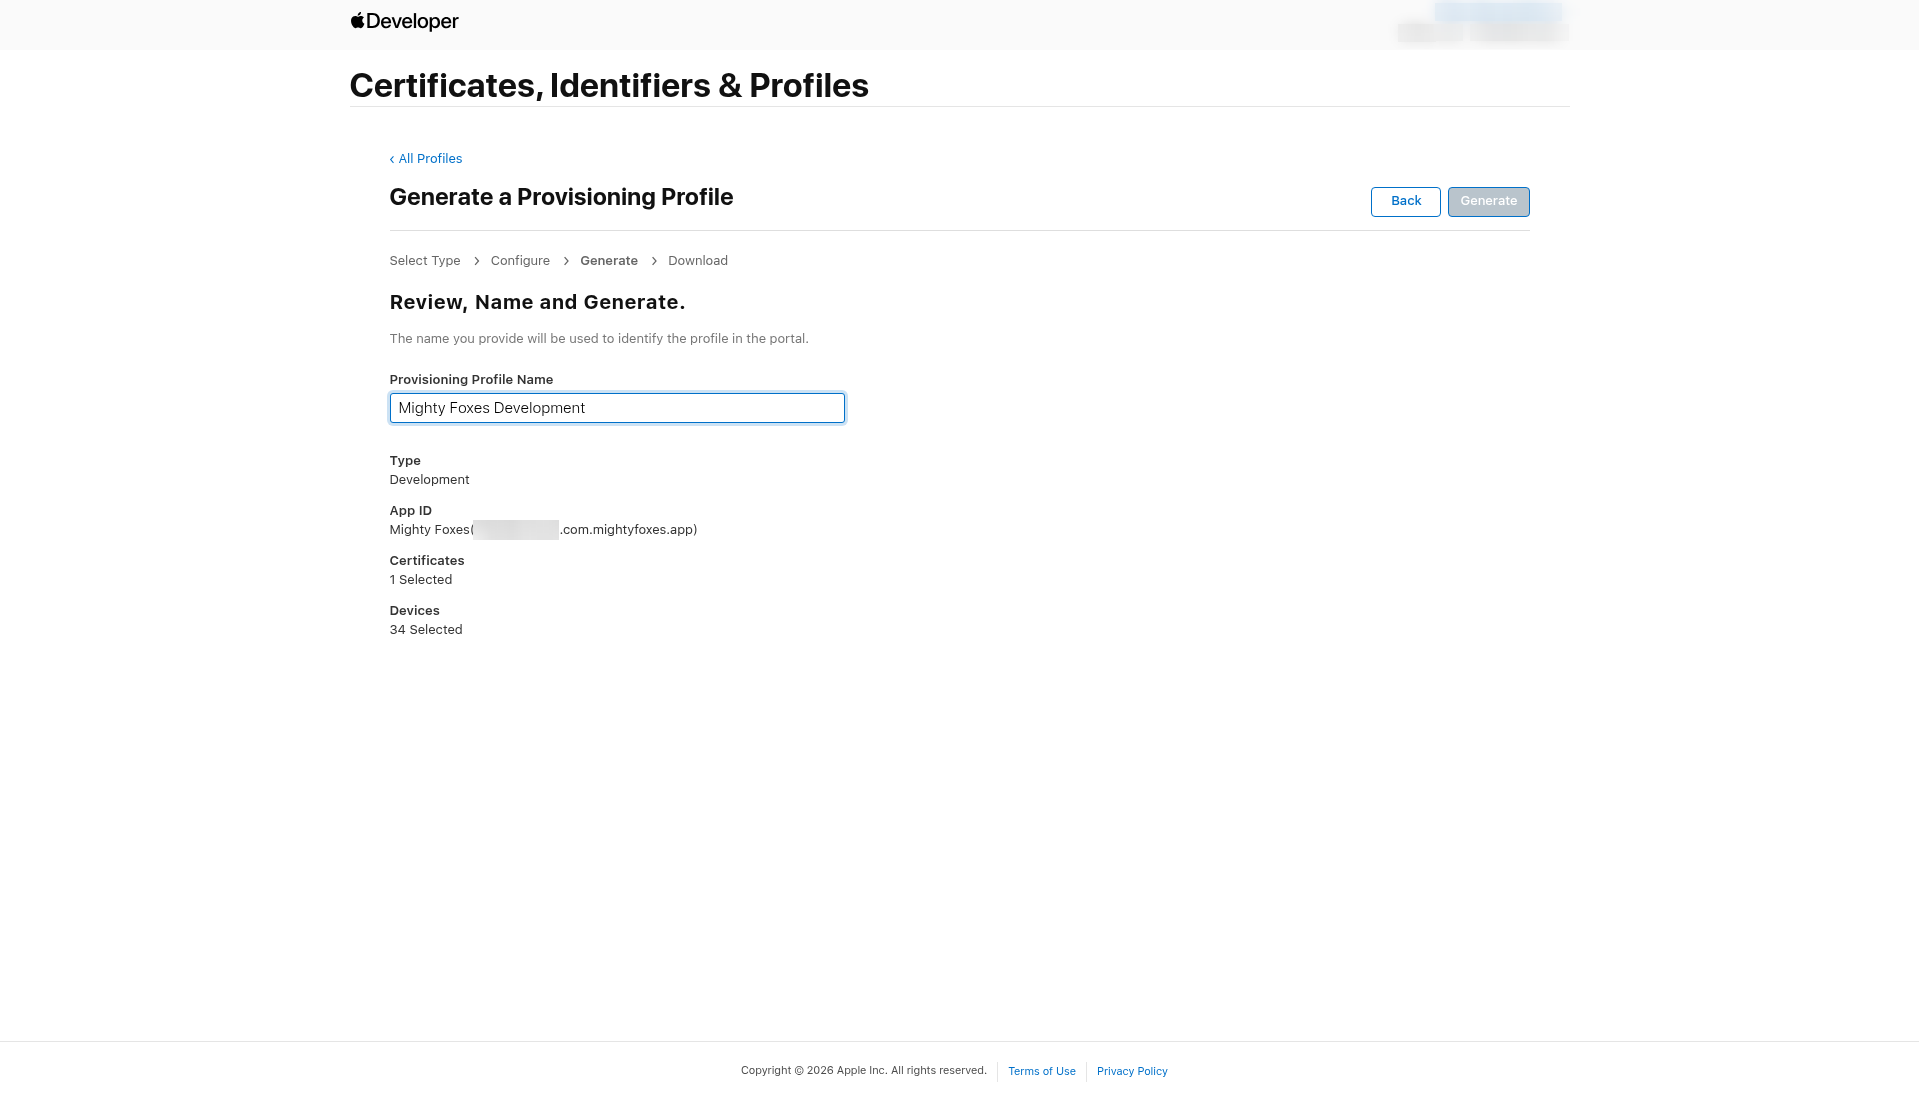
Type a name, for example "My Example App Development". Check the summary (Type: Development, your App ID, 1 certificate, the number of devices), then click Generate.
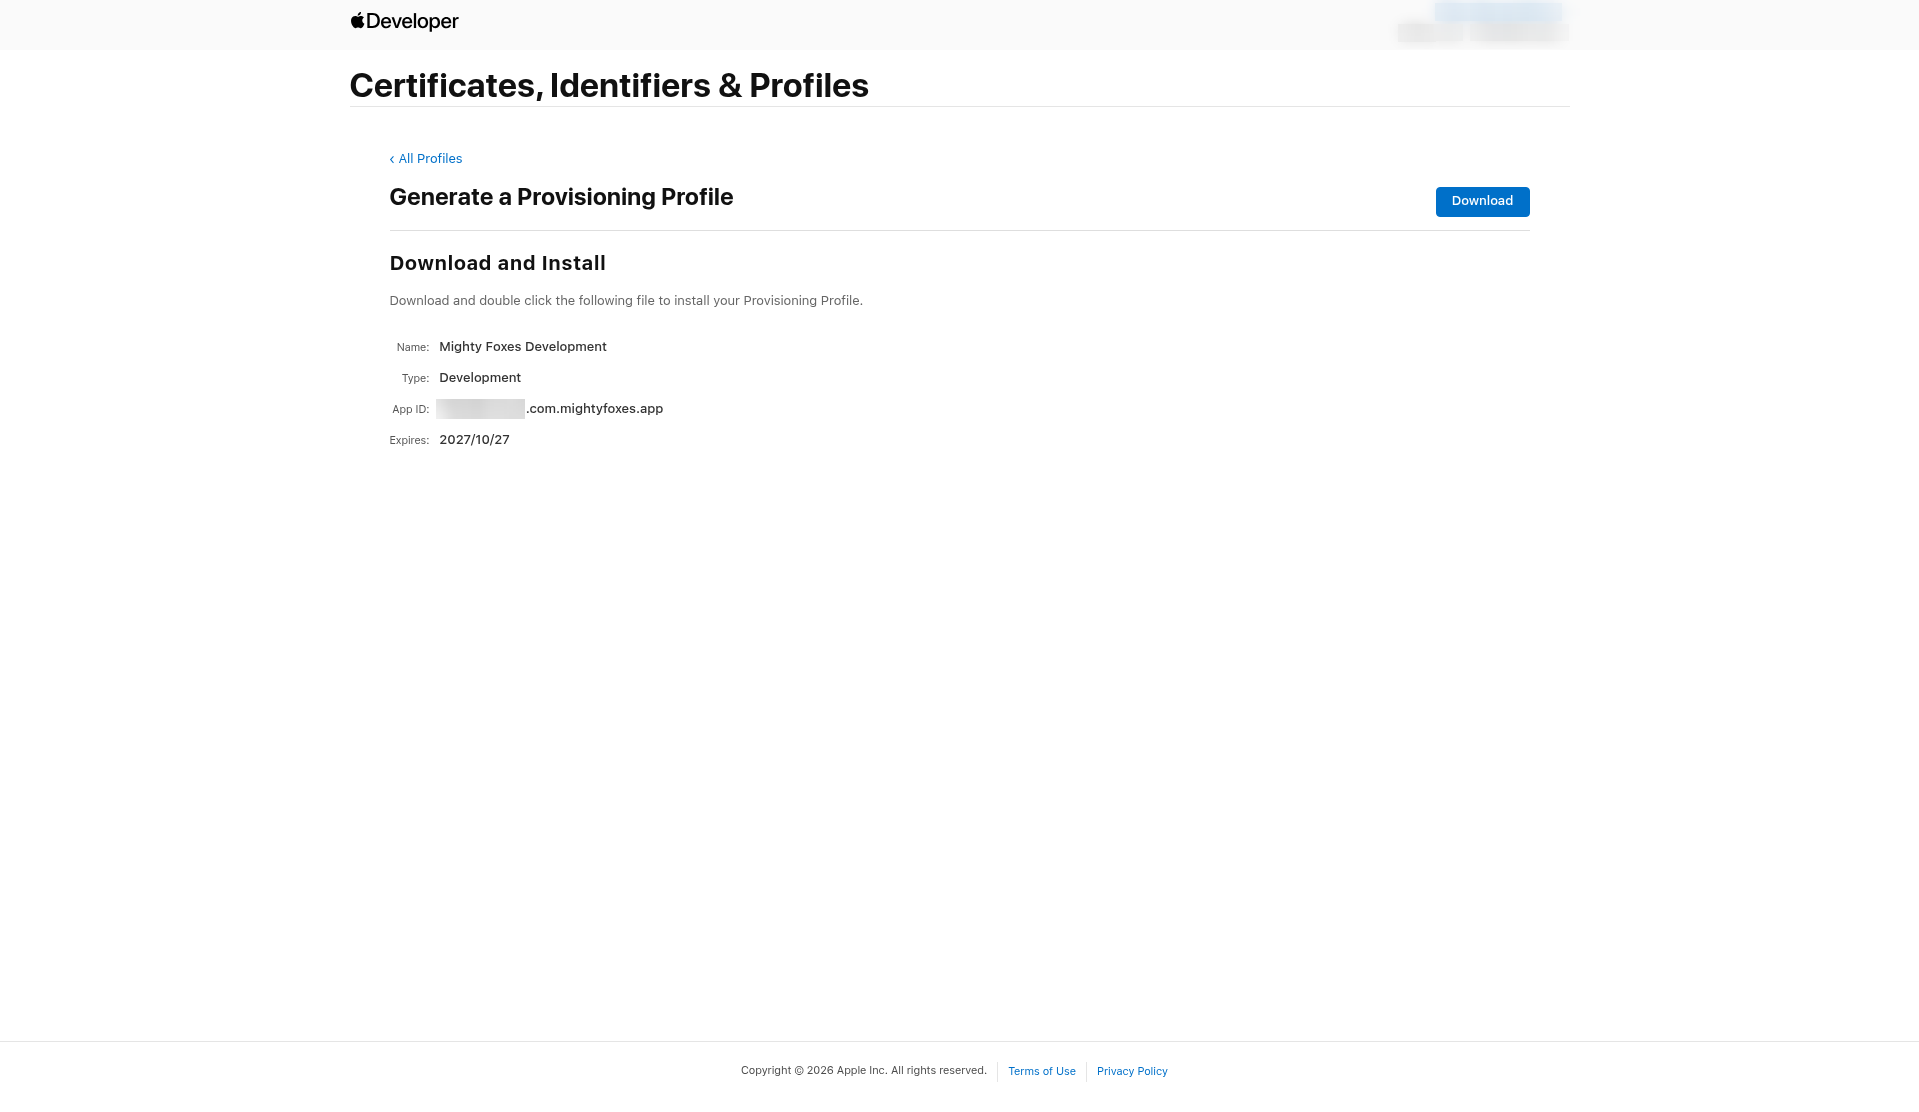
Click Download to save the .mobileprovision file. A Development profile expires one year after you create it.
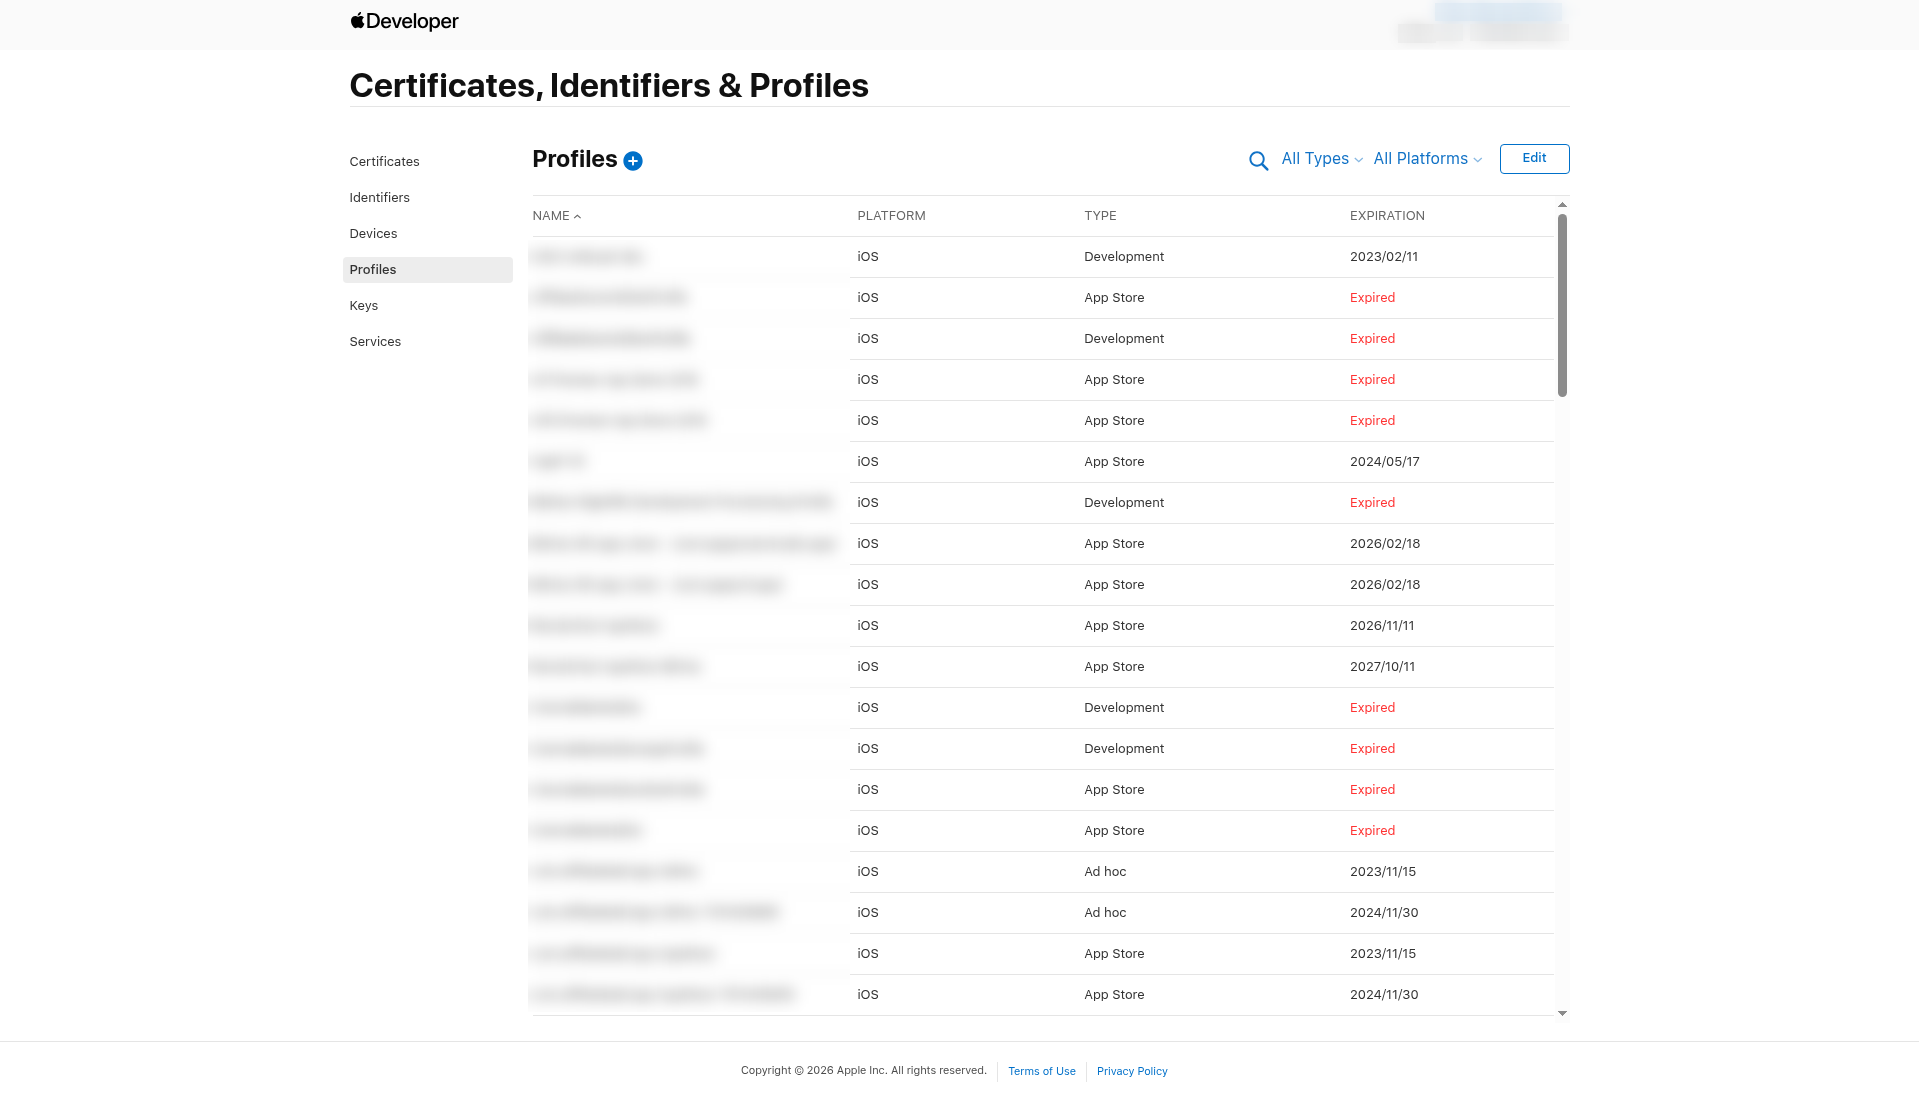
- Both new profiles are now in the Profiles list. (You'll add a third, the Ad Hoc profile, in Step 7b.)
Important: If you register a new device later, the Development profile doesn't pick it up by itself. Edit the profile to add the device, then download it again and send the new file.
Step 7b: Create the Ad Hoc provisioning profile (needed for test builds)
An Ad Hoc profile lets your distribution certificate sign a version of your app that installs on specific registered iPhones without going through the App Store. It's free to make, like every other profile.
Important: make this profile now. Validation (Step 13) labels the Ad Hoc build as optional, but your iOS Development (test) build also needs an Ad Hoc profile. Without one, the Development build fails.
- In Certificates, Identifiers & Profiles, click Profiles, then click the blue plus (+).
- Under Distribution, choose Ad Hoc, then click Continue.
- In the App ID list, choose your app (for example com.example.myapp), then click Continue.
- Under Select Certificates, choose the same distribution certificate you used for the App Store profile in Step 6. If the names look identical, pick the one whose expiration date matches the .p12 you're using. Then click Continue.
- Under Select Devices, check the iPhones and iPads you want to install test builds on, or check Select All. Leave Include Mac Devices off. Then click Continue. An Ad Hoc profile needs at least one registered device. If the list is empty, register a device first (see "No devices yet? Register one." in Step 7), then start this step again.
- Under Provisioning Profile Name, type a name that includes the exact word AdHoc, written as one word with a capital A and H. For example: "My Example App AdHoc". Check the summary (Type: Ad Hoc, your App ID, 1 certificate, the number of devices), then click Generate.
Important: AppPresser works out the profile type from the profile's name, and the match is exact, capital letters included. It looks for Development, AdHoc, AppStore or Distribution. A name like "My Example App Ad Hoc" (with a space) or "My Example App adhoc" isn't recognized.
- Click Download. You get a .mobileprovision file. Like the App Store profile, it expires when your distribution certificate does.
As with the Development profile, if you register a new phone later, edit the Ad Hoc profile to add it, then download it again and send the new file.
Step 8: Turn each .cer into a .p12 (on your Mac)
Do this on the same Mac that made the CSR, because that's where the private key is.
- Double-click the .cer file you downloaded (aps.cer or development.cer). Keychain Access opens and adds it to your login keychain.
- In Keychain Access, click My Certificates (in older versions: the login keychain, category My Certificates).
- Find the certificate. It has a small arrow next to it. Click the arrow to check there's a private key underneath. If there's no key, you're on a different Mac from the one that made the CSR.
- Right-click the certificate (the line with the key under it) and choose Export.
- Choose the file format Personal Information Exchange (.p12), give it a clear name (for example MyExampleApp-push.p12), and click Save.
- Type a password for the .p12 and confirm it. Your Mac may also ask for your Mac login password to allow the export.
- Save the .p12 file and its password together in your password manager right away.
Repeat for each certificate: push, development and distribution (if you made a new one).
Step 9: Add the files to AppPresser
Push certificate
- In the left menu, under Configuration, click Push Notifications.
- On the Setup tab, under iOS, choose Manual ("Use your own certificates").
- Under Push certificate .p12, click Upload .p12 certificate and choose your push .p12 file.
- Under Provisioning profile .mobileprovision, click Upload provisioning profile and choose your .mobileprovision file.
- In Certificate password, type the password for your push .p12.
- Click Save changes.
- Click Deploy iOS push config. Saving does not deploy your push config.
Good to know: Changes to these build files also need a new app build.
Build signing files
Your build signing files (the development and distribution .p12 files, their passwords and the three .mobileprovision files) go to AppPresser support, not into the dashboard. Keep them safe in your password manager. Step 11 explains how to get them to support.
You validate everything in Step 13.
Step 10: Turn on push notifications
Your push certificate is in place, but push stays off for your app until you switch it on.
In the left menu, under Configuration, click Push Notifications. The Enable Push Notifications switch is at the top right. It starts off.
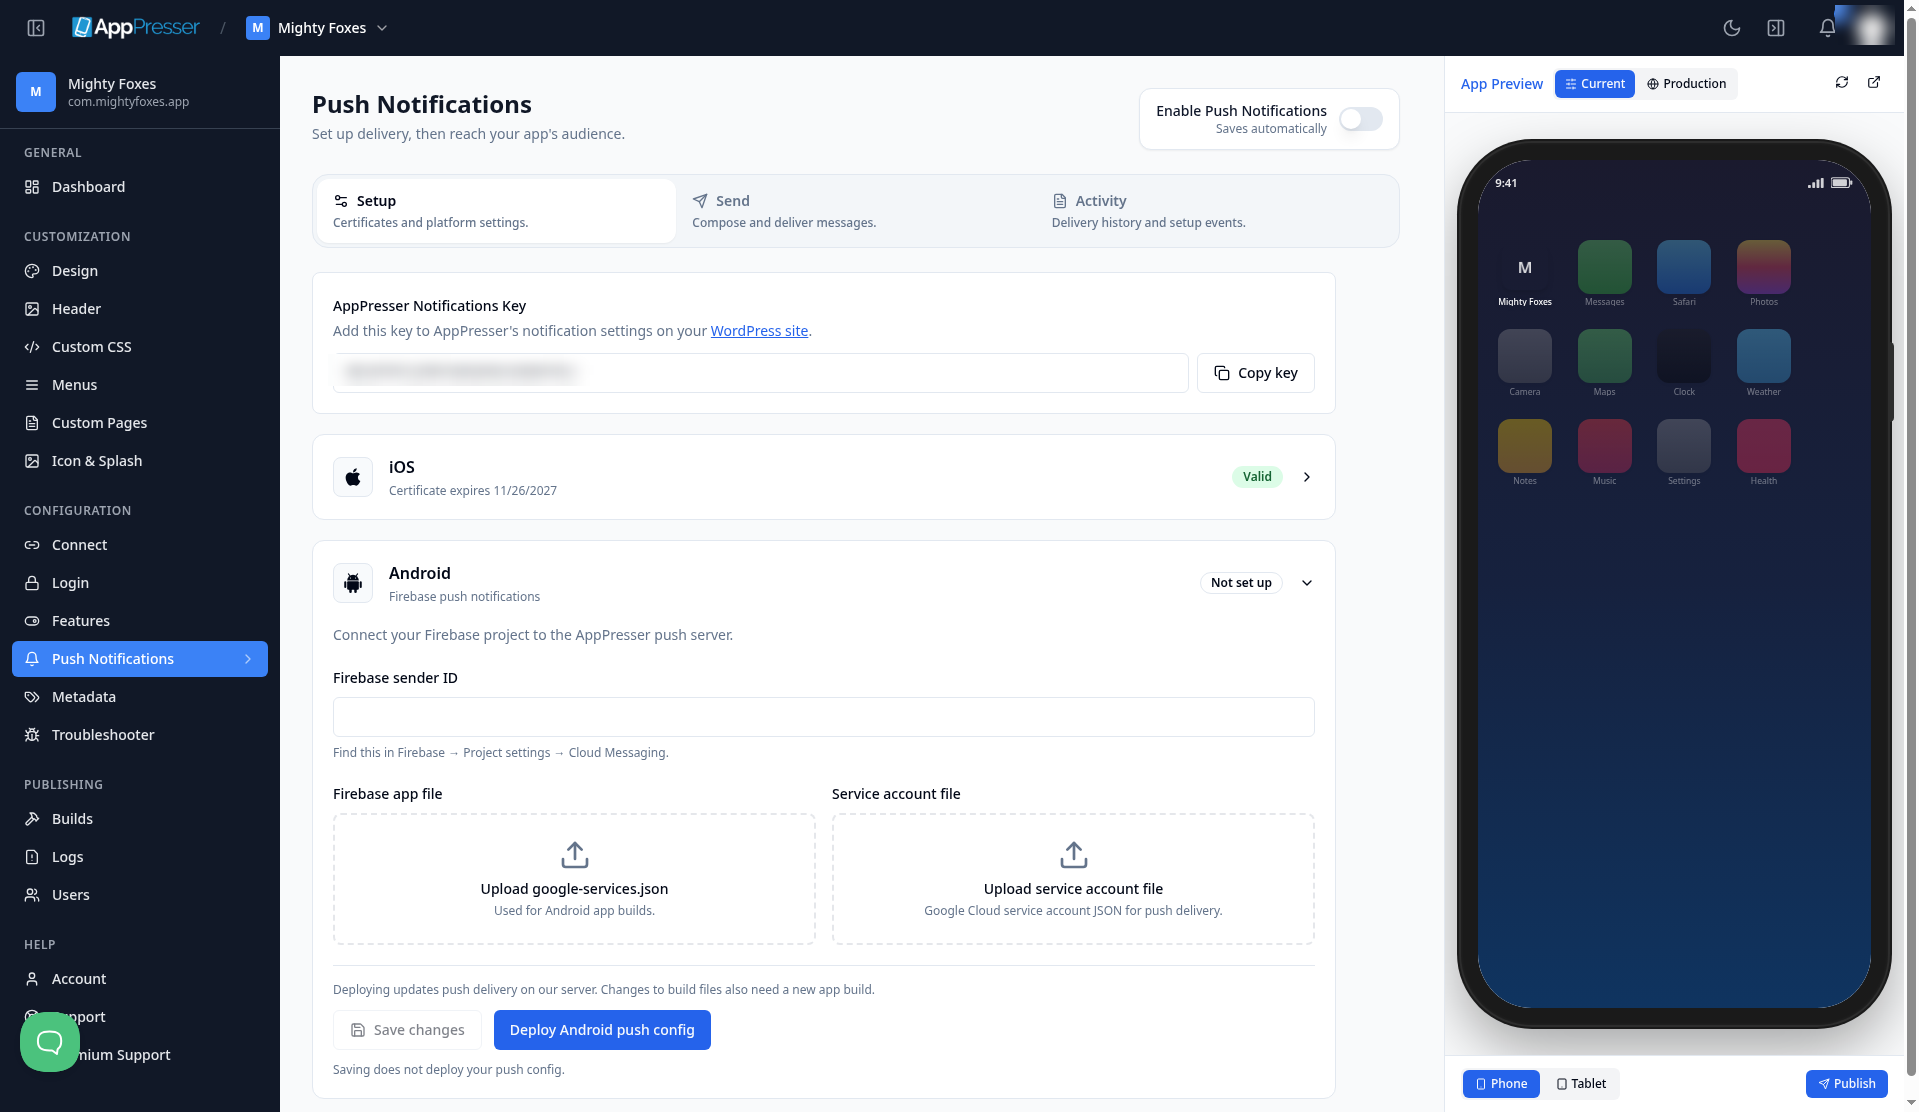
- Click the switch to turn it on. It saves automatically and shows a green message: Push notifications enabled. You can now send messages from the Send tab to people who install your app.
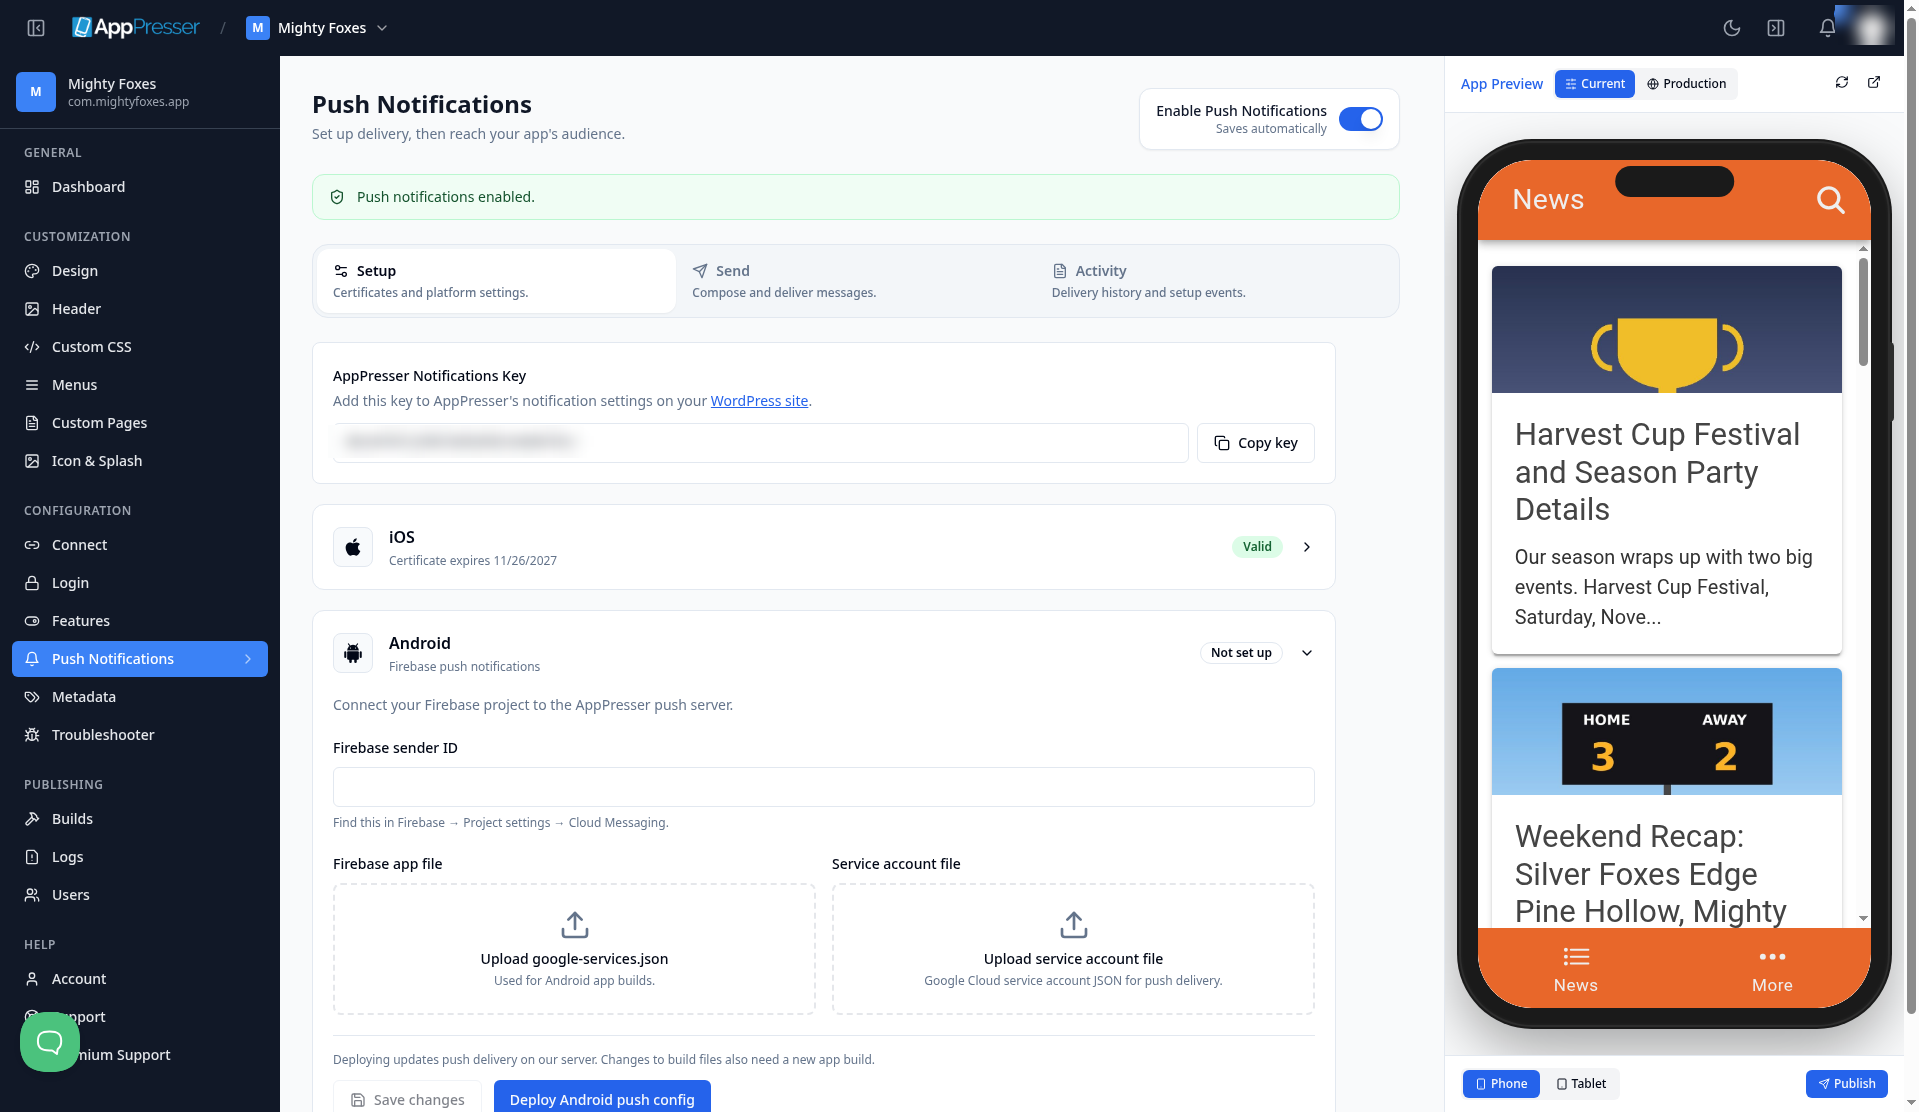
Good to know: The green Valid label on the iOS row means only that your push certificate is good. It can say Valid while push is still turned off, so always check that the Enable Push Notifications switch is on.
Step 11: Send your signing files to AppPresser support
AppPresser support adds your build signing files (the two .p12 files and the three provisioning profiles) to the service that builds your app. Your only job in this step is to get the files to support safely.
What support needs from you:
- Your App Store provisioning profile (.mobileprovision).
- Your Development provisioning profile (.mobileprovision).
- Your Ad Hoc provisioning profile (.mobileprovision). Don't skip this one. Your test (Development) build needs it (see Step 7b).
- Your distribution .p12 file and its password.
- Your development .p12 file and its password.
Careful: Never send a .p12 password in the same email as the .p12 file. Anyone who gets both can sign apps as you. Send the password a different, secure way (support will tell you how), and keep every password in your password manager.
Tell the build service your team and which profiles to use
The build service also needs to know which Apple team your app belongs to and which profile to use for each kind of build. AppPresser support fills this in for you. Send support your Team ID (on the Apple Developer website, under Membership details) and your team name exactly as Apple shows it.
Step 12: Add your Apple ID and app-specific password
To send your finished app to Apple, AppPresser needs your Apple ID (the email you sign in to Apple with) and an app-specific password.
What an app-specific password is: It's a separate password Apple makes for you so another service can sign in as you without ever knowing your real Apple ID password. You can cancel it at any time without changing your normal password.
Make an app-specific password:
- Go to account.apple.com (opens in a new tab) and sign in with the Apple ID that has access to your Apple Developer team.
- Open Sign-In and Security, then App-Specific Passwords.
- Click the plus (+), type a label you'll recognize (for example "AppPresser"), and click Create.
- Copy the password into your password manager right away. Apple shows it only once, in the form xxxx-xxxx-xxxx-xxxx. If you lose it, make a new one.
Good to know: One app-specific password works for every app on your Apple account, so you can reuse it for all your AppPresser apps. Make separate ones only if you want to cancel one service's access without affecting the others.
Add them in AppPresser (free):
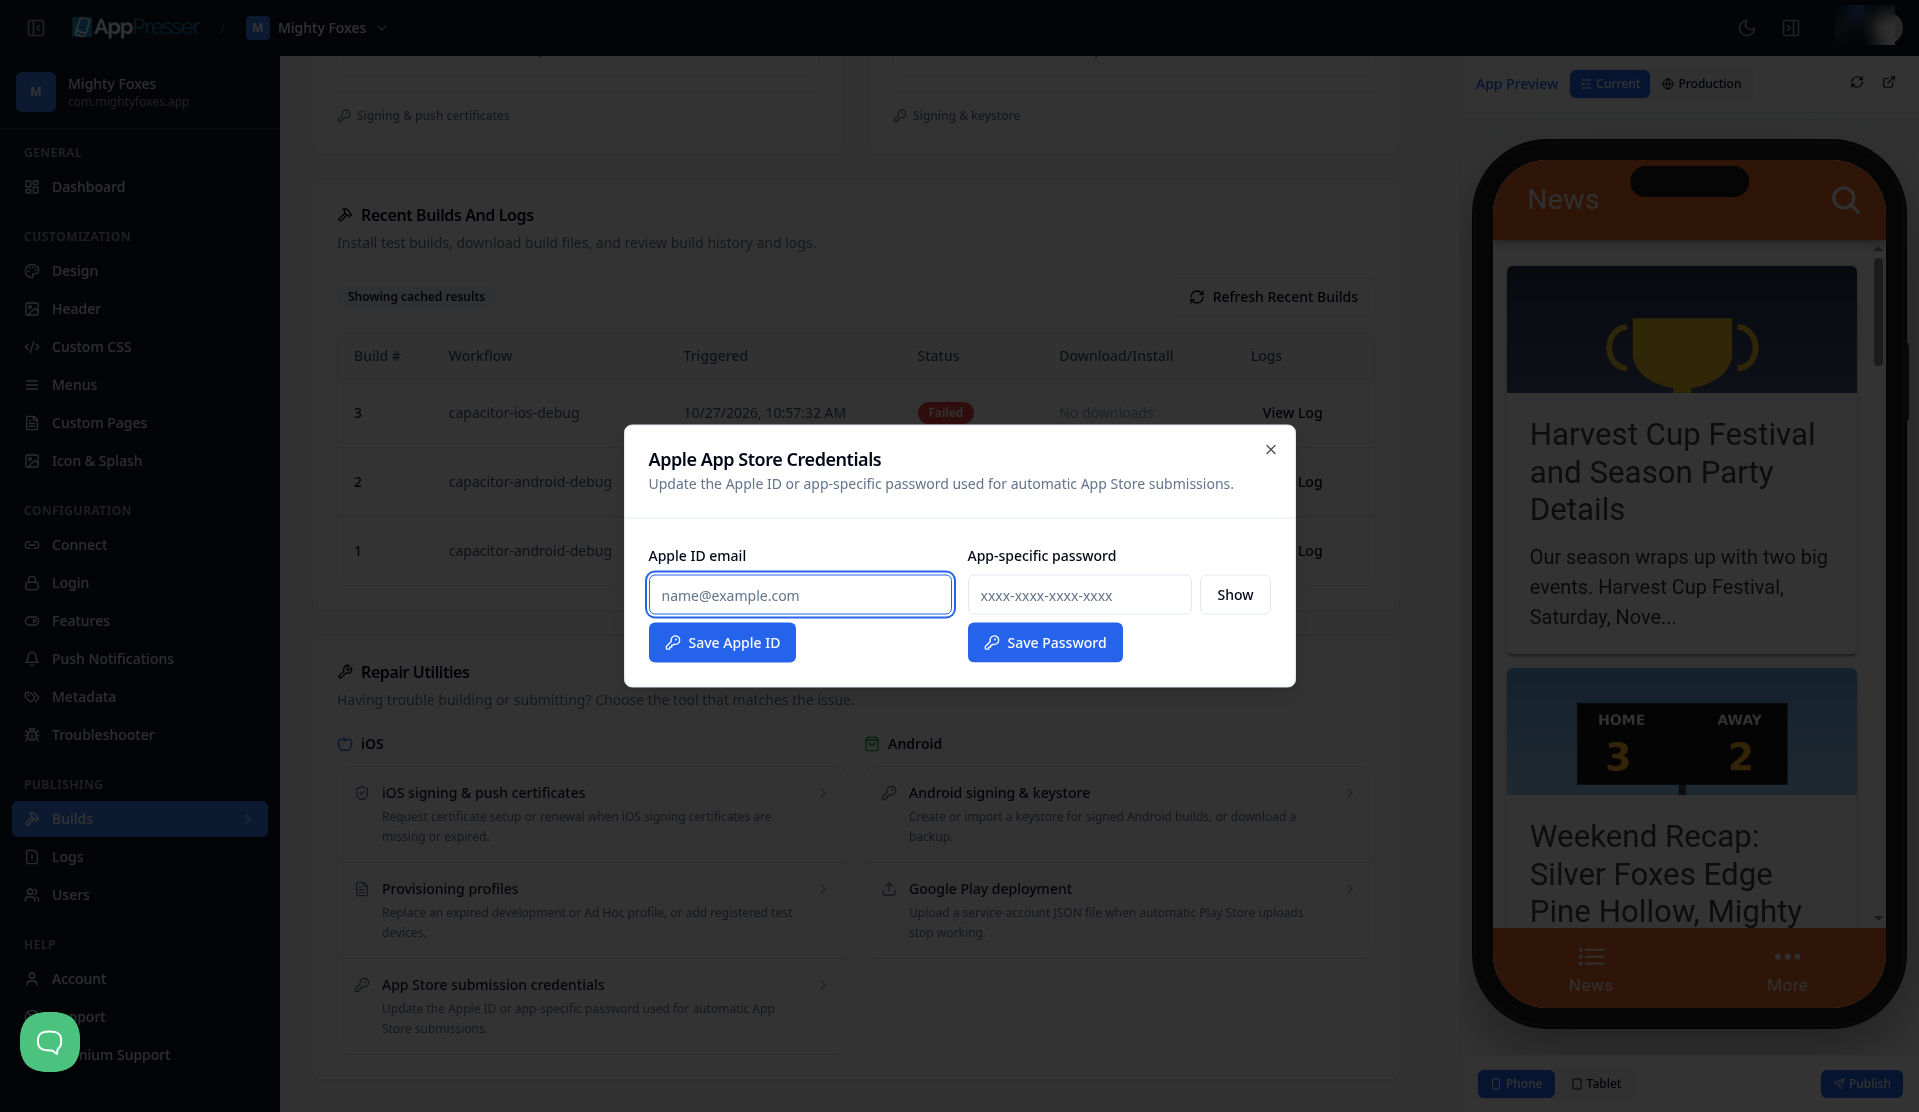
- In the left menu, under Publishing, click Builds, then scroll down to Repair Utilities.
- Under iOS, click App Store submission credentials. The Apple App Store Credentials window opens.
- In Apple ID email, type your full Apple Account email address, then click Save Apple ID. You see Apple credentials updated successfully.
- In App-specific password, paste your app-specific password, then click Save Password. The next validation confirms it saved.
- Close the window.
Important: use your full Apple Account email address. The Apple ID must be the complete email address you sign in to Apple with (for example you@yourcompany.com), not your name, company name or team name. Otherwise validation can still say Ready, but the upload to Apple fails with Your Apple Account or password was entered incorrectly. Each field has its own save button, so click both.
Step 13: Validate your iOS setup
Validation checks that everything your iOS builds need is in place before you start one.
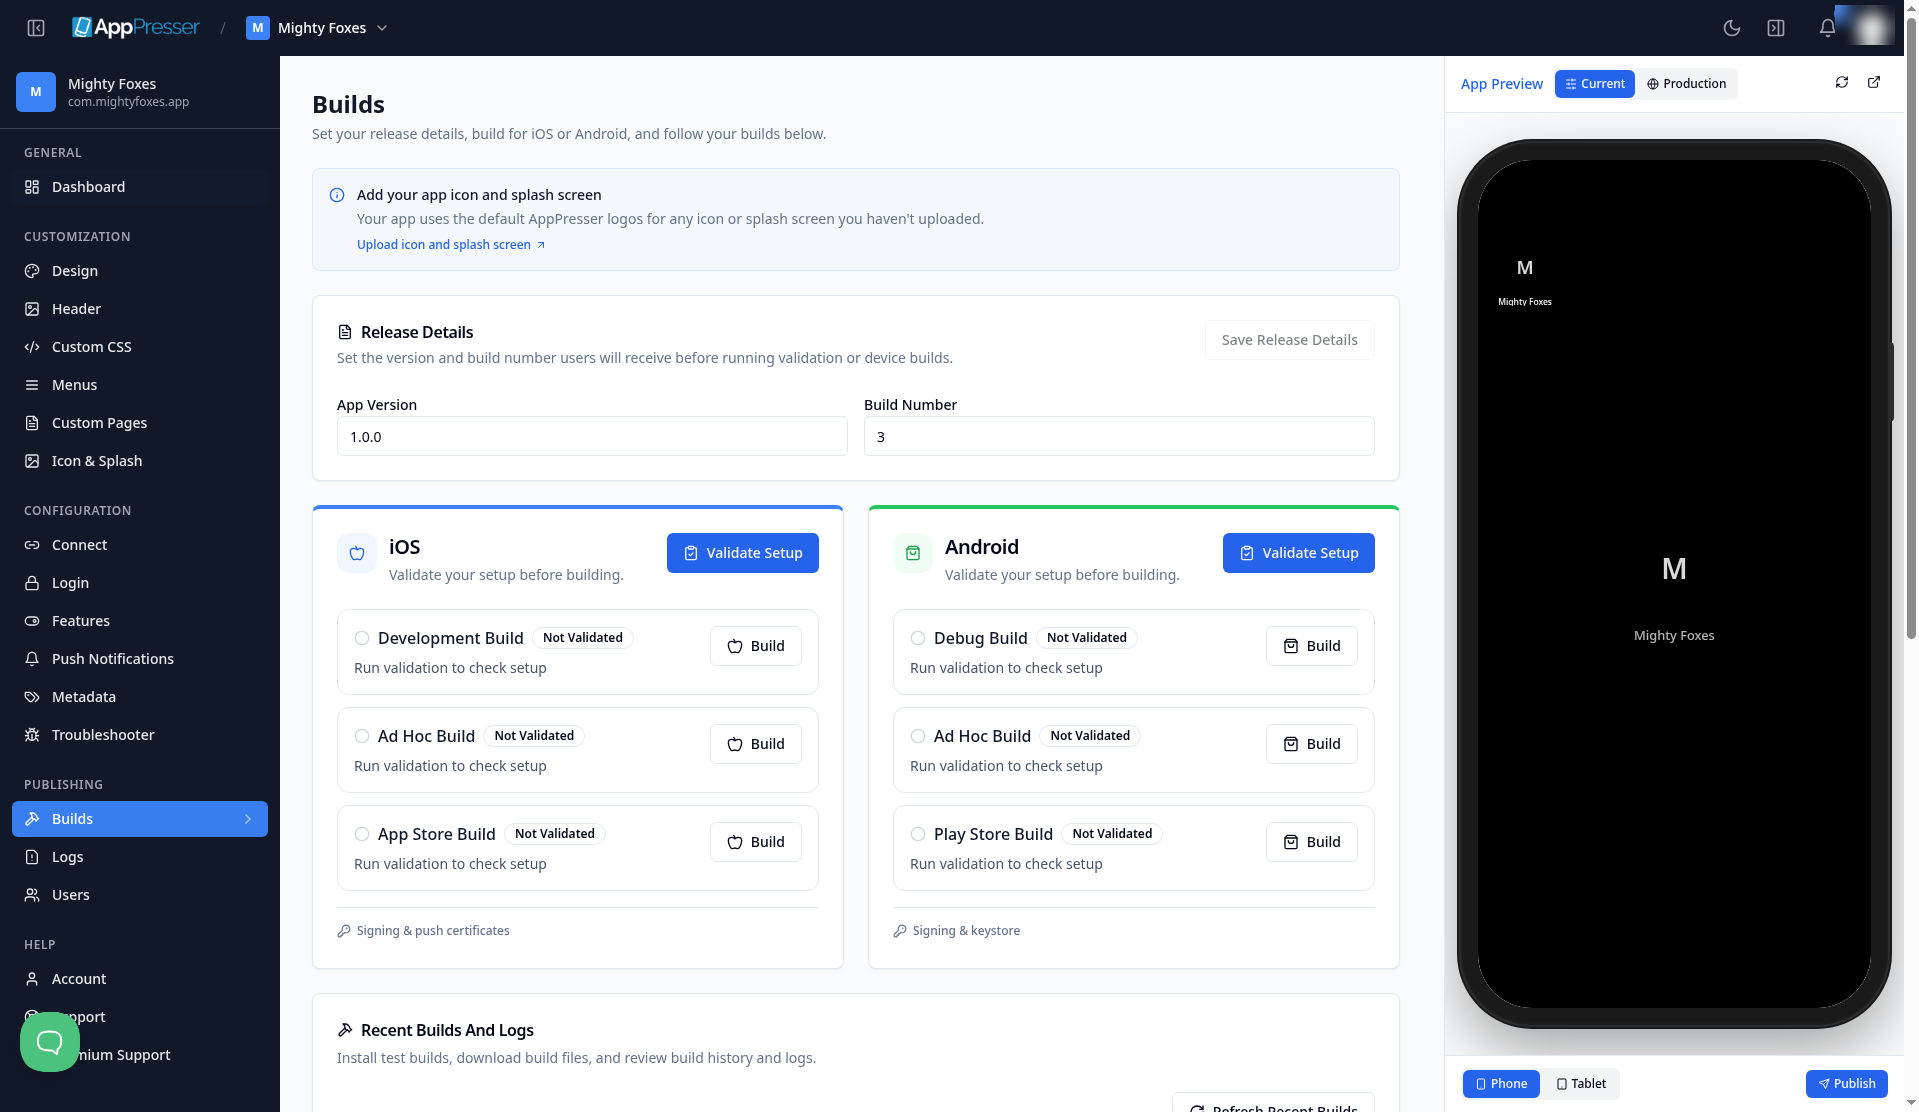
- In the left menu, under Publishing, click Builds. On the iOS card, all three builds say Not Validated.
Click Validate Setup.
If something is still missing, a window called iOS App Signing and Push Certificates may open by itself. It shows a yellow Validation needs attention box listing what's missing, plus a form to ask the AppPresser team to set up your certificates for you. You can close this window if you've already sent your files to support.
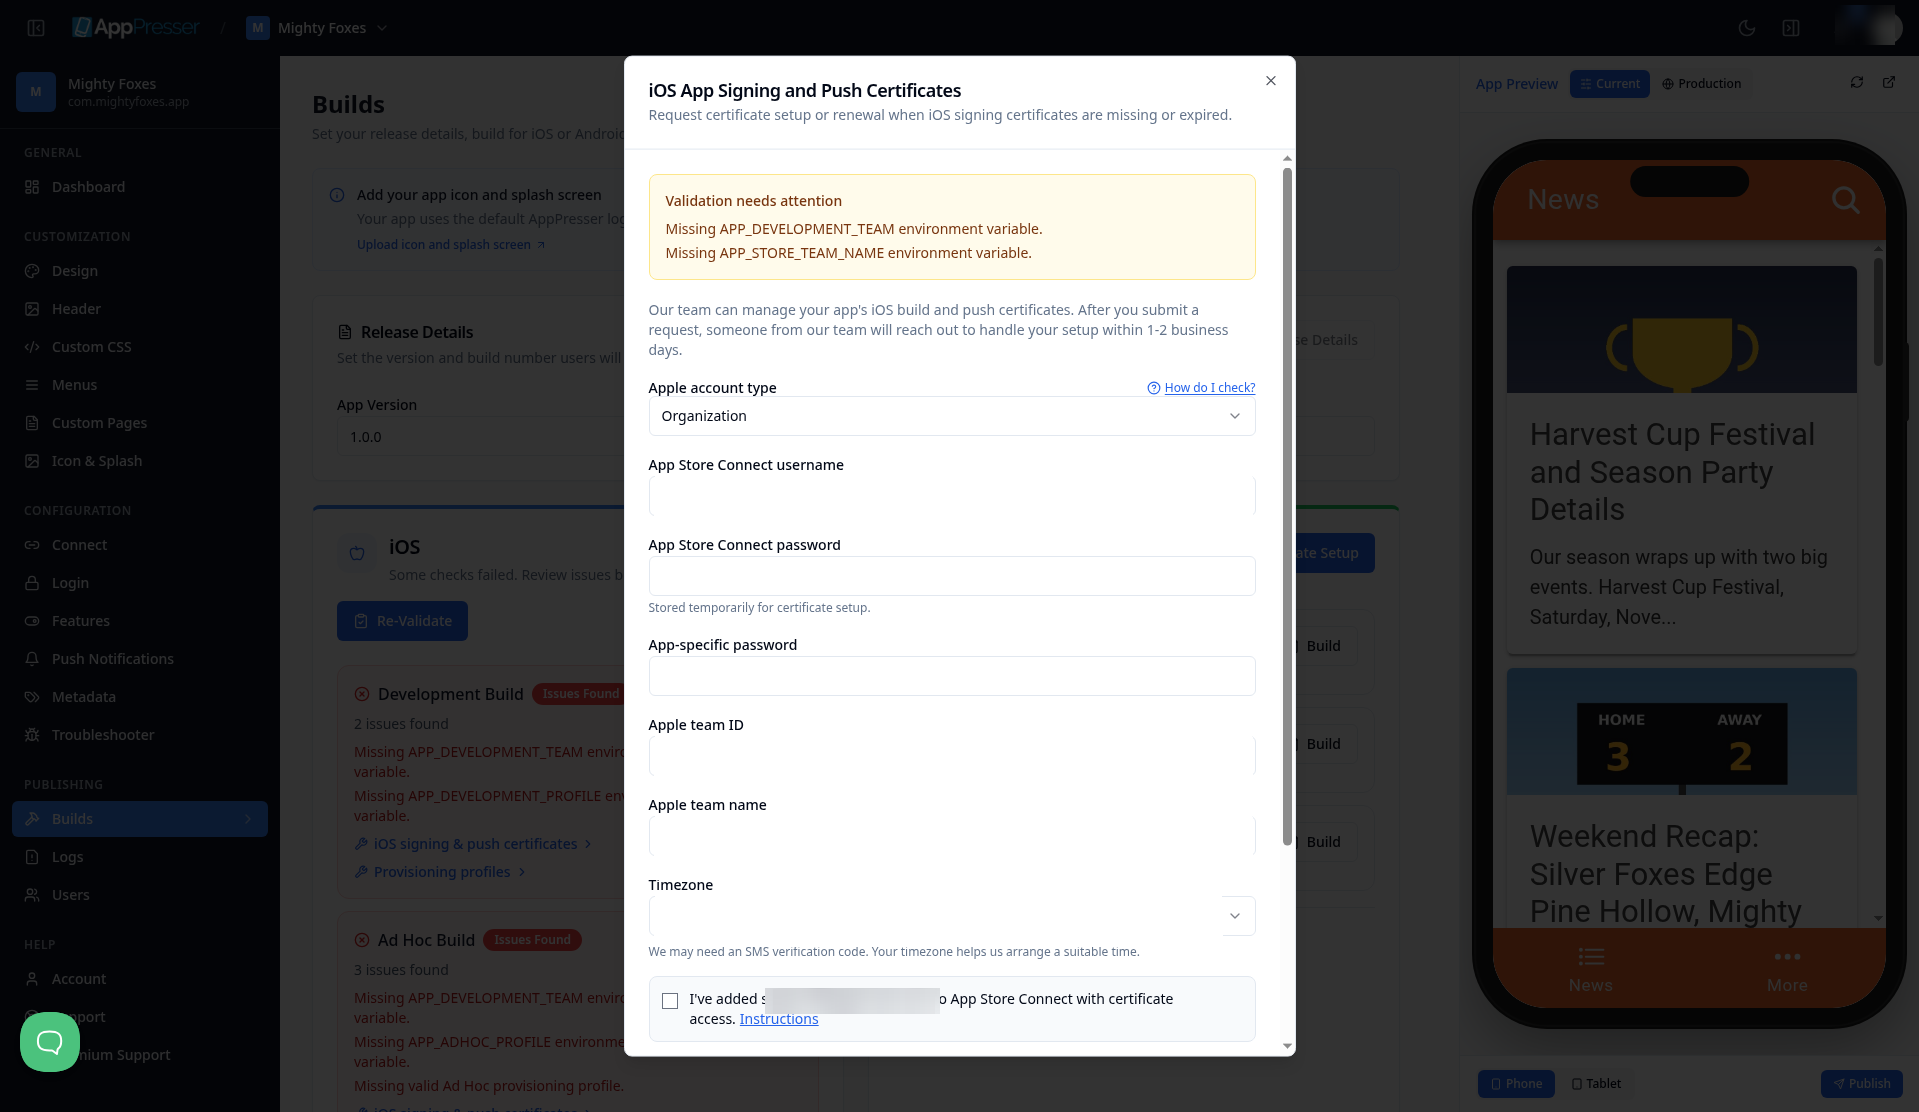
The window may open after a failed check, listing what is missing. Blanked fields appear empty. If you validate before support has finished Step 11 (or before you've done Step 12), the iOS card says Some checks failed. Review issues before building. and every build shows Issues Found. That's normal at this point. Wait for support to tell you Step 11 is done, finish Step 12, then click Re-Validate.
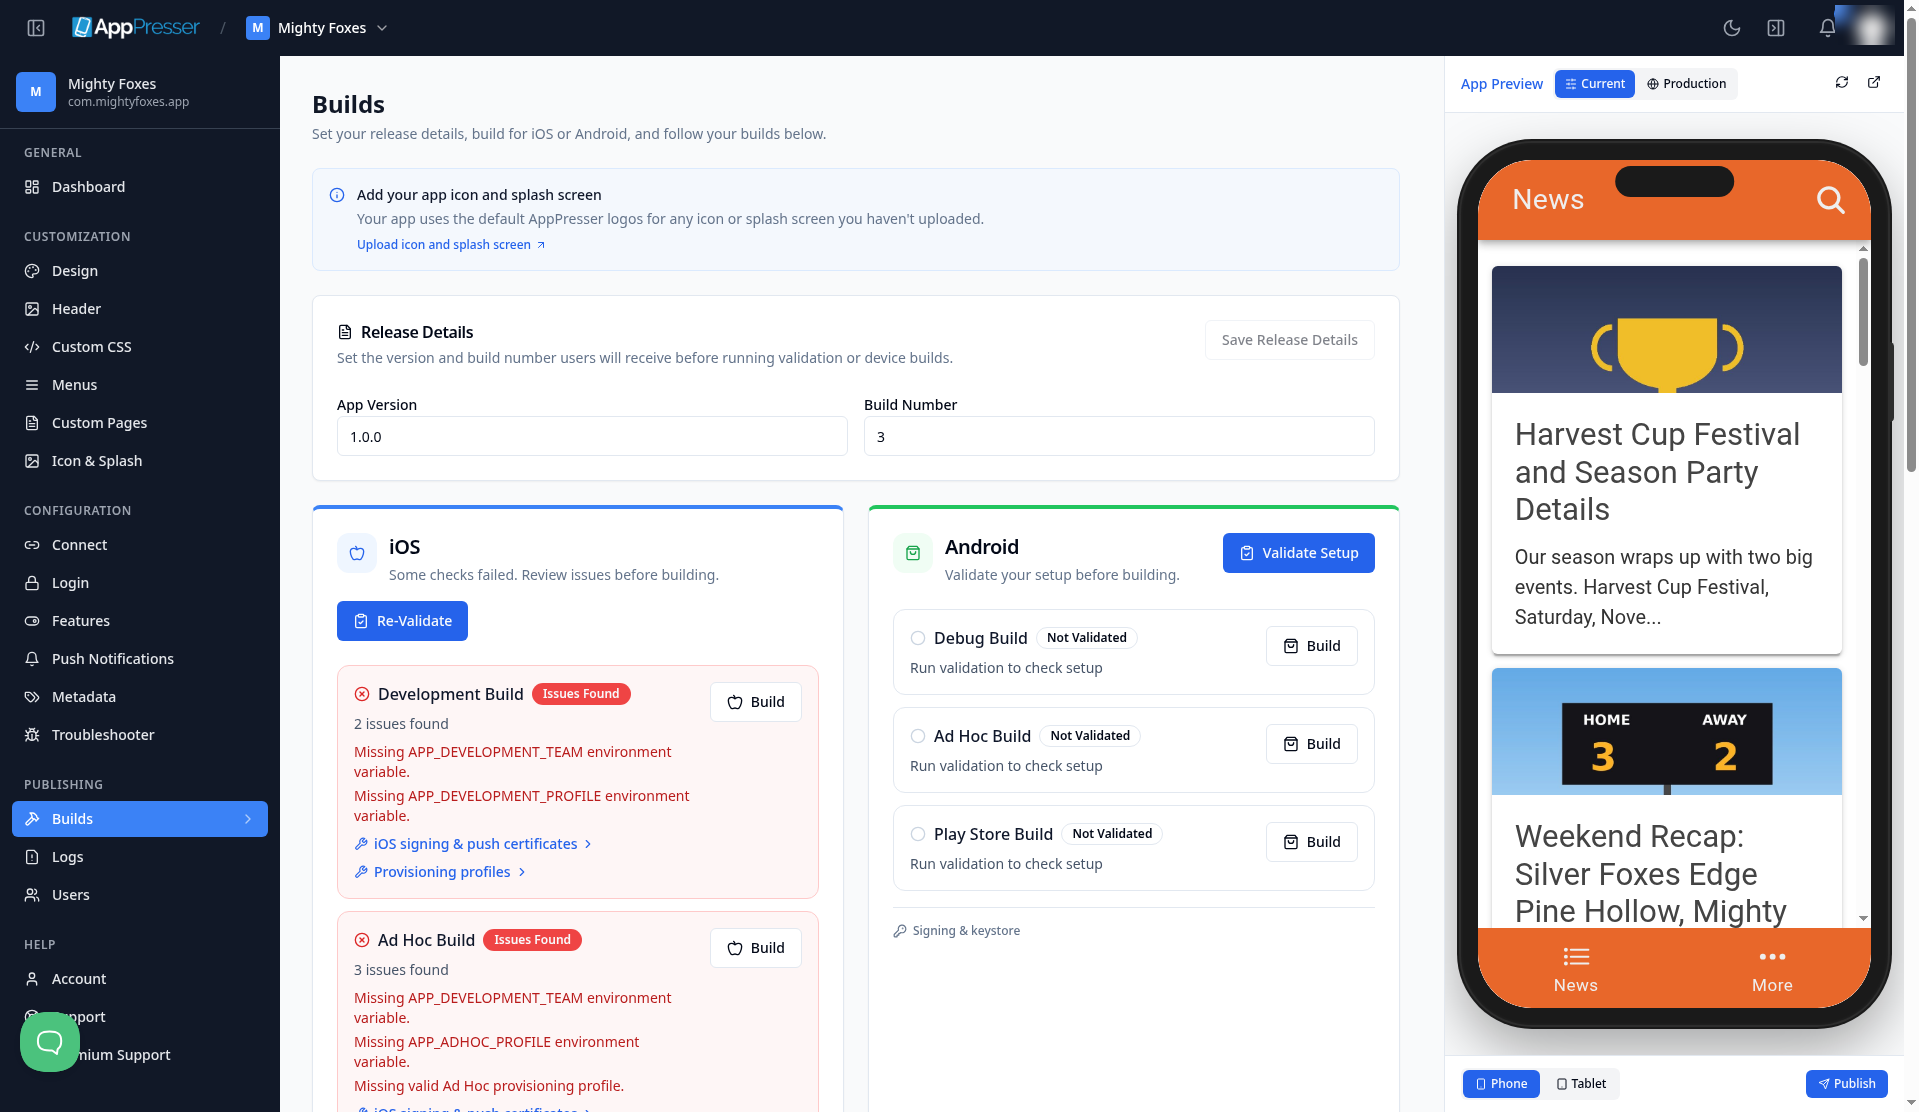
- After Steps 11 and 12 are done, click Re-Validate. The table below shows what you should see.
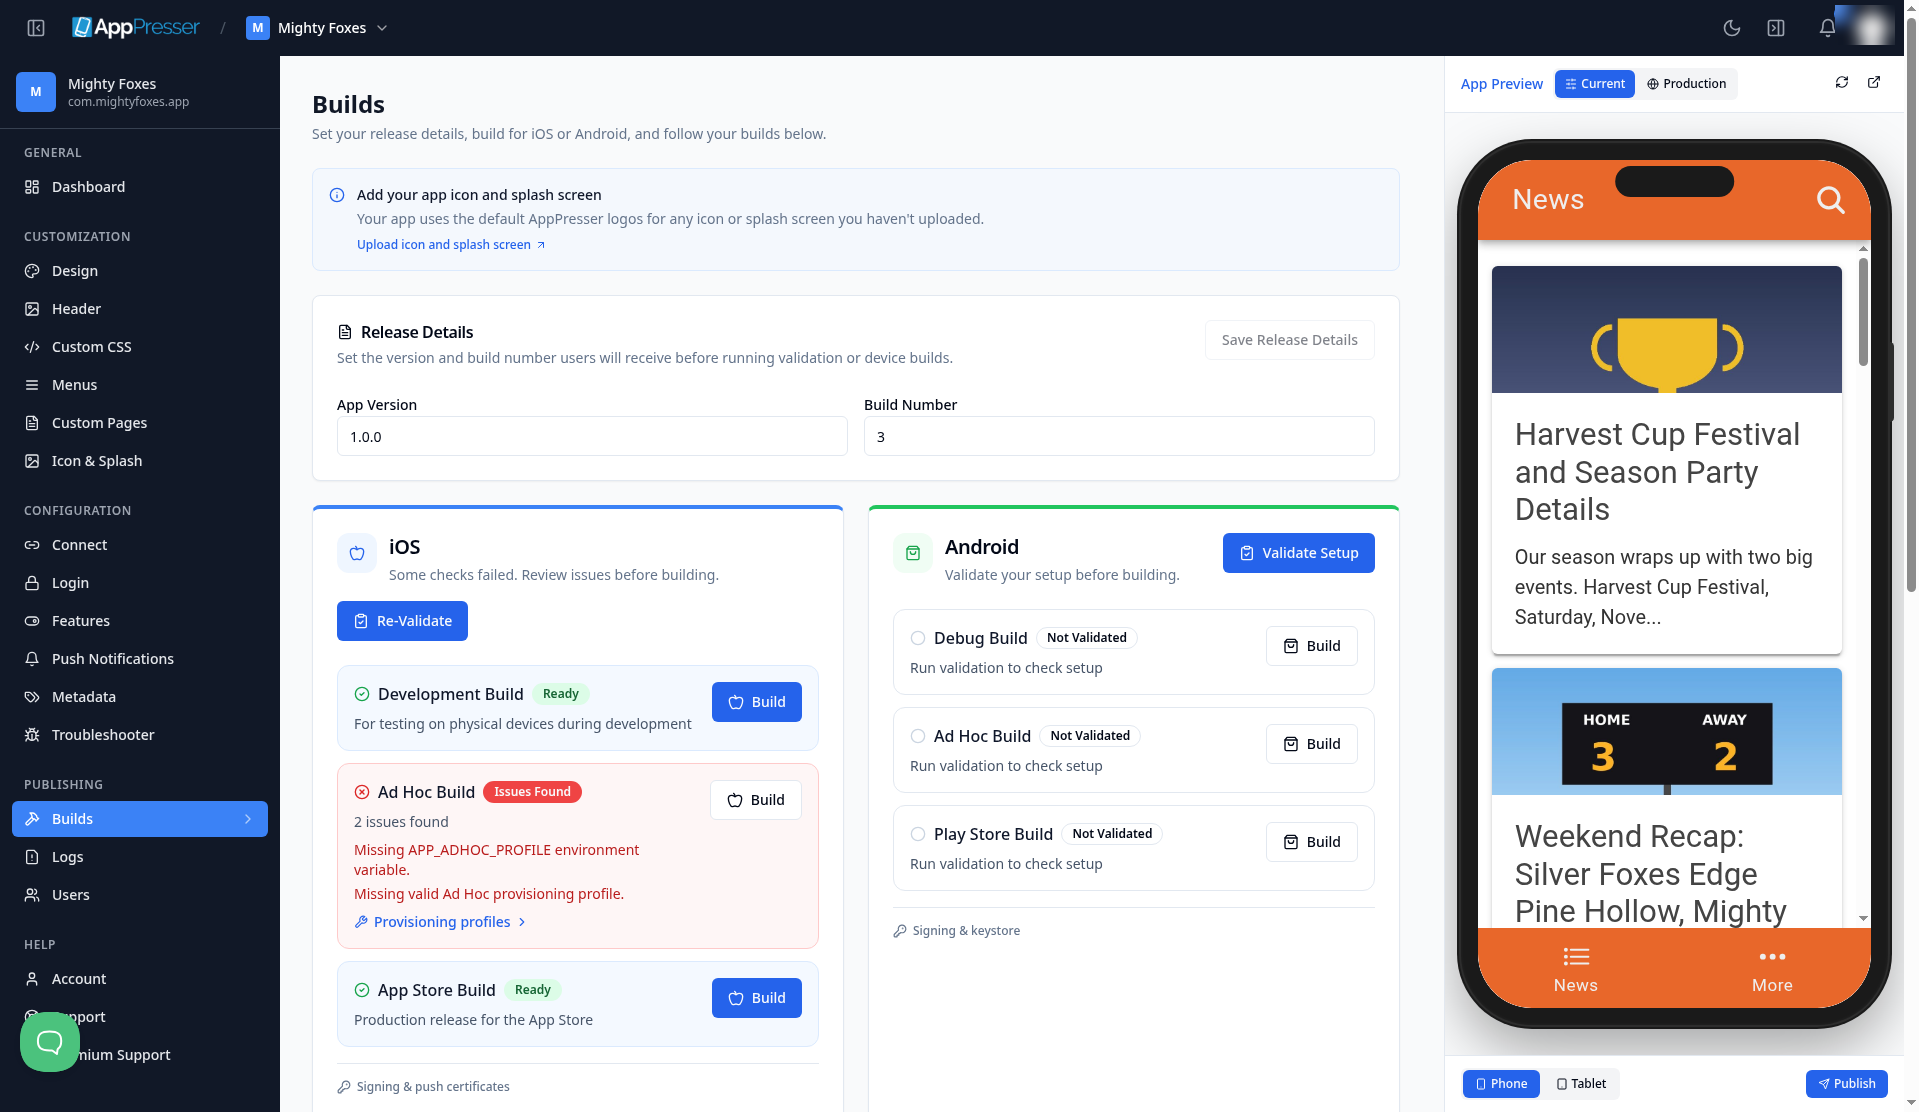
Swipe sideways to see the rest of this table.
| Build | Result | What it means |
|---|---|---|
| Development | Ready | You can build a test version and put it on your own registered iPhones. |
| App Store | Ready | You can build the version for TestFlight and the App Store. |
| Ad Hoc | Ready once your Ad Hoc profile is in place. Without one, Issues Found (2) | AppPresser labels this build optional. It's for sharing test builds with specific phones without the App Store. Don't skip the Ad Hoc profile: your Development build needs it too (see Step 7b). |
If Ad Hoc says Issues Found, make sure you did Step 7b and that support has your Ad Hoc profile. Development can say Ready without it, but the Development build still needs it.
If App Store says "Missing valid App Store provisioning profile", check that your App Store profile's name contains AppStore with no space (see Step 6). If it says your Apple ID or app-specific password is missing, go back to Step 12 and make sure you clicked both save buttons.
Validation checks that an Apple ID is saved, not that it is a real email address. Before you build, open App Store submission credentials again and check that the Apple ID is your full Apple Account email (for example you@yourcompany.com).
Step 14: Start your App Store build for TestFlight
The App Store build is the version of your app that goes to TestFlight and, later, the App Store. It's different from the Development build. A Development build only installs on the iPhones you registered in Step 7. The App Store build is the one Apple accepts for TestFlight testers and for review.
Before you start, make sure Step 13 shows App Store Build as Ready, then check these three things.
Check your Apple ID
In Builds, under Repair Utilities, open App Store submission credentials. The Apple ID must be the full email address of your Apple Account (for example you@yourcompany.com), not a name or team name. Otherwise the upload fails with Your Apple Account or password was entered incorrectly.
Create your app in App Store Connect
Apple accepts a build only for an app it already knows about. Do this once per app:
- Sign in to App Store Connect (opens in a new tab) and click Apps.
- Click the plus (+) next to Apps and choose New App.
- Under Platforms, check iOS.
- Type your app's Name (the name people see on the App Store) and choose a Primary Language, for example English (U.S.).
- Choose your app's Bundle ID from the list (the one you registered in Step 1).
- Type a SKU, any short code of your own, for example yourapp-ios.
- Under User Access, choose Full Access.
- Click Create.
If you skip this, the upload fails with Could not determine provider public id from Bundle ID.
Make sure your Apple agreements are Active
In App Store Connect, open Business (Apple's Agreements, Tax, and Banking area). The Free Apps agreement must show Active, and so must the Paid Apps agreement if your app or its in-app purchases cost money. Only the Account Holder can accept them.
Start the build
- In the left menu, under Publishing, click Builds.
- On the iOS card, find App Store Build and click its Build button once. No confirmation window appears, so don't click again.
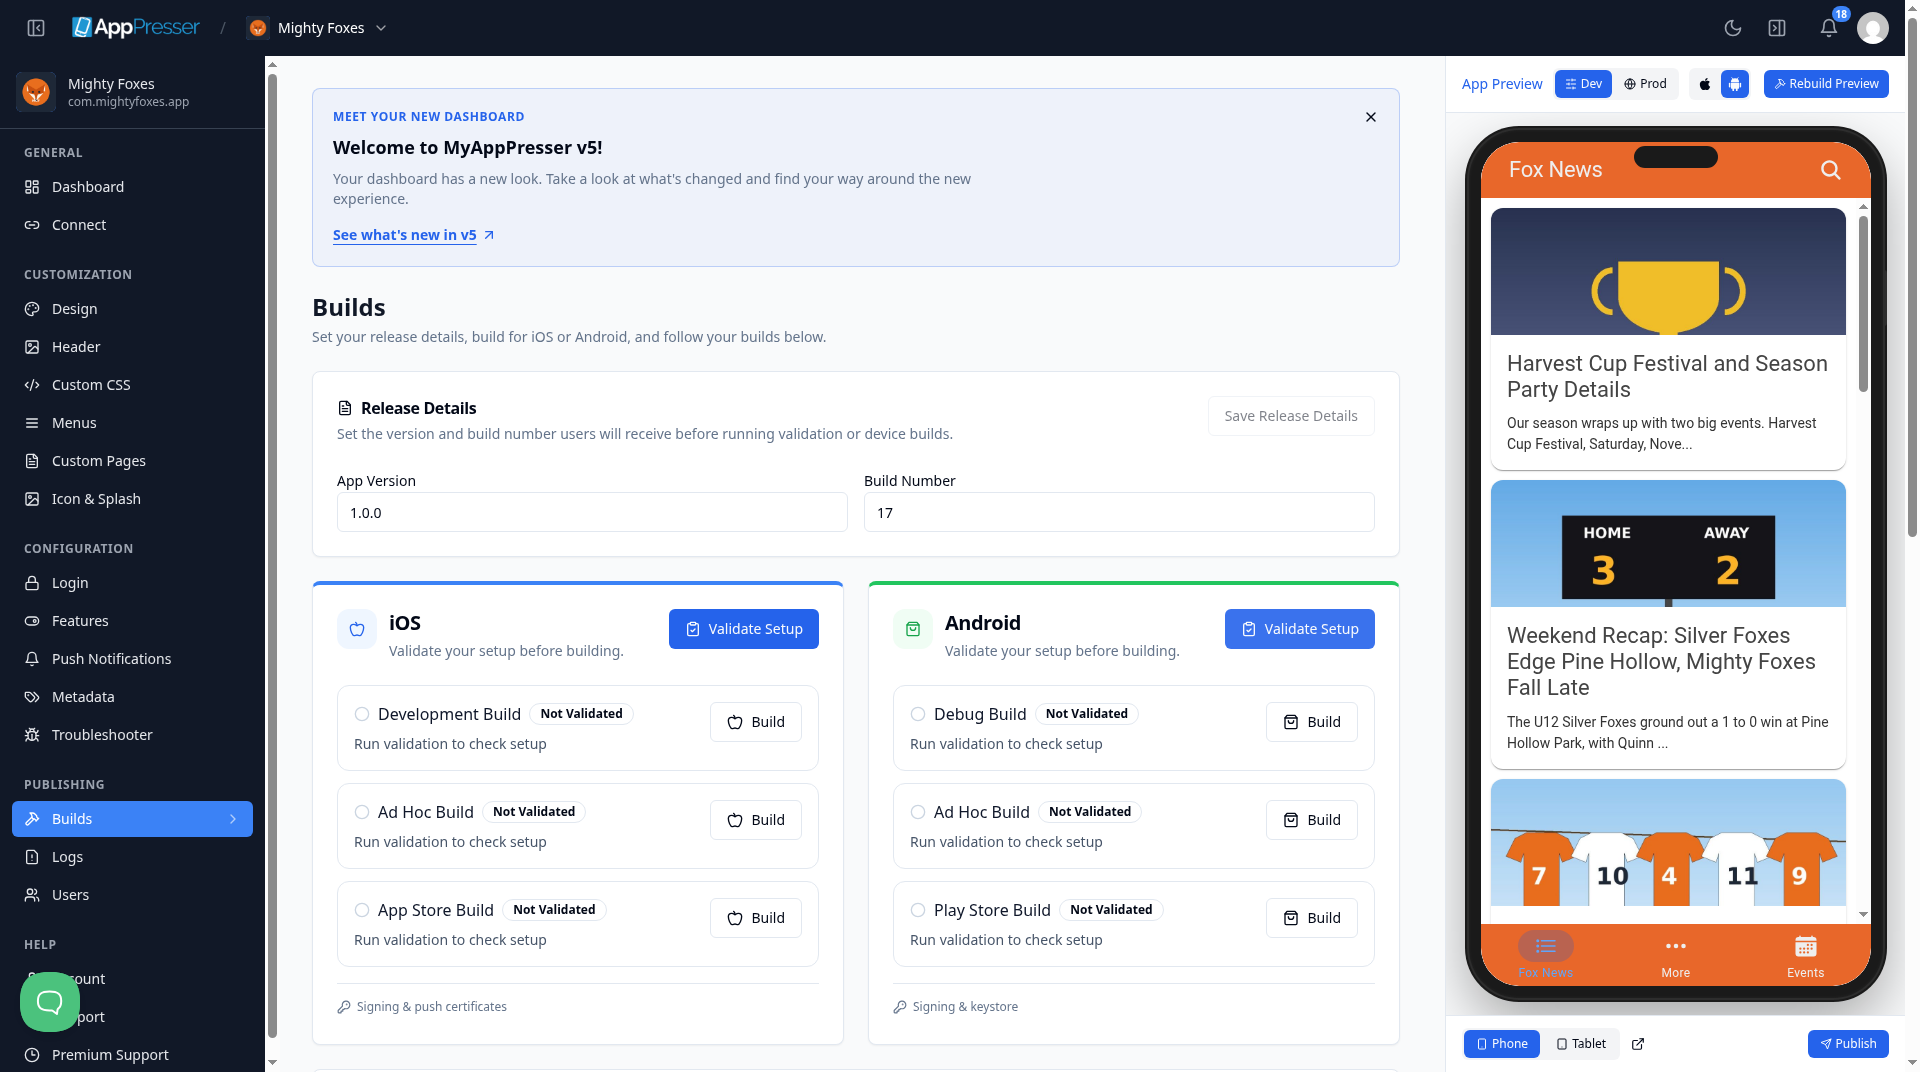
This example shows the Builds screen before validation, with every row marked Not Validated. Click Build after App Store Build shows Ready (see Step 13).
Scroll down to Recent Builds And Logs. You see the message Build started. Follow its progress below. and your new build at the top of the list, with the workflow capacitor-ios-app-store and the status In Progress.
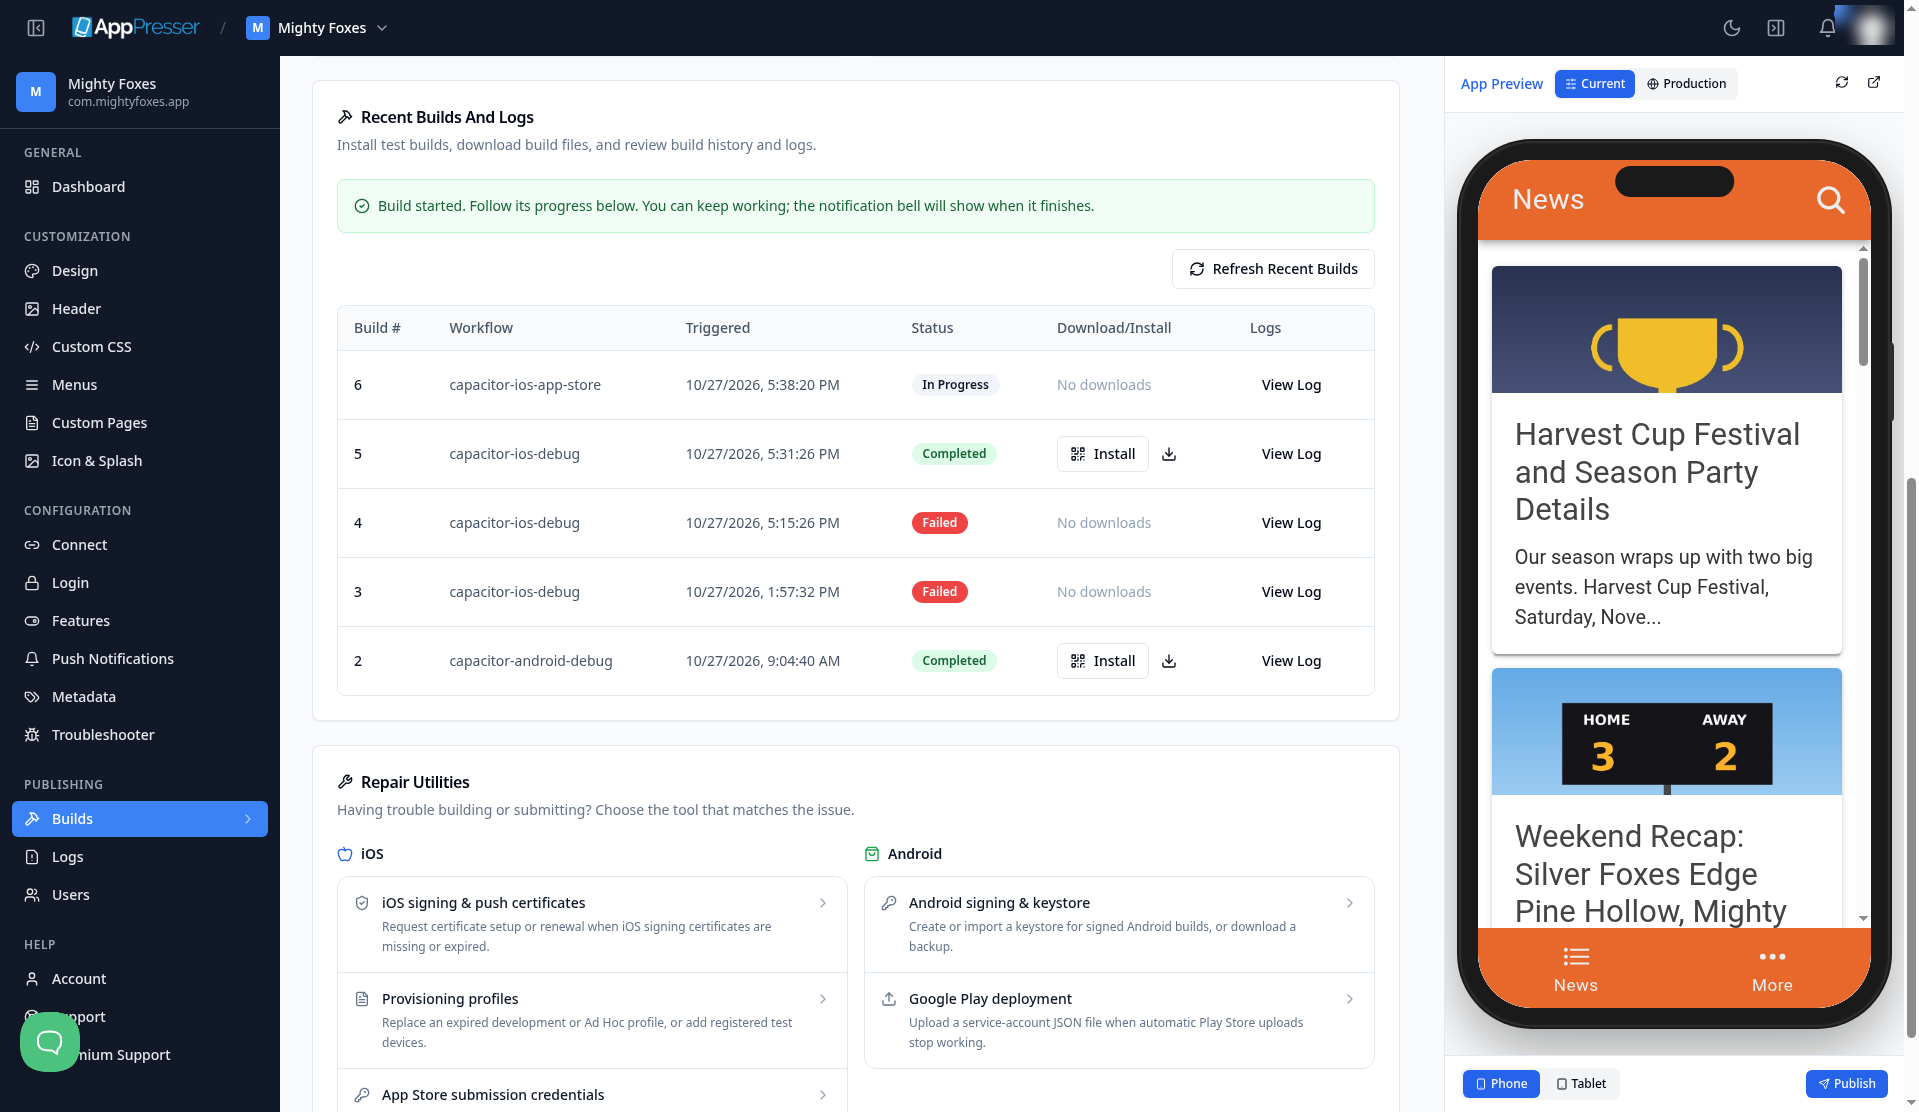
- Wait several minutes. You can keep working. The notification bell shows when the build finishes.
- To check on it, click Refresh Recent Builds. The page may show Showing cached results for a moment before the latest status loads.
When the build finishes, the status changes to one of these:
- Completed: Your App Store build was built and uploaded to Apple. After Apple finishes processing it (often 5 to 30 minutes), it appears in App Store Connect under Apps > your app > TestFlight. Apple emails the account when processing is done. Step 15 shows how to get it onto your iPhone.
- Failed: The row shows Failed and the Download/Install column says No downloads. Nothing was sent to Apple.
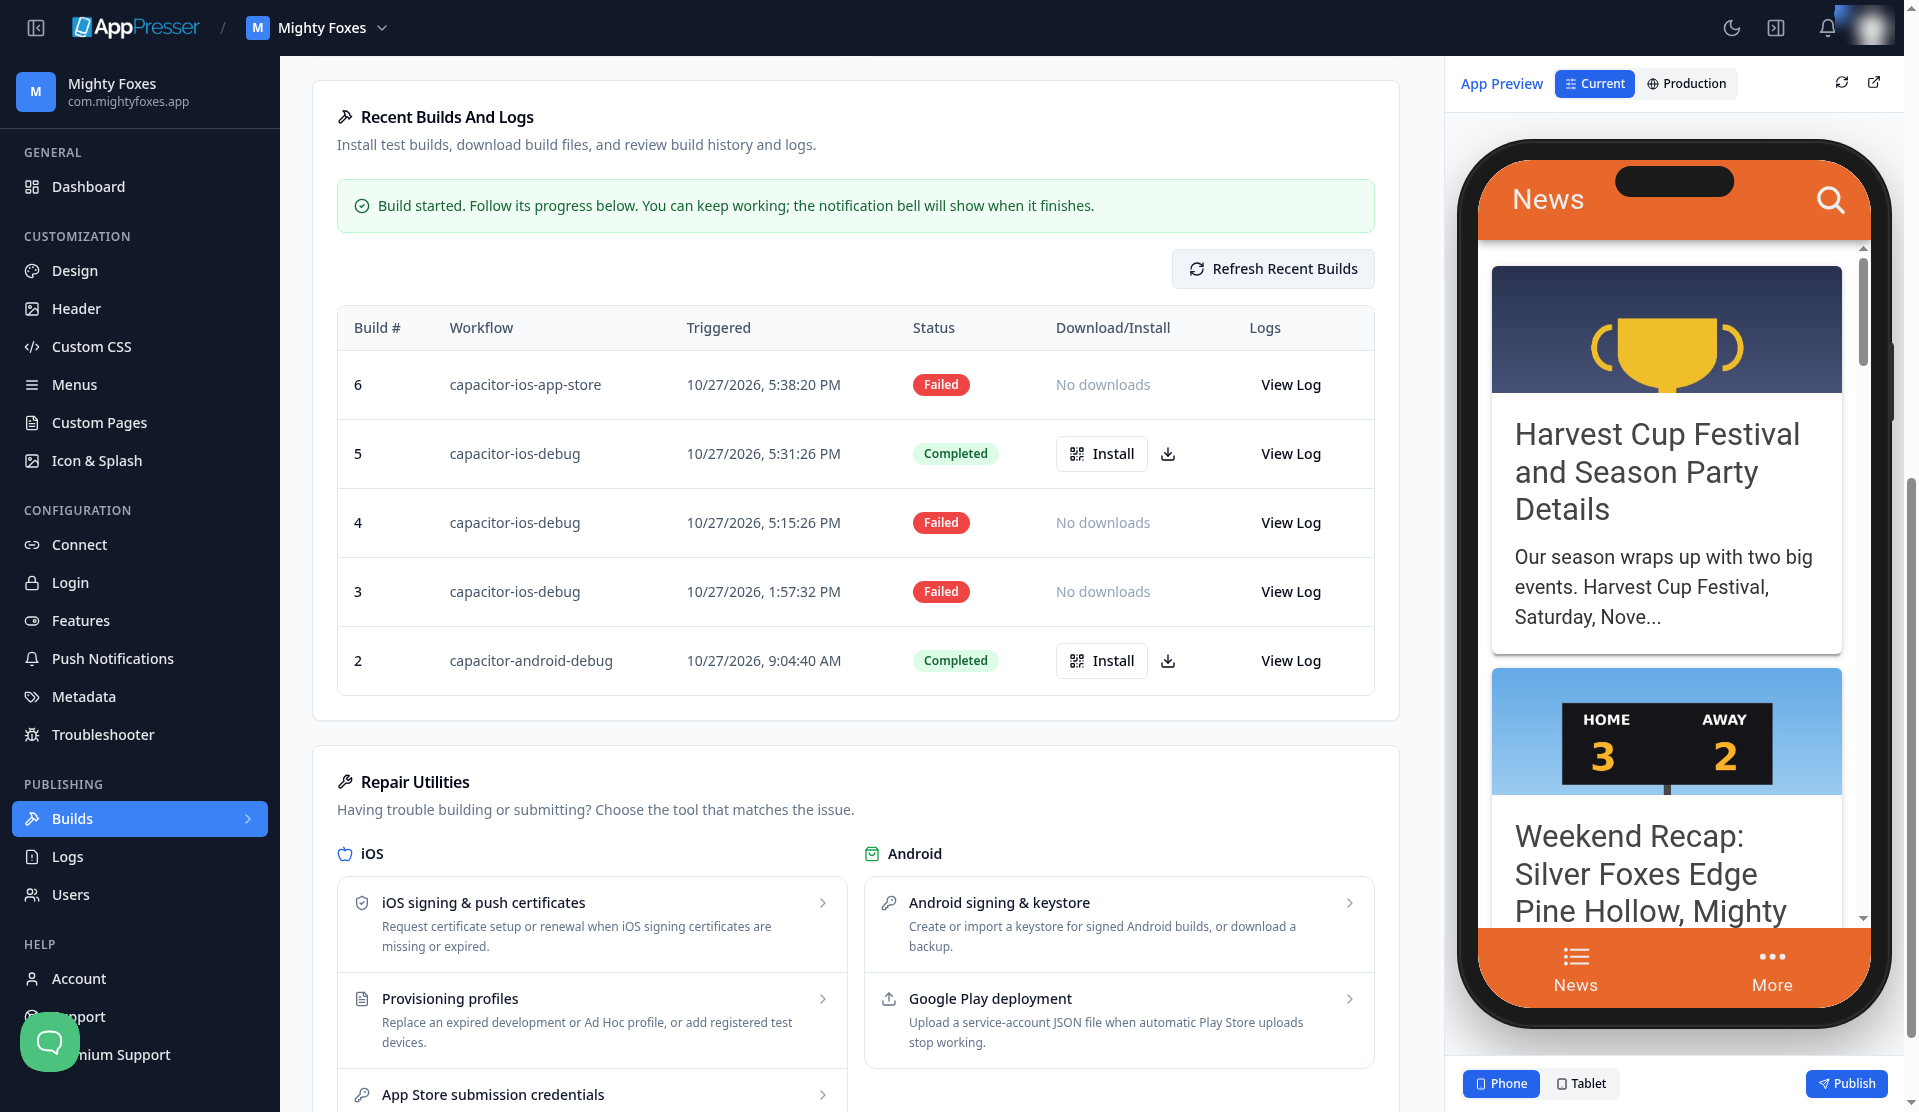
If the build failed, click View Log on that row. A Build Log window opens with every step in the build and how long each one took. Scroll through the steps to find the one that failed. The banner at the top may say No common issues detected even when a step failed, so always check the steps themselves. Close the window with the X in the top corner.
If you can't tell what went wrong, send the build number and a screenshot of the Build Log to support. See "What if something goes wrong?" below for common App Store build errors.
Step 15: Install your app with TestFlight
TestFlight is Apple's free app for trying your app on a real iPhone before it's on the App Store. Your App Store build from Step 14 goes there. It won't show up in the TestFlight app until two things are true: Apple has finished processing the build, and you've been added as a tester in a testing group. This step does both.
Wait for Apple to finish processing your build
After your App Store build shows Completed, Apple checks and processes it. This often takes 5 to 30 minutes. When it's done, the account gets an email from App Store Connect with a subject like App Store Connect: Version 1.0.0 (8) for Your App has completed processing. The email lists the version number and build number.
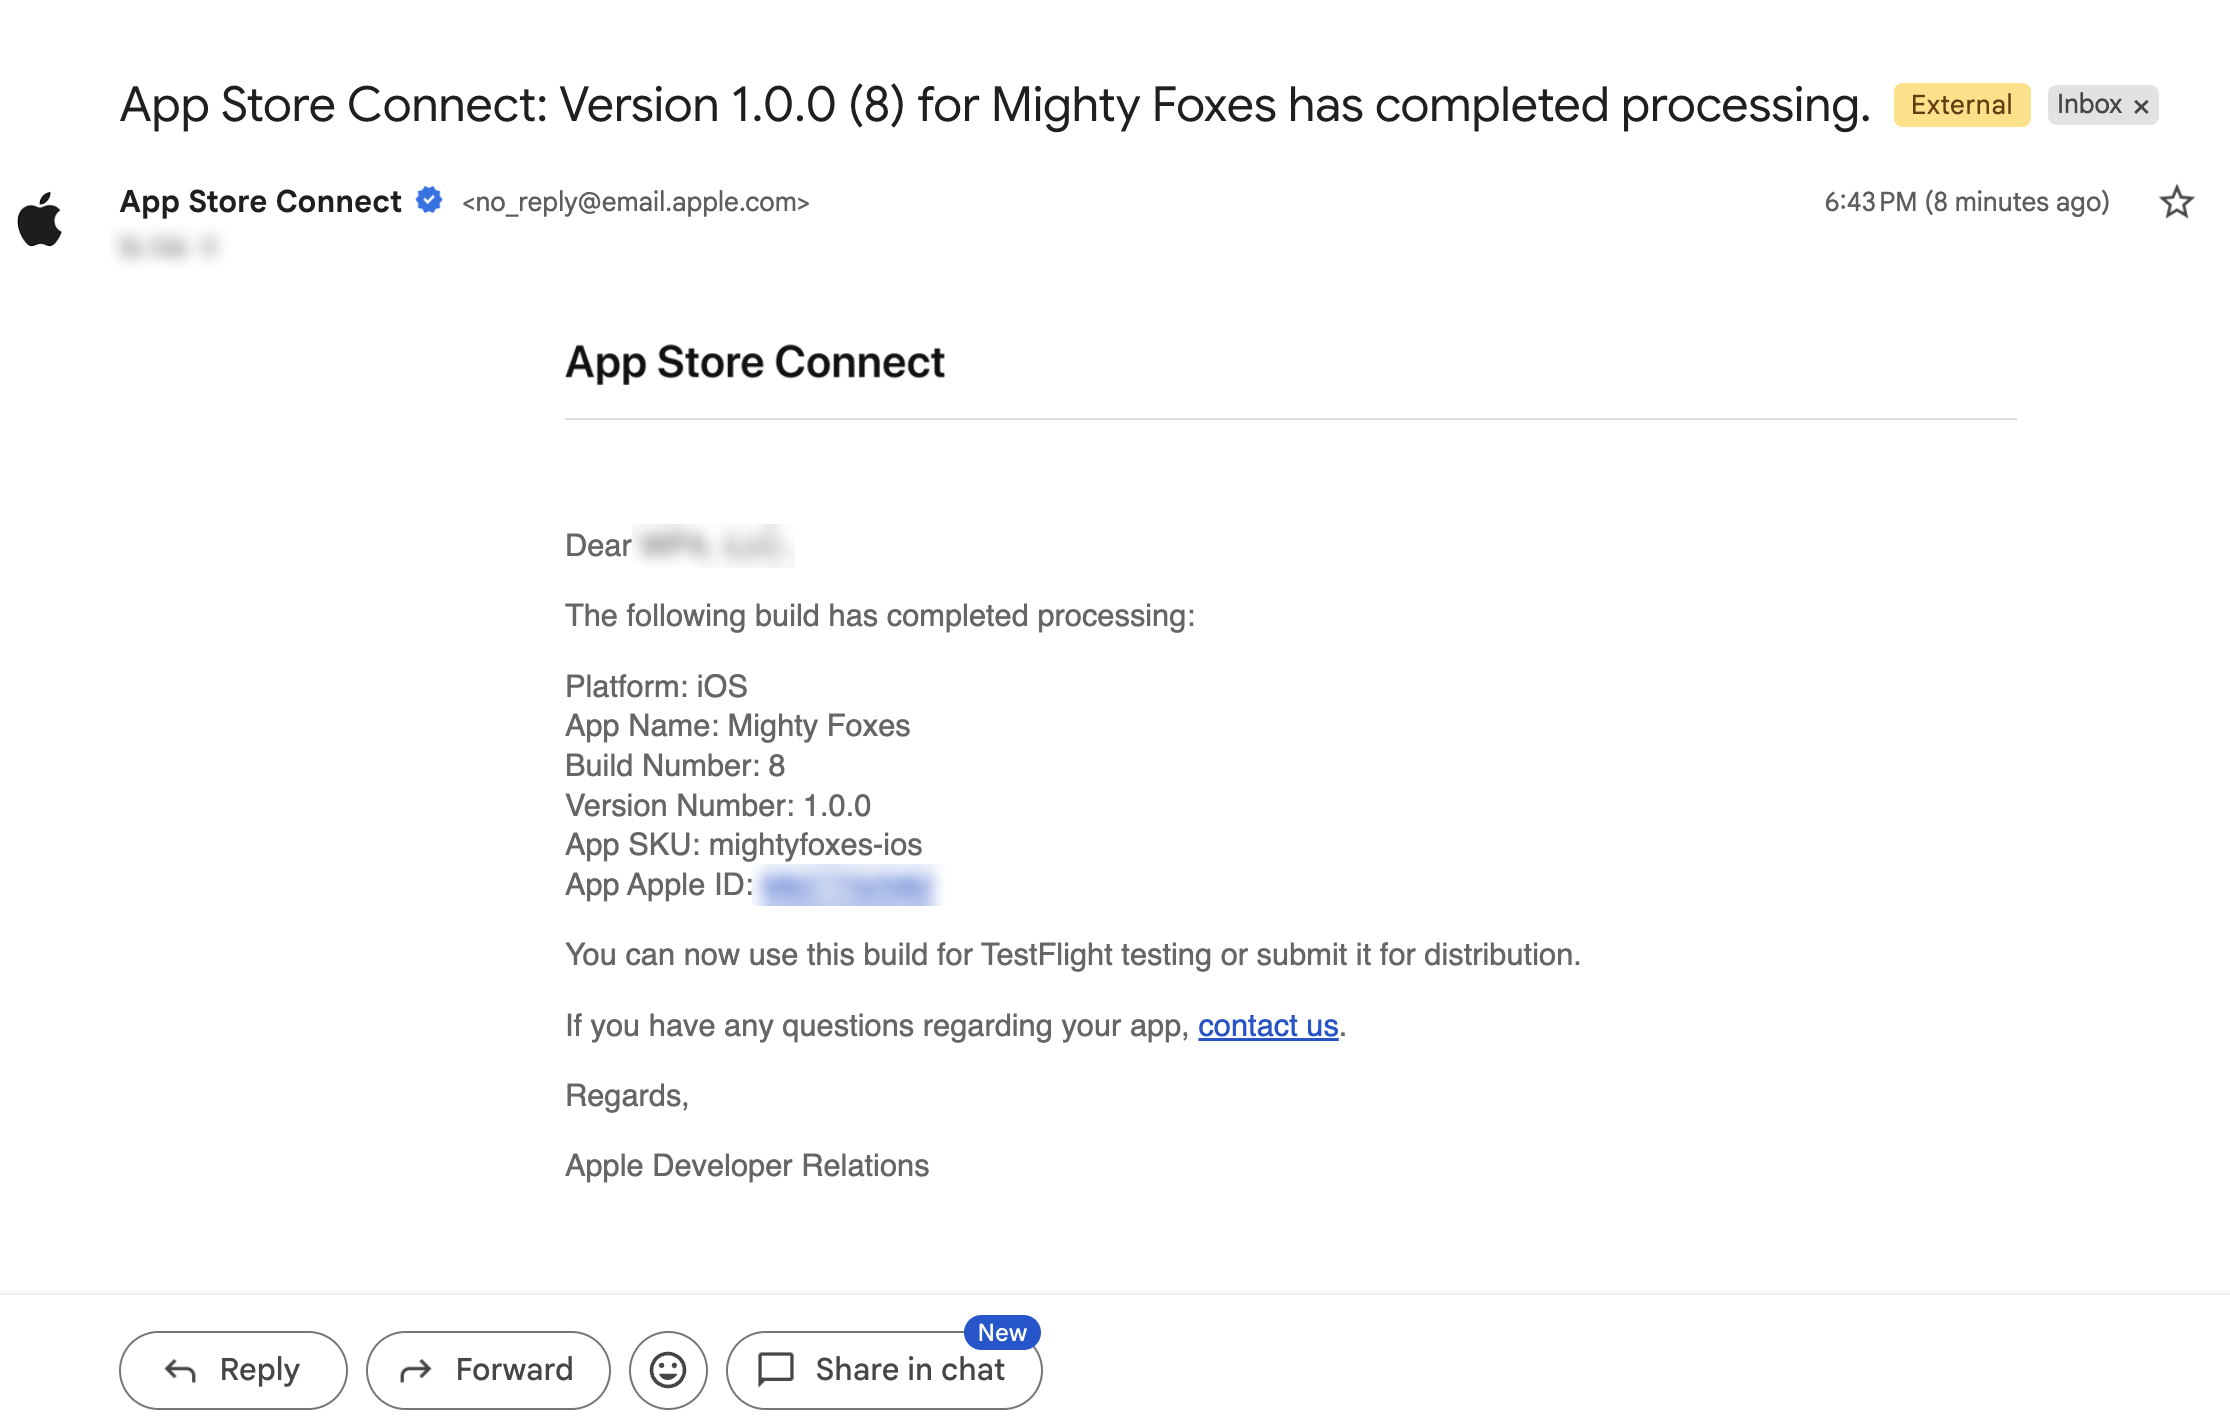
Find your build in App Store Connect
- Sign in to App Store Connect (opens in a new tab), click Apps, then click your app.
- Click the TestFlight tab at the top.
- Under iOS Builds, open your version (for example Version 1.0.0). Your build number is listed with its status. A processed build shows Ready to Submit and Expires in 90 days. Each TestFlight build works for 90 days, then you'll need a newer build.
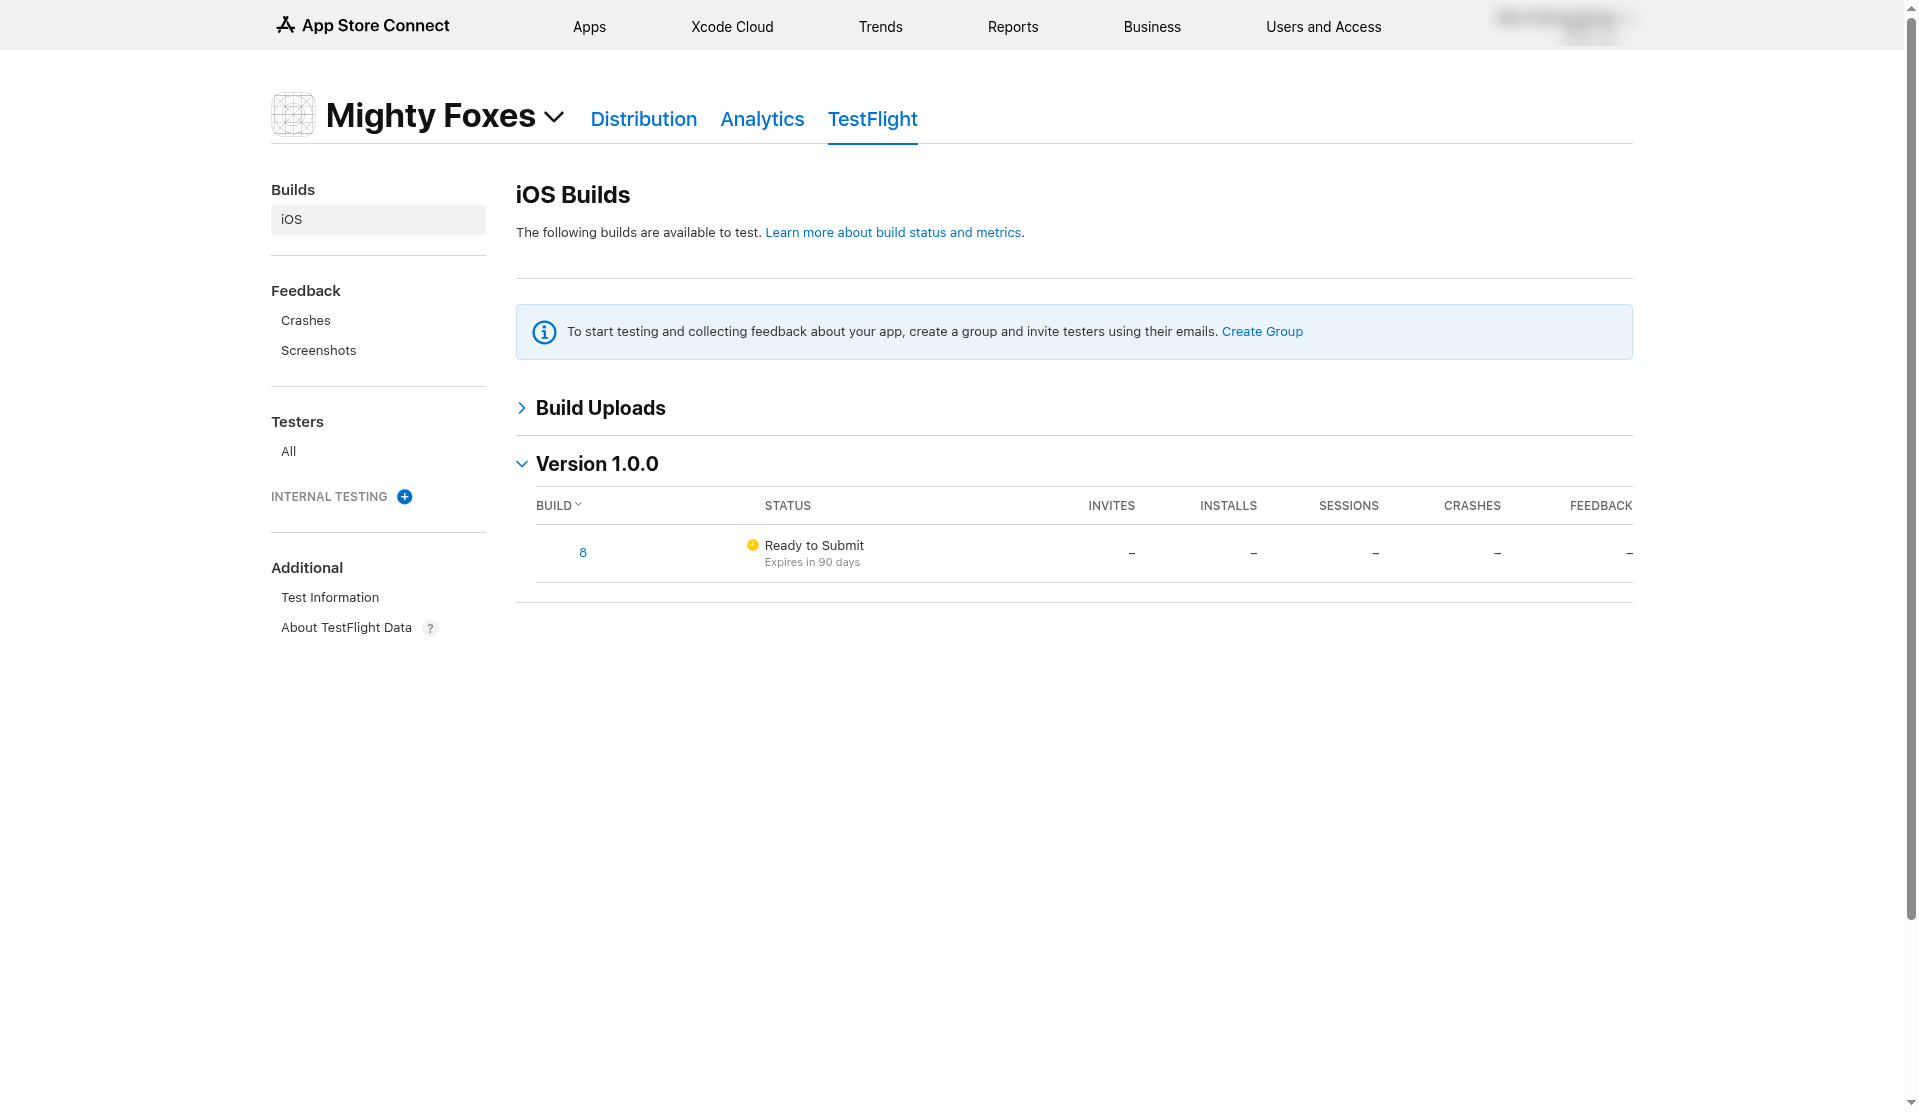
If the status says Missing Compliance instead, Apple wants to know about the encryption your app uses. Click Manage next to the build and answer the questions. Most apps that only use standard HTTPS connections (like a normal WordPress site) qualify for the exemption.
Create an internal testing group and add yourself
Internal testers are people on your App Store Connect team. They can test right away, with no review from Apple.
- In the left menu, next to Internal Testing, click the plus (+).
- Give the group a name, for example Internal Testers, and leave Enable automatic distribution turned on. That way every new build you make goes to your testers automatically, and you won't need to add each one by hand.
- Click Create.
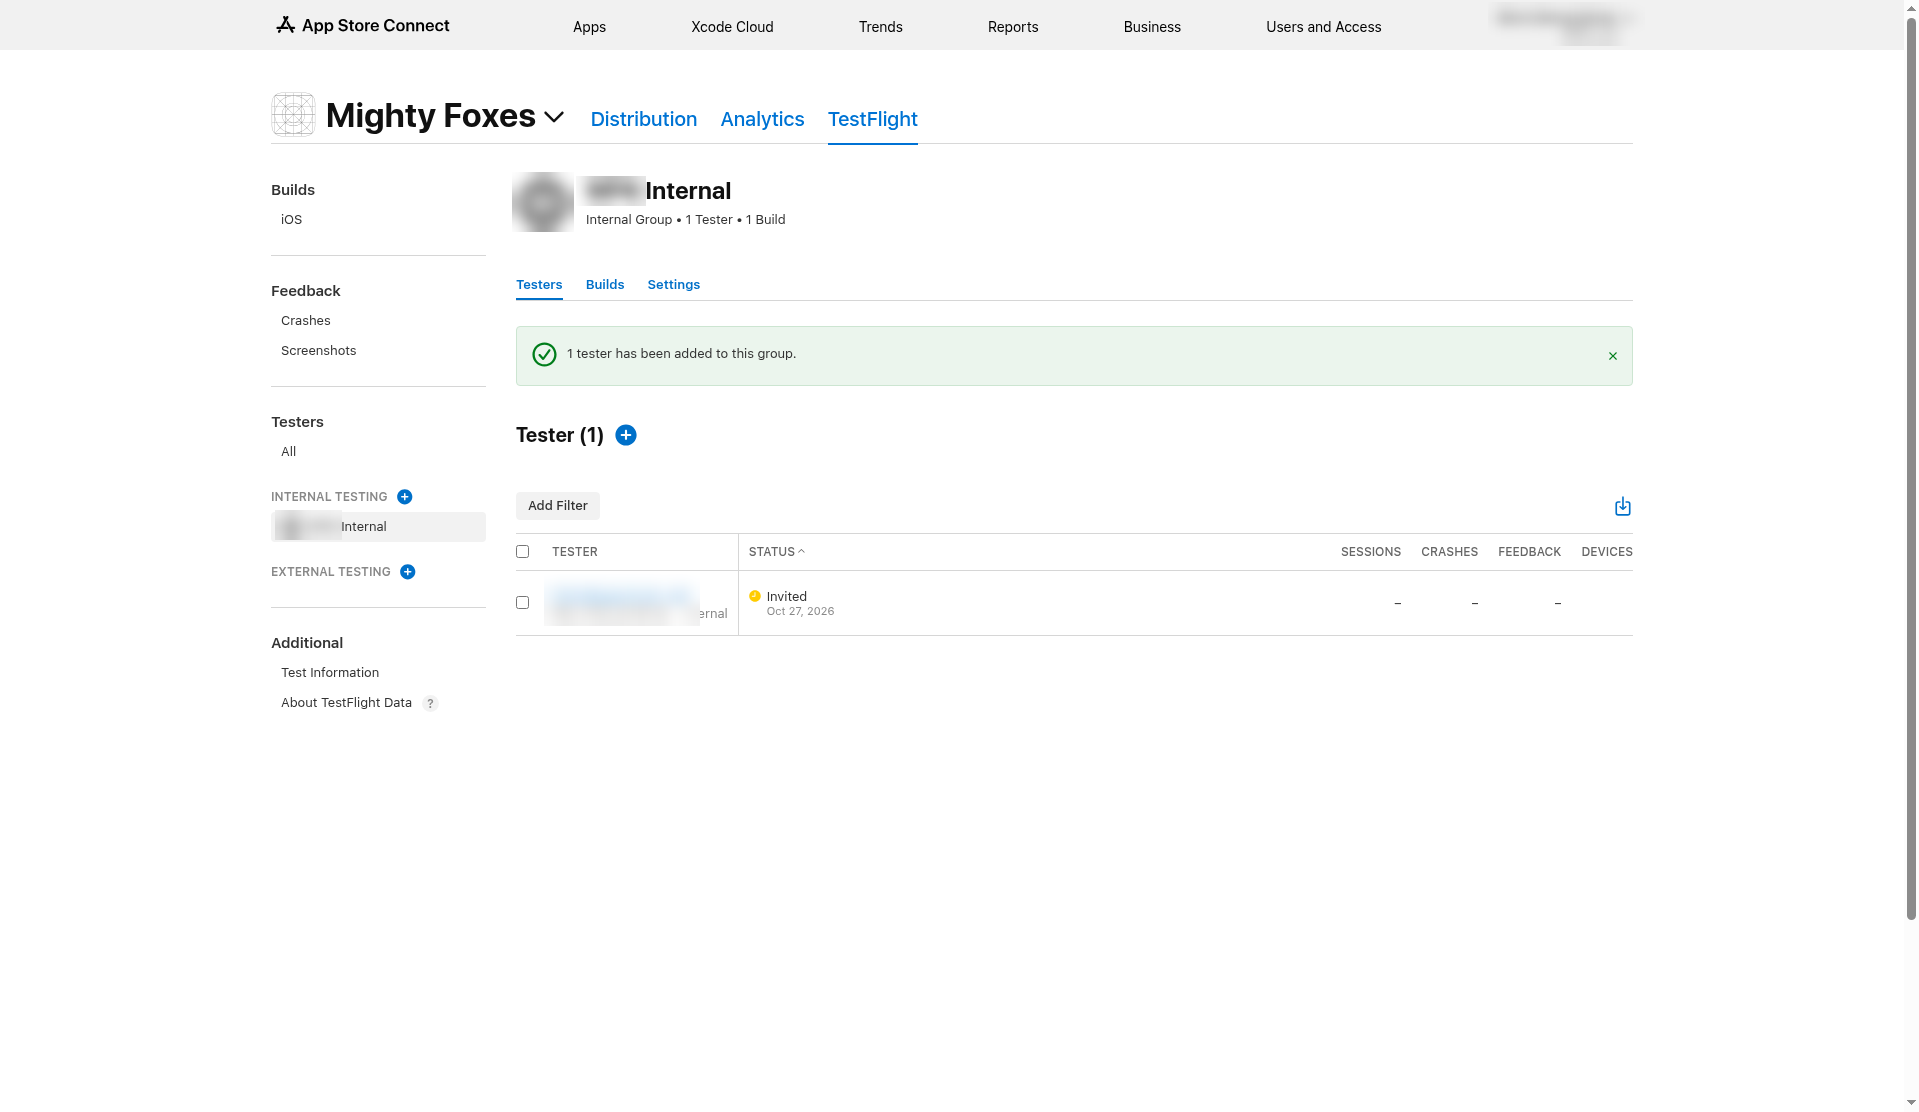
- On the group's Testers tab, click the plus (+) next to Tester and check the people to invite. Only users on your App Store Connect team appear in this list. You can add people under Users and Access.
Click Add. The tester now shows Invited until they accept the invite.
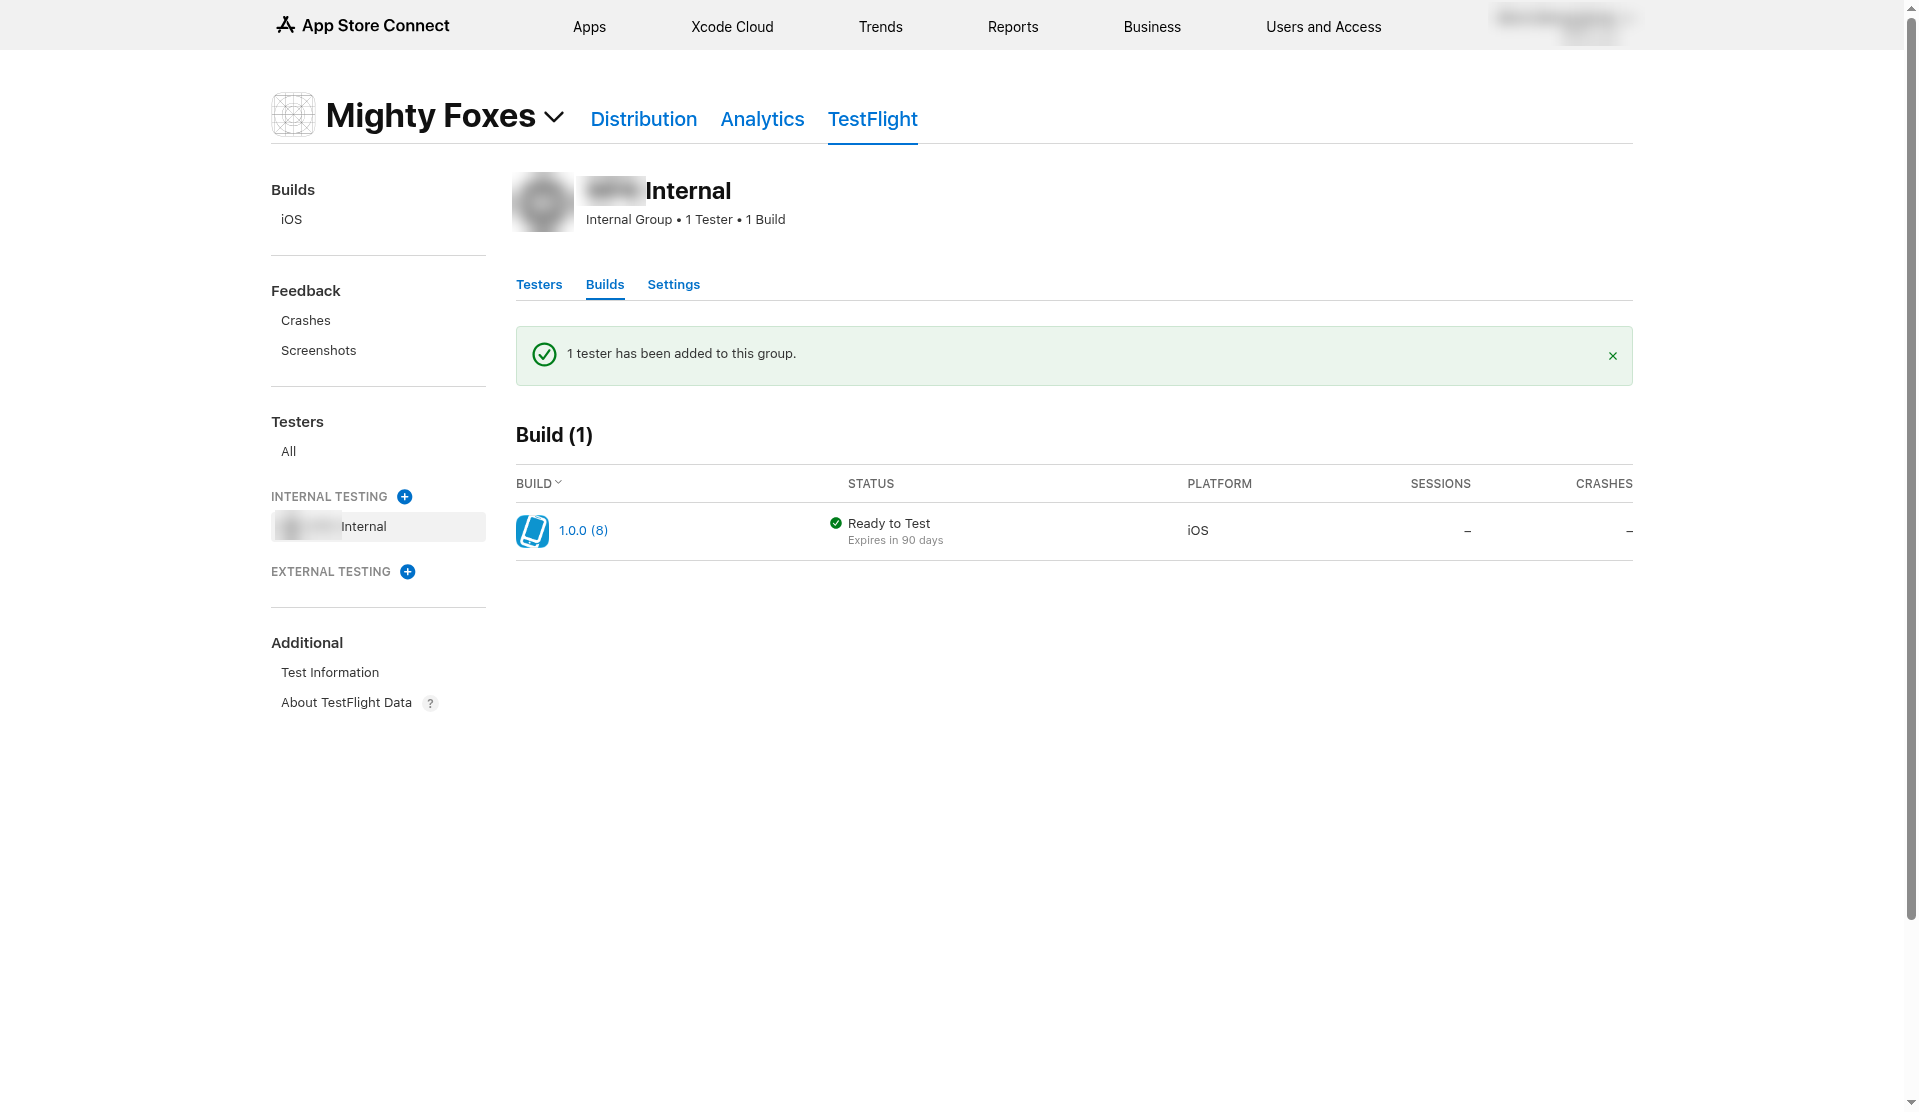
- Click the group's Builds tab. Your build should be listed with the status Ready to Test.
Install the app on your iPhone
Each tester does this on their own iPhone:
- Install Apple's free TestFlight app from the App Store.
- Open TestFlight and make sure it's signed in with the same Apple Account as the email address that got the invite.
- Open the invite email from TestFlight and tap View in TestFlight (or, if you were given a code, tap Redeem in the TestFlight app and enter it).
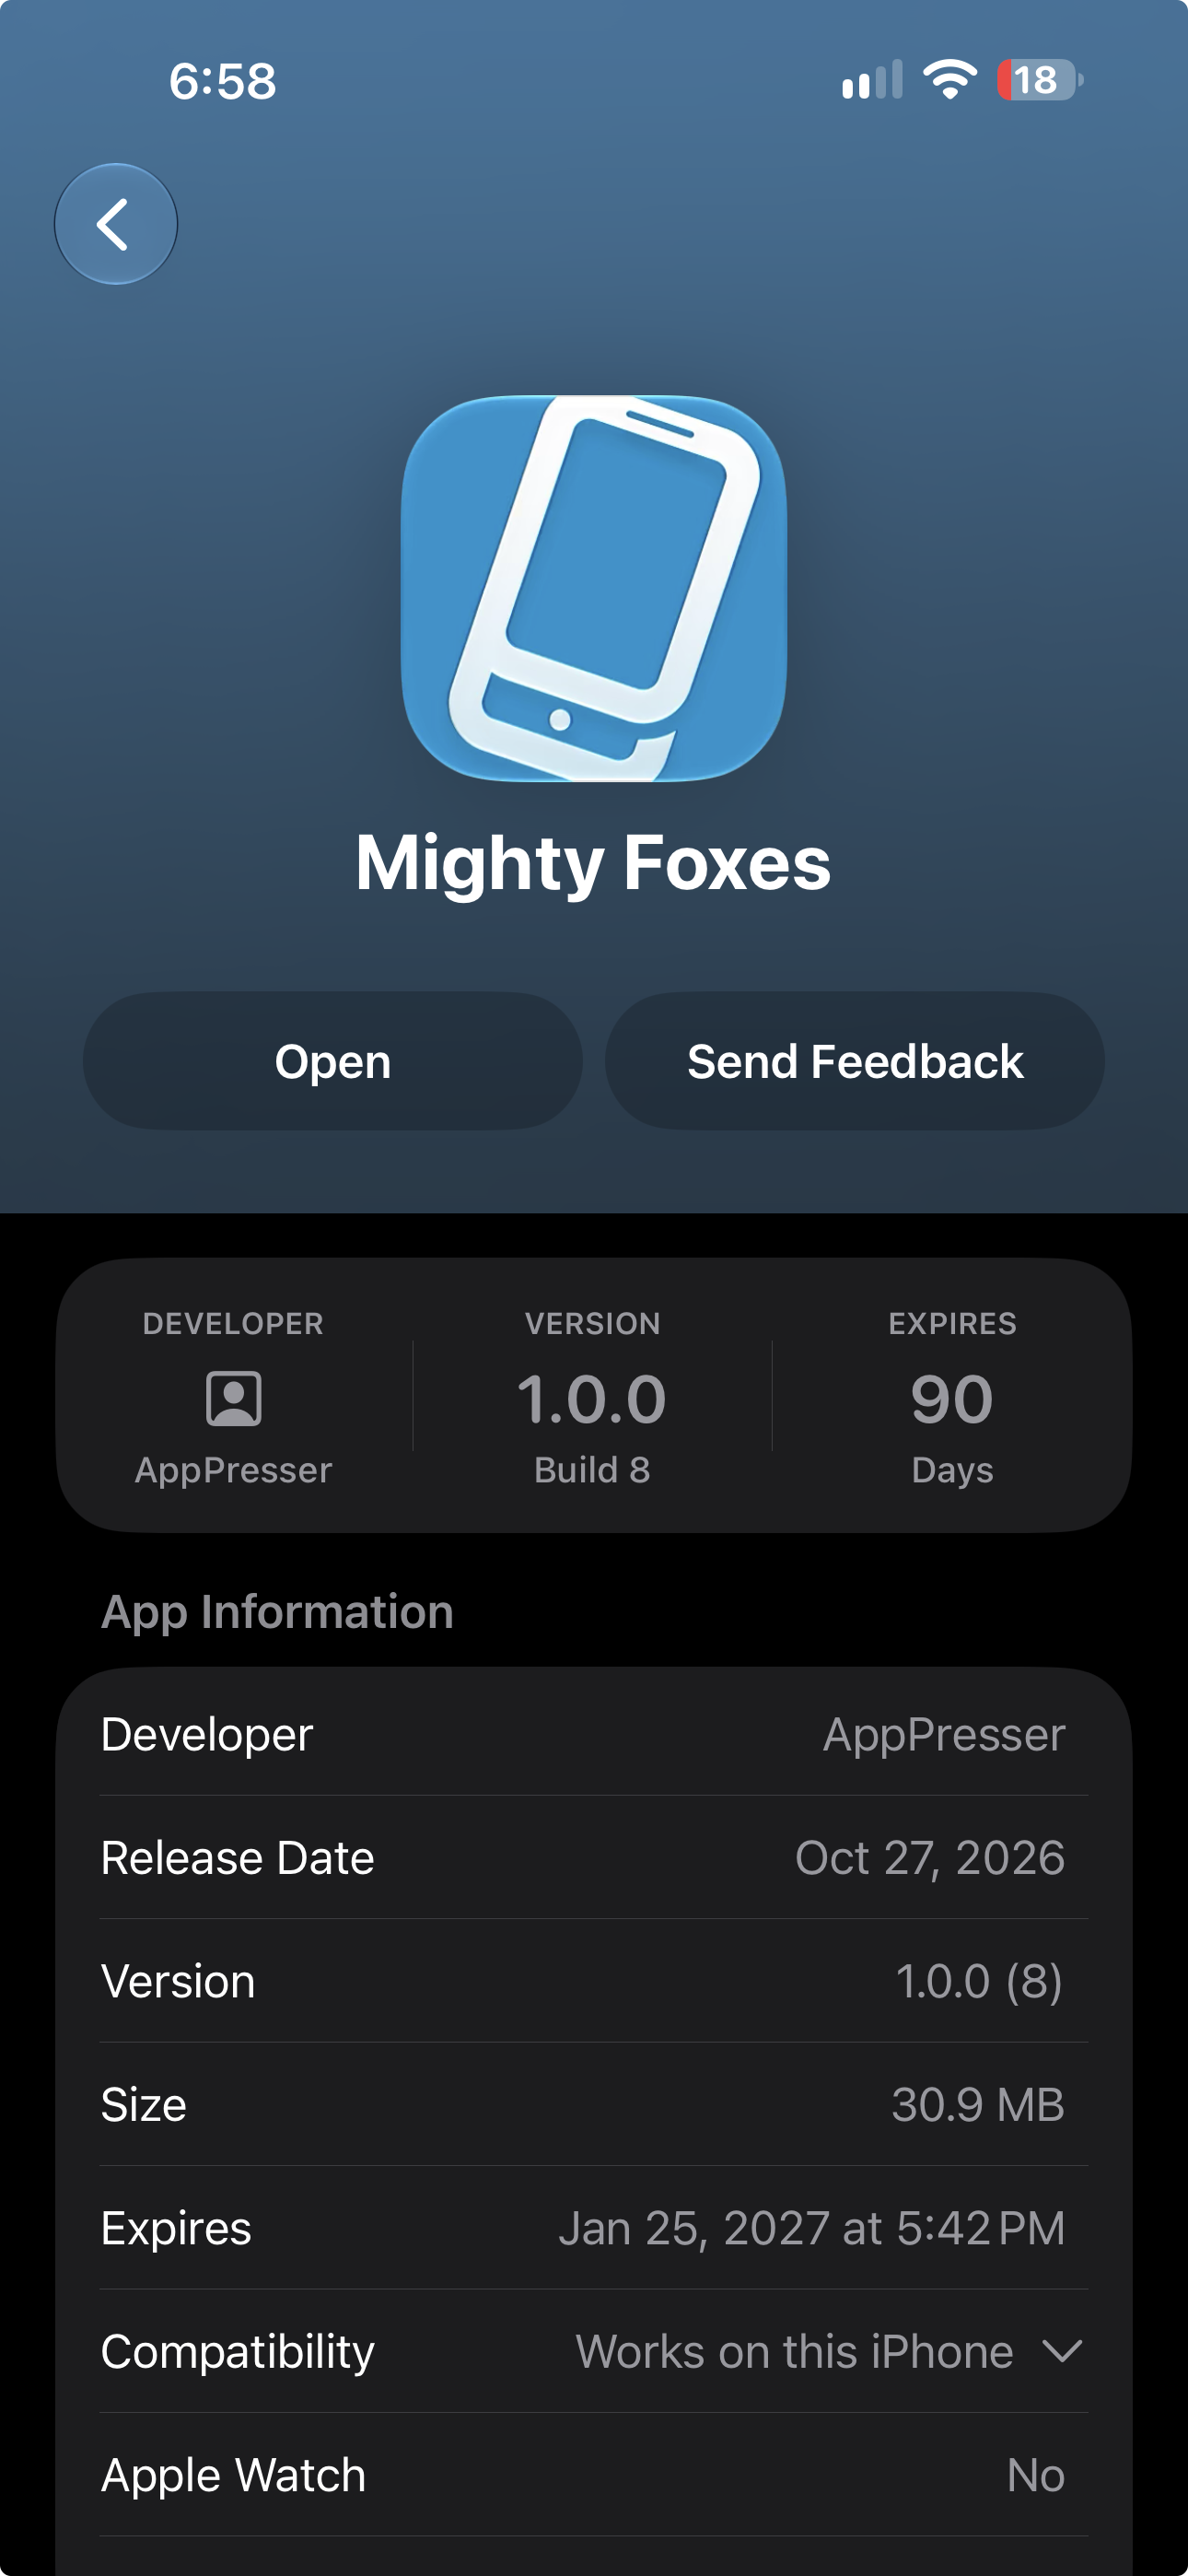
- Your app appears in TestFlight. Tap Install. When it's done, the app shows up on your Home Screen like any other app.
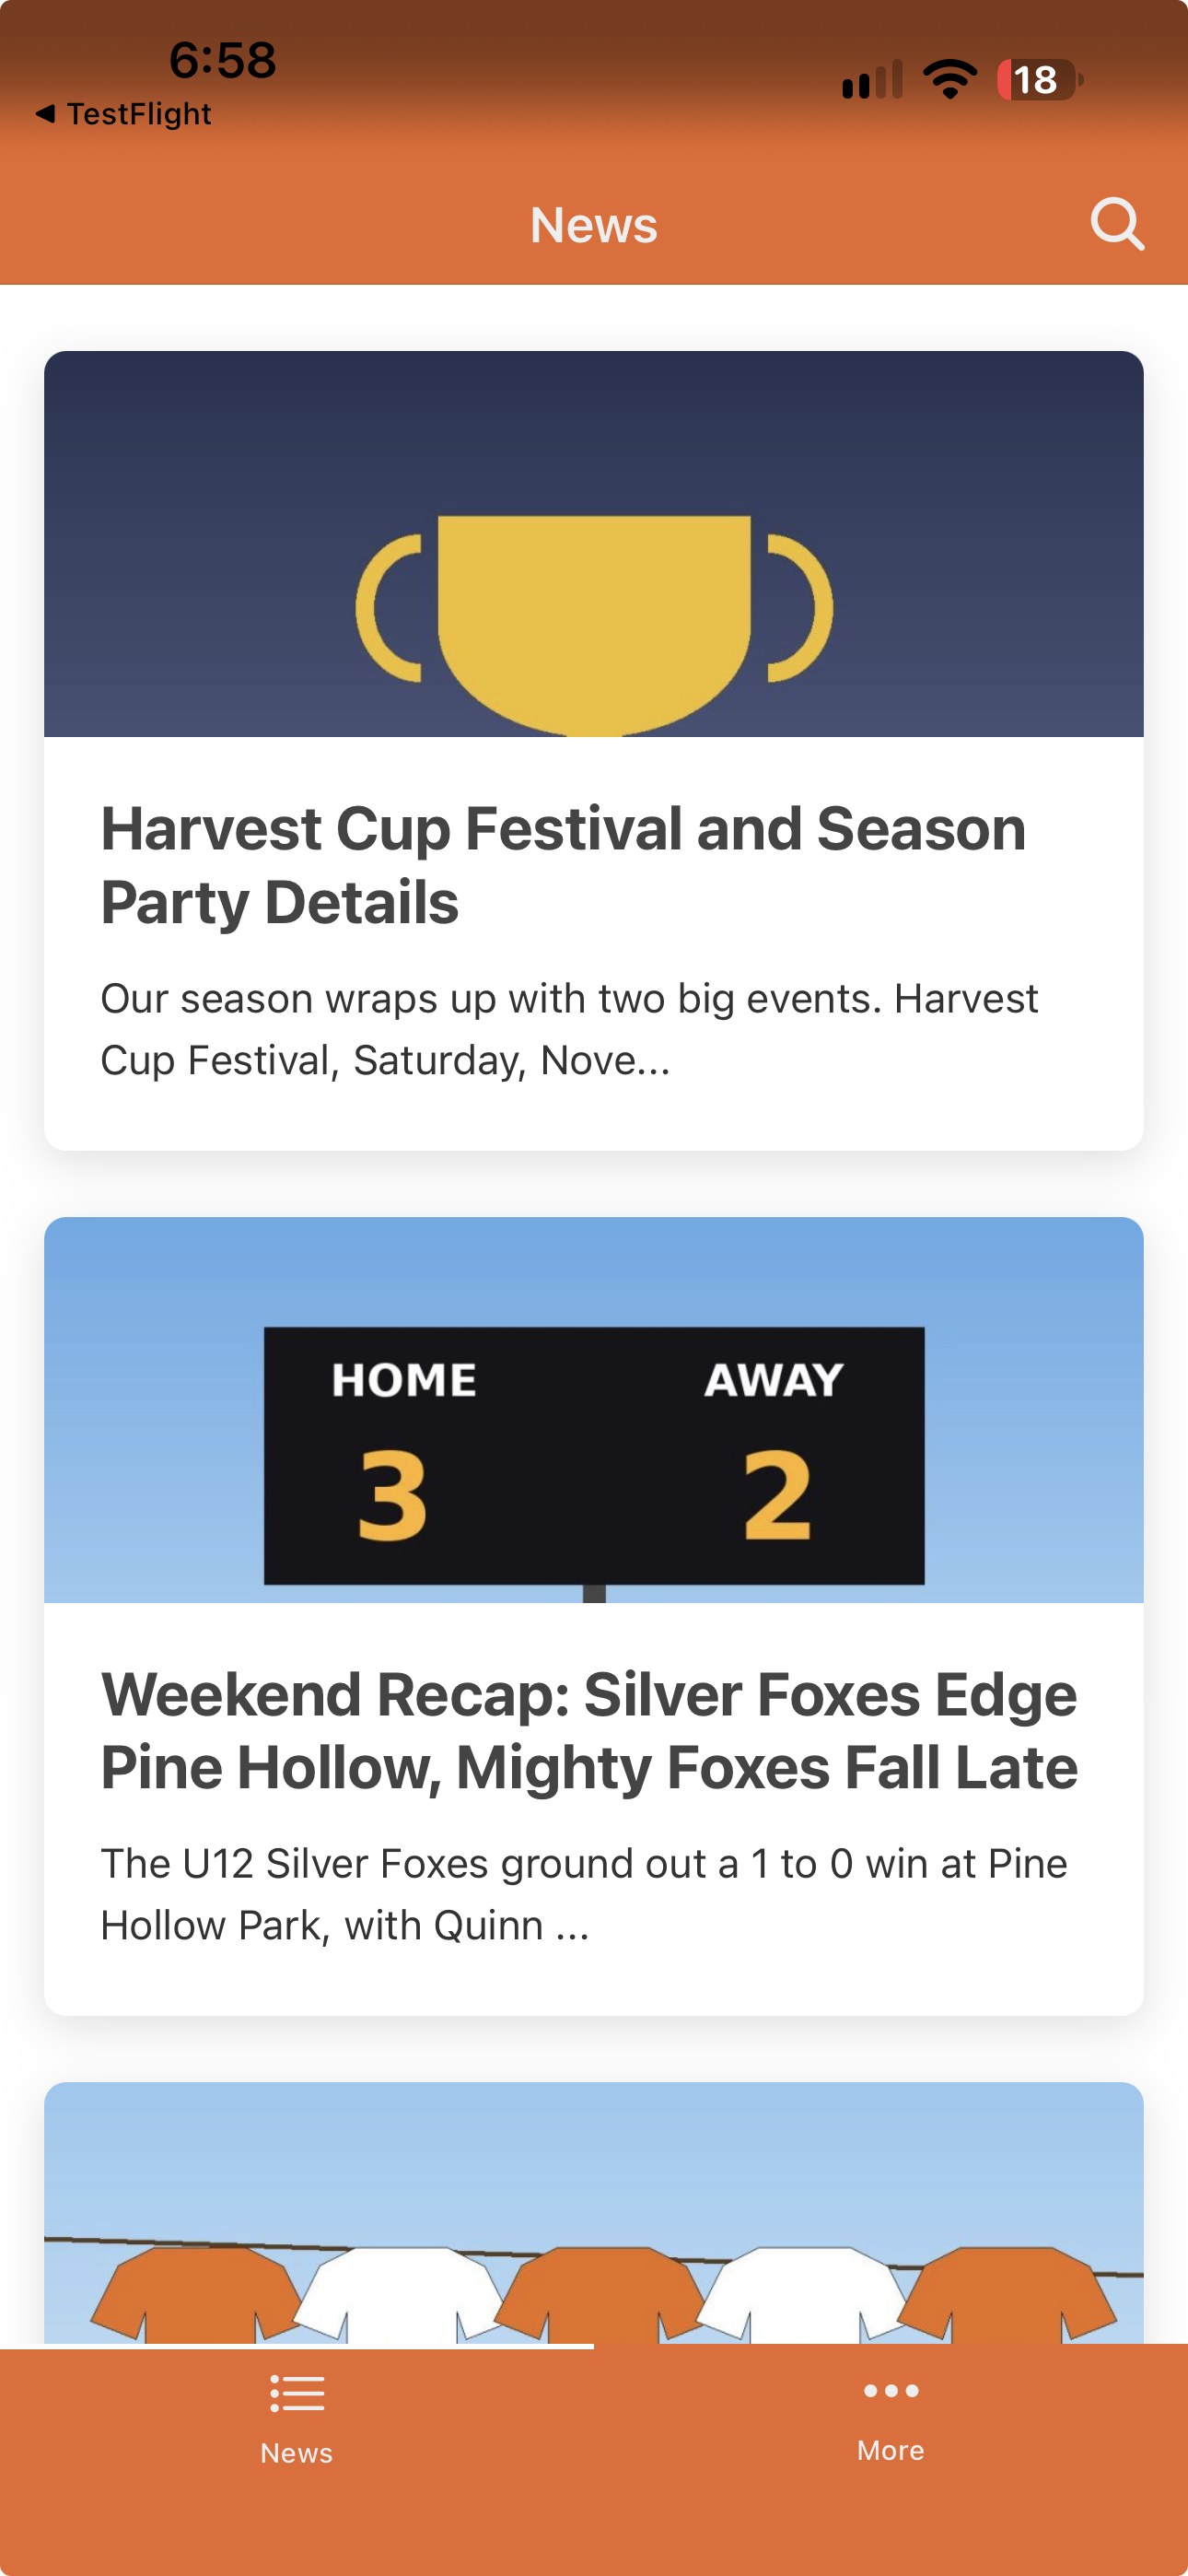
Test every screen before you submit to the App Store.
Check your app icon. If TestFlight and your Home Screen show the AppPresser phone icon instead of your own, your app is using the default icon. Upload your icon in Icon & Splash (a .png, 1024 by 1024 pixels, with no transparency), then make a new App Store build. The icon changes only in a new build.
Testing with people outside your team (external testing) and sending your app to Apple for App Store review are separate, optional steps. They aren't covered in this guide.
What if something goes wrong?
Swipe sideways to see the rest of this table.
| What you see | What it means | What to do |
|---|---|---|
| A banner asks you to accept an updated agreement | Apple changed its Program License Agreement | The Account Holder signs in and accepts it |
| You can't add a new distribution certificate | Your team has hit Apple's limit | Reuse an existing one. Only revoke one you're sure no app uses |
| No private key under the certificate in Keychain Access | You're on a different Mac from the one that made the CSR | Use the original Mac, or make a new CSR and a new certificate |
| You lost a .p12 or its password | Apple can't give it back | Make a new certificate, then new profiles that use it |
| Your app isn't in the App ID list | The App ID isn't registered yet, or it's a wildcard | Do Step 1 with an Explicit bundle ID |
| A test phone can't install the app | The phone isn't registered, or isn't in the Development profile | Register it, edit the profile to include it, download and upload again |
| Two certificates look the same | Apple names them after the team or person | Tell them apart by expiration date |
| Your Development build failed right away with no reason shown | Most likely there's no Ad Hoc profile set up for your app. The Development build needs one, even when validation says Development is Ready | Make the Ad Hoc profile (Step 7b) and send it to support (Step 11). Once support confirms it's in place, start the Development build again |
| Validation doesn't recognize your Ad Hoc profile | The profile's name doesn't contain the exact word AdHoc | Rename it in Apple Developer so the name contains AdHoc with no space (for example "My Example App AdHoc"), download it again and send the new file |
| App Store build fails at the upload with Your Apple Account or password was entered incorrectly (error -20101) | Apple couldn't sign in with the Apple ID and app-specific password AppPresser has. Most often the Apple ID field holds a name or team name instead of your full Apple Account email | In Builds > Repair Utilities > App Store submission credentials, set the Apple ID to your full Apple Account email (for example you@yourcompany.com) and click Save Apple ID. Paste your app-specific password again and click Save Password. If it still fails, make a new app-specific password (Step 12). Then start the App Store build again |
| App Store build fails at the upload with Could not determine provider public id from Bundle ID | Your app doesn't exist in App Store Connect yet, so Apple doesn't know where to put the build | Create the app in App Store Connect (Apps, +, New App) with the same bundle ID (see Step 14). Make sure your Free Apps agreement (and Paid Apps, if needed) is Active. Then start the App Store build again |
| Build not showing in the TestFlight app | One of these: Apple hasn't finished processing the build; you aren't a tester in a testing group; you haven't accepted the invite; or the TestFlight app is signed in with a different Apple Account from the one invited | Wait for the "has completed processing" email, then check that the build shows Ready to Test in your group (Step 15). Make sure you're listed as a tester and tap the link in the invite email. In the TestFlight app, check you're signed in with the same Apple Account as the invited email |
You're done when your app opens on your iPhone from TestFlight.
Next step
Publish your iOS app to TestFlight (step by step)
Related articles
এটি কি সহায়ক ছিল?
টাইপ করার সাথে সাথে ফলাফল আপডেট হয়। অনুসন্ধানে যেতে স্ল্যাশ চাপুন।
খুঁজে পাচ্ছেন না?
আমাদের সাপোর্ট টিম সেটআপ, বিল্ড ও app store সংক্রান্ত প্রশ্নে সাহায্য করতে পারে।