
Getting Started with the BuddyPress REST API
The BuddyPress REST API allows you to interact with BuddyPress from a 3rd party site or app.
You can do things like grab the activity feed, upload an activity update, interact with groups and members, and more. It does not have 100% parity with the PHP functionality in the plugin, but it has most of the good stuff.
The BP REST API is supposed to be added to the BuddyPress core plugin in version 5.0, but for now it is available on Github. It is still beta-ish, but we’ve been using a modified version with AppPresser apps for several months successfully.
In this article I’ll give you an introduction to the main components of the BP REST API, along with some tips from our experience using them.
I will be showing screenshots from Postman for Chrome, download it to run your own API calls in your browser.
Getting Started
Install the BP REST API plugin
Make sure you are using at least WP 4.7 and BuddyPress 4.0, and then add the BP REST plugin from Github. You can download the master .zip file and unzip in your plugins directory, then activate.
That will create a variety of endpoints you can interact with at https://yoursite.com/wp-json/buddypress/v1/, you can see the full list here.
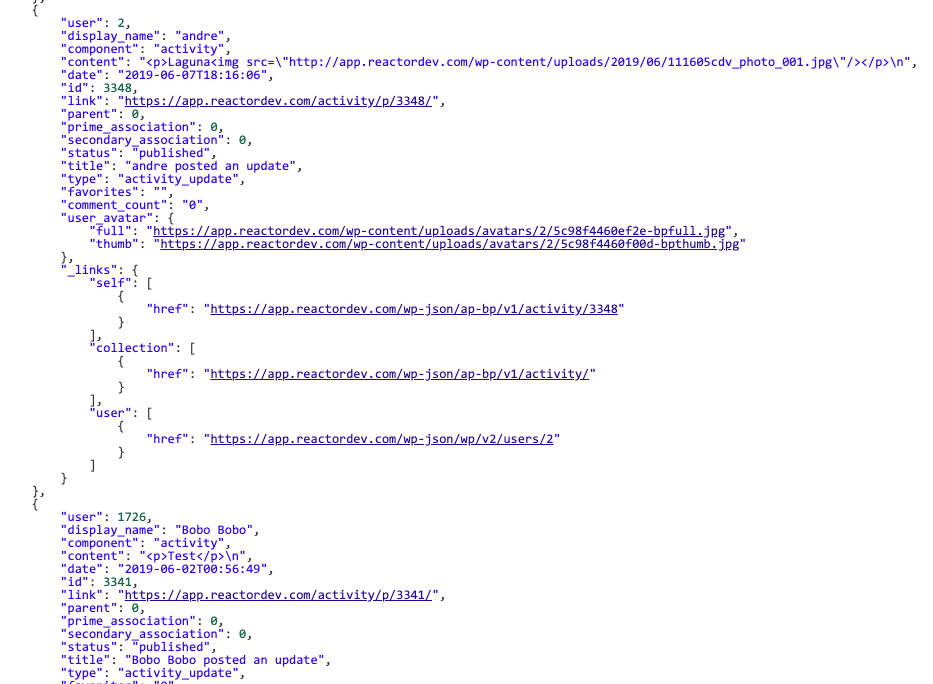
To test if things are installed correctly, login to your site. Then use Postman to send a GET request to https://site.com/wp-json/buddypress/v1/activity
You should see a list of activity data.
Authentication
If you are calling the API from a WordPress plugin or theme, you do not need to worry about authentication. The API will detect if the user is logged in, and return appropriate data.
If you are using a 3rd party app, you can’t use cookies, so you need to use OAuth or JWT. JWT (json web token) auth works great and is easier than oAuth, so we’ll use that.
Setup JWT Auth
Install this plugin, and follow the configuration instructions.
Make sure you define your secret key, and enable CORS by adding this code to your wp-config.php file.
define('JWT_AUTH_SECRET_KEY', 'your-top-secret-key');define('JWT_AUTH_CORS_ENABLE', true);
You should then be able to get a token by sending a POST request to /wp-json/jwt-auth/v1/token with your username and password as url parameters. Save that token, we will hard code it into our API calls. (For a full-fledged application, you would need to create a UI for this, but that’s for another tutorial)
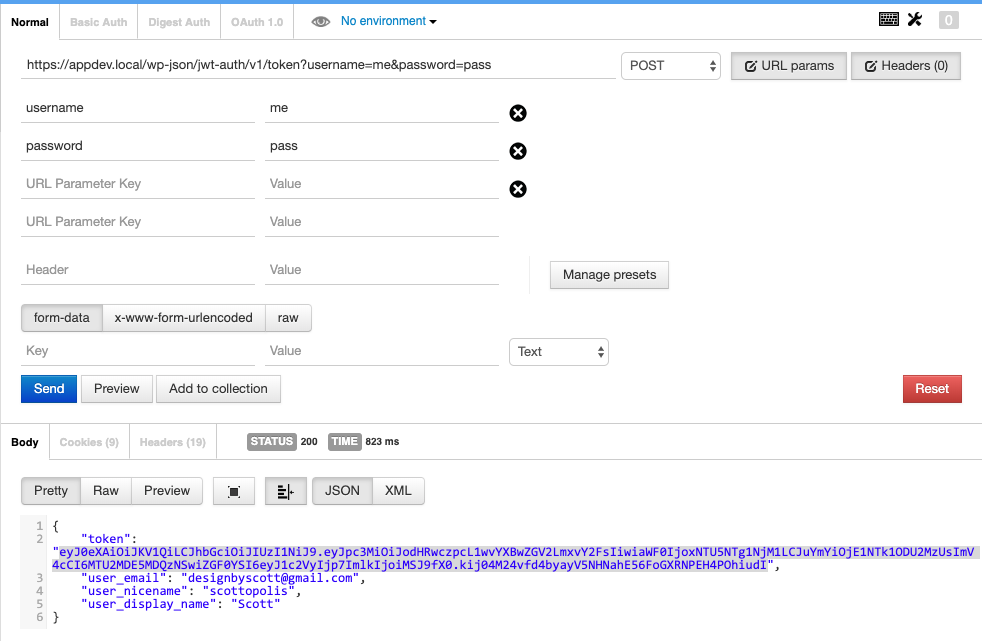
This bearer token can now be used in an Authorization header to get sensitive data like private messages.
Request Examples
The BP REST API has several endpoints available, and they are still adding more. This is not an exhaustive list, but rather a few examples of how to interact with the API.
Activity
To grab all the site activity, send a GET request to http://site.com/wp-json/buddypress/v1/activity
Here’s a list of arguments available at the time of writing:
$args = array(
	'exclude'           => $request['exclude'],
	'in'                => $request['include'],
	'page'              => $request['page'],
	'per_page'          => $request['per_page'],
	'search_terms'      => $request['search'],
	'sort'              => $request['order'],
	'spam'              => $request['status'],
	'display_comments'  => $request['display_comments'],
	'site_id'           => $request['site_id'],
	'group_id'          => $request['group_id'],
	'count_total'       => true,
	'fields'            => 'all',
	'show_hidden'       => false,
	'update_meta_cache' => true,
	'filter'            => false,
);
An example of using an argument would be like this:
http://site.com/wp-json/buddypress/v1/activity?group_id=2&display_comments=false&per_page=12
To post a new activity, make a POST request to the same endpoint. The only required parameter is “content,” and of course you must send your Bearer token in an Authorization header as described above.
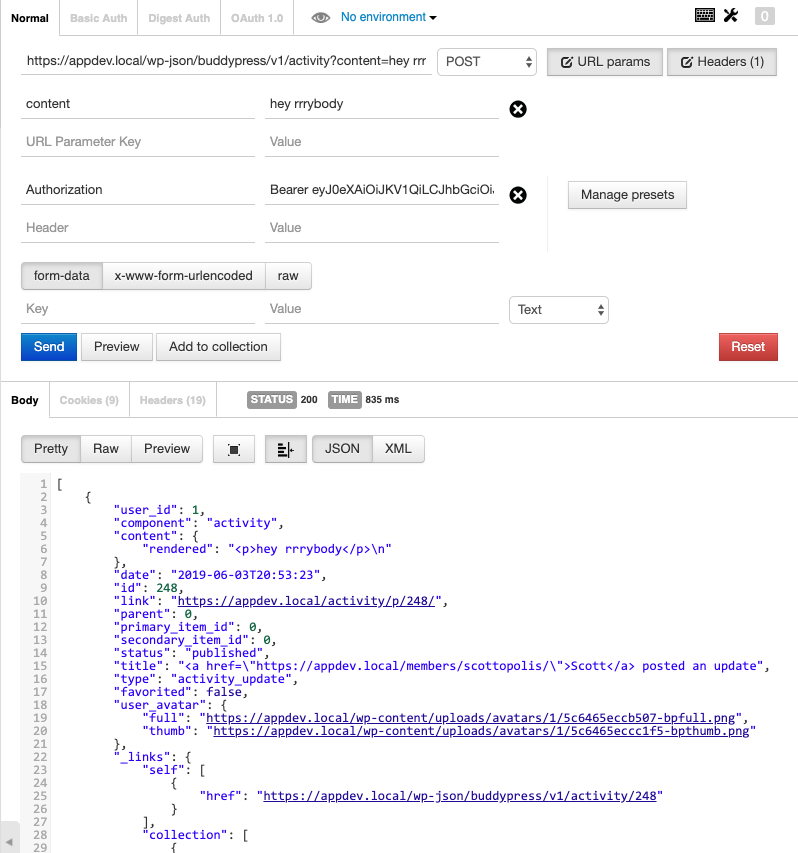
To post an activity comment, you make the same request, but add a type of activity_comment and include the parent and id.
https://site.com/wp-json/buddypress/v1/activity?content=mycomment&parent=247&id=247&type=activity_comment
Members
To list all members, send an authenticated GET request to https://site.com/wp-json/buddypress/v1/members
Arguments:
$args = array(
			'type'           => $request['type'],
			'user_id'        => $request['user_id'],
			'user_ids'       => $request['user_ids'],
			'xprofile_query' => $request['xprofile'],
			'include'        => $request['include'],
			'exclude'        => $request['exclude'],
			'member_type'    => $request['member_type'],
			'search_terms'   => $request['search'],
			'per_page'       => $request['per_page'],
			'page'           => $request['page'],
		);
To get information about an individual member, just add their ID to the end of the request: https://site.com/wp-json/buddypress/v1/members/12
You can also create members using a POST, adding or removing friendships is not part of the API at the time of this writing.
Messages
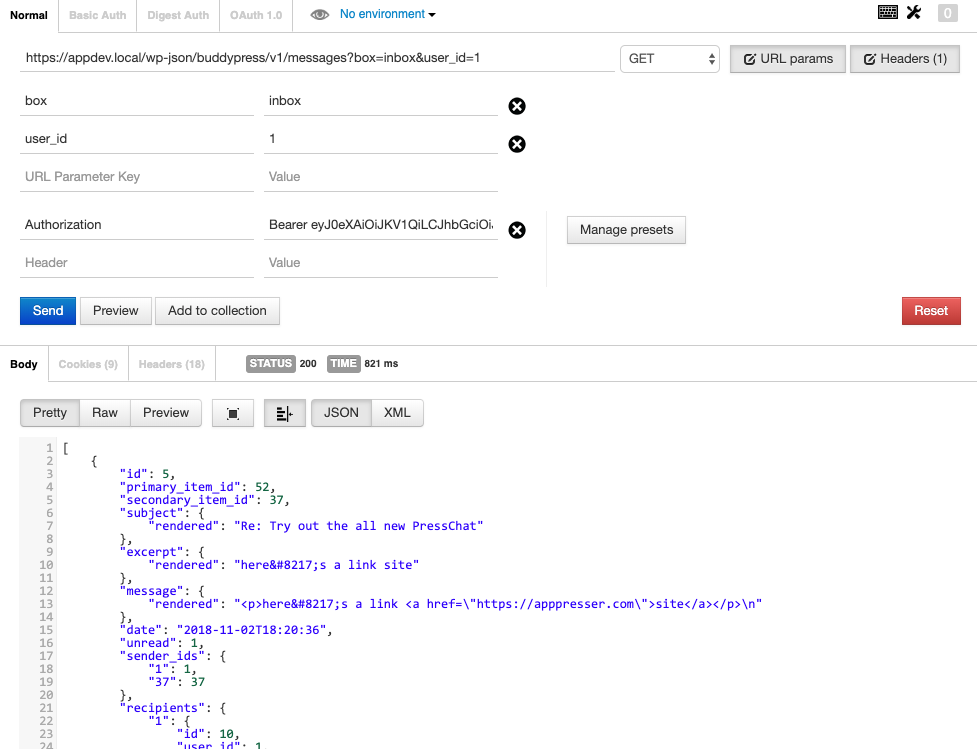
If you are not familiar with BuddyPress messages, they can be a little confusing. They are like email, they have an inbox, sentbox, and outbox. There are threads with multiple messages, just like an email thread.
To get all of your threads, you can send a request like this: .../wp-json/buddypress/v1/messages/?box=inbox&user_id=1
A thread is an array of objects that have information about the thread, such as ID, recipients, array of messages, most recent message, date, etc. Here’s an example thread object.
{
        "id": 42,
        "primary_item_id": 55,
        "secondary_item_id": 1,
        "subject": {
            "rendered": "New thread"
        },
        "excerpt": {
            "rendered": "hey there!"
        },
        "message": {
            "rendered": "<p>hey there!</p>\\n"
        },
        "date": "2019-06-03T21:23:34",
        "unread": 1,
        "sender_ids": {
            "1": 1
        },
        "recipients": {
            "1": {
                "id": 83,
                "user_id": 1,
                "thread_id": 42,
                "unread_count": 1,
                "sender_only": 0,
                "is_deleted": 0
            }
        },
        "messages": [
            {
                "id": 55,
                "thread_id": 42,
                "sender_id": 1,
                "subject": {
                    "raw": "New thread",
                    "rendered": "New thread"
                },
                "message": {
                    "raw": "hey there!",
                    "rendered": "<p>hey there!</p>\\n"
                },
                "date_sent": "2019-06-03 21:23:34"
            }
        ]
    }
To get a single thread, add the thread id: .../wp-json/buddypress/v1/messages/5

Arguments for retrieving messages:
$args = array(
			'user_id'      => $request['user_id'],
			'box'          => $request['box'],
			'type'         => $request['type'],
			'page'         => $request['page'],
			'per_page'     => $request['per_page'],
			'search_terms' => $request['search'],
		);
To post a new message, send a POST request to /messages with the following params: subject, content, and recipients.
https://site.com/wp-json/buddypress/v1/messages/?subject=reply to thread 5&content=this is my reply&recipients=1
To reply to an existing thread, add the id of the thread and remove the subject.
https://site.com/wp-json/buddypress/v1/messages/?content=this is my reply&id=5&recipients=1
Groups
To get all groups, query ...wp-json/buddypress/v1/groups
To get an individual group, add the group ID to the end ...wp-json/buddypress/v1/groups/12
To get members of a group ...wp-json/buddypress/v1/groups/1/members
To add a member to a group, send a POST request to the members endpoint with the user ID to add at the end .../wp-json/buddypress/v1/groups/1/members/37
To remove a member from a group, use the same request as above but use DELETE.
Extending the BP REST API
There are a variety of hooks and filters available to extent the API. You can find all of the hooks and filters available in the API documentation.
Here’s a few examples of extending the BP REST API using hooks and filters.
Example Filter Usage
// add something to the activity post
add_filter( 'bp_rest_activity_pre_insert_value', function( $prepared_activity, $request ) {

	$prepared_activity->content .= $request['my_custom_param'];
	return $prepared_activity;

}, 10, 2 );
// add an endpoint. This is probably a bad idea, you should use your own rest base slug, not buddypress/v1. You must add your own callbacks as well.
add_action( 'bp_rest_api_init', function() {

	register_rest_route( 'buddypress/v1', '/my-endpoint', array(
		array(
			'methods'             => WP_REST_Server::READABLE,
			'callback'            => array( $this, 'get_items' ),
			'permission_callback' => array( $this, 'get_items_permissions_check' ),
		),
	) );

} );
// send the admin an email when a new group is created
add_action( 'bp_rest_groups_create_item', function( $group, $response, $request ) {
	$to = '[email protected]';
	$subject = 'New group created!';
	$body = 'The group name is ' . $group->name;
	$headers = array('Content-Type: text/html; charset=UTF-8');

	wp_mail( $to, $subject, $body, $headers );
}, 10, 3 );
Using the BP REST API in an App
To see what can be done with the BP REST API in a mobile or web app, here are some visuals. These are from the BuddyPress integration included with AppPresser.
Challenges
Completeness
The BP REST API is not complete yet, so some functionality does not exist. For example, the friend component is not there, you will have to roll your own way to add/remove friendships. It’s also requires custom code to upload an image with an activity post or message.
Recreating Logic
As with any 3rd party app, the hardest part is recreating the logic that already exists on the website. For example, the add friend button. After someone clicks it, you need to send the API request, and display the result. An error if it fails, a success message, or pending. You need to save that data to the app and change the button to say “pending request”, or if successful, change it to “unfriend.” These type of considerations happen for every user interaction, which requires a lot of extra thought.
Supporting Plugins
Supporting 3rd party plugins is difficult. Let’s say there is a photo filter add-on someone is using for their BuddyPress activity posting. You would have to rebuild the entire UI in the app, then build endpoints to handle the processing of the image filters when the activity is uploaded.
That said, the challenges are also part of the fun.
Conclusion
When you de-couple BuddyPress from the website using its API, a lot of new possibilities exist. BuddyPress is such a powerful plugin for self-hosted social interactions, you can build a private messaging app like Facebook Messenger, an Instagram-style photo sharing app, or even a full Facebook style social community app.
You can rebuild the UI to make it faster, and more focused on your specific use case. You can cache data offline, utilize push notifications, mobile device features like the camera and geolocation, and more.
We plan on building more cool stuff with it, hopefully you will too.
Very useful post…thank you for posting. The link to the location of the Endpoints is especially useful.