
Use Fastlane to Speed Up iOS App Store Submission
Updated July 2017 for Fastlane 2.4+
If you’ve submitted an app to the Apple app store, you know it can be a huge pain.
You have to generate certificates, provisioning profiles, .p12 files, create the app store listing, and more. You login to different places to do those things, rebuild the app, download multiple files, and hopefully only do it once. If you mess up, you may have to do it all over again.
App submission can be a complex process, but Fastlane Tools allows you to automate all of it. Fastlane is a set of command line tools (free and open source) that can do everything from generate your certificates and profiles, to create your app store listing.
I recently tried it, and let me tell you, it’s magic.
After I’ve installed Fastlane, I can create an app along with all the certificates I need (even with push notifications) in 4 commands. 4 simple commands, and I’m not even that good at CLI!
Here’s an example of the cert command, taken from Fastlane’s Github:
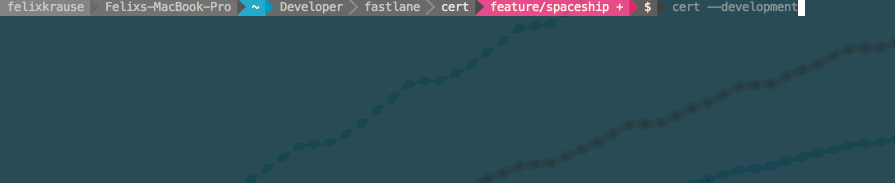
That was simply cert –development, and the cert was created and downloaded.
There’s a lot more where that came from, let’s take a look at how it works.
First, this only works for Mac because it uses Xcode command line tools (sorry Windows!)
Open terminal (or iTerm2 with Oh My Zsh if you’re savvy).
Install Fastlane:
sudo gem install fastlane
This may take a while. When it’s done, make sure you have the Xcode CLI installed.
xcode-select --install
Fastlane has a lot of tools included, we’ll be using:
- pem: Automatically generate and renew your push notification profiles
- cert: Automatically create and maintain iOS code signing certificates
- sigh: Because you would rather spend your time building stuff than fighting provisioning
- produce: Create new iOS apps on iTunes Connect and Dev Portal using the command line
Fastlane has lots of other cool features, but all I want to do is create my certs and provisioning profiles automatically. Let’s start with produce.
1. Produce Your App
Produce creates a new app ID in your developer center, and an app store listing in iTunes Connect.
There are a lot of options you can configure, but we’ll just start with the simple command.
fastlane produce
It will prompt you for your Apple developer center login, and some details about the app, such as the title and identifier. (The app identifier is a reverse domain name such as com.mycompany.myapp)
When it finishes, you will have a new App ID in your developer center, and in iTunes Connect. (If you’re not familiar, the Apple developer center is where you create all of your certs and profiles, and iTunes Connect is where you create the actual app store listing. It’s super cool that this is done through produce.)
2. Create Certificate
After our app is created, we need to make sure we have a certificate.
To do this, run the cert command:
fastlane cert
This will create a production certificate that can be used for submitting to the app store. To create a development certificate instead, use the development flag:
fastlane cert --development
You should now see your certificate in your working directory, and in the Apple developer center.
3. Push Notification Certs
Push notifications require another certificate. Normally you’d create this certificate, then manually export a .p12 and/or .pem file for use on your push notification server.
It’s sort of complicated, but the pem tool takes care of all of it. (You don’t need to do this if you aren’t using push notifications)
We are going to add an app identifier to the command, this is optional. If you don’t add an identifier, it will prompt you to enter it after running the command.
fastlane pem -a com.mypushapp.app
This will generate your certificate signing request, create the push notification cert, export a .p12 and .pem, and download it all to your working folder. Amazing.
I’ve been creating push notification certificates manually for years, and I still mess it up sometimes. The thing I love about this tool is that it gets it right every time. This is a huge time saver.
4. Provisioning Profile
The last thing we need to do is generate a provisioning profile. You can create development, distribution, and even ad hoc profiles. This is done with the sigh tool.
fastlane sigh
This will create an app store profile, which you can’t use for development. To create a development cert, use:
fastlane sigh --development
Since I’m creating an app with push notifications, I want to test those notifications before submitting my app. I can do that with the production certificate I created above, and an ad hoc provisioning profile.
fastlane sigh -a com.mypushapp.app --adhoc
That will create the profile and download it to my working directory.
When I’m ready to submit to the app stores, I’ll generate an app store profile and rebuild my app.
What do I do now?
If you’ve successfully followed the steps above, you’ll have all of the iOS certs you need to test your app, or submit it to the App Store.
Depending on the way you build your app, you will need to add your certificate and profile and rebuild. The push notification certificates need to be installed on your push server.
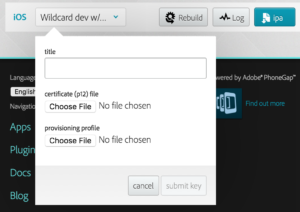
We use PhoneGap Build a lot, so in that case you would export a .p12 from your cert in step 2, and use that along with your provisioning profile in step 4. Upload that as one of your PhoneGap Build keys.
Fastlane does a lot more
This tutorial only covered 4 of the Fastlane Tools, but this alone can speed up app store submission many times over.
Fastlane has more tools and the whole process can be automated. For example, we could combine steps 1-4 above into a single command, or we could upload our metadata to the app stores automatically.
You can also automate app screenshots, setting up TestFlight, and even uploading your Android app to Google Play.
To learn more about what Fastlane has to offer, check out their Github here.