
Custom Photo Modal
A modal is a popup that slides in on top of the current page. Mobile apps use modals quite a bit, because they look and work great.
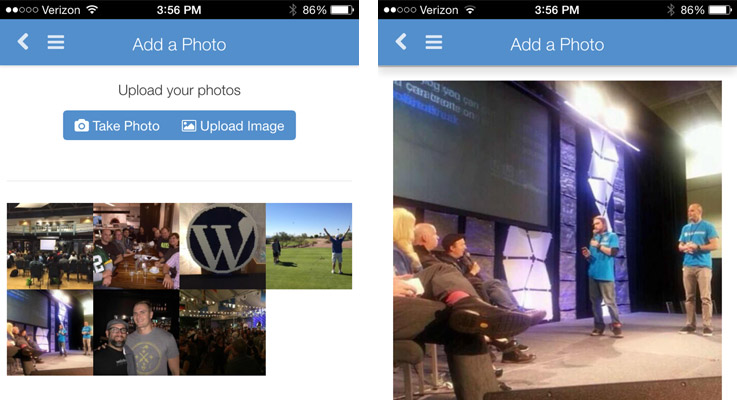
 Click the image to the left to see an example of a modal.
We use modals in AppPresser for a variety of things, including login screens and BuddyPress activity posting. In this tutorial, I’ll show you how to create a custom modal for an image gallery.
We will create a page that allows app users to upload images, which get displayed in a gallery on the same page. Clicking an image opens a modal with the full screen image.
You will need the AppTheme and AppCamera extensions for this tutorial.
You will need a child theme for this tutorial, you can download the finished project files below. Note: Depending on the theme you are using, you may need to change this line in style.css: @import url(“../apptheme/style.css”); to @import url(“../AppPresser/style.css”);.
You can install the child theme, then all you need to do is add the page markup below. The PHP, javascript and CSS is already taken care of.
The WordPress Page
We need a gallery to show our images. WordPress has this taken care of with a gallery shortcode. Create a new page, and add this shortcode (you’ll need to upload some images to get it to display).
[gallery link="file" columns="4"]
Below that, we’ll add the markup for our modal.
The Modal
The AppTheme already has everything you need for a modal, but we have to add some customizations. First, we will add the markup for the modal. You can see the basic markup in our documentation.
We need to make some customizations to this markup. We need to change the ID of the modal, then get rid of the header since we won’t be using it.
[gallery link="file" columns="4"]
<div id="gallery-modal" class="io-modal"> <div class="modal-content"><img class="gallery-modal-image io-modal-close" src="" /></div> </div>
There is no source for our image tag, because we’ll add that dynamically with javascript.
Child Theme Files
If you installed the child theme, you don’t need to add anything else. The code below is explained for learning purposes, so you can create more custom modals.
Enqueue our script
Create a file named app-custom.js, and place it in the /js folder of your child theme. We need to enqueue this file, so create or open functions.php in your child theme, and add this code.
<?php

function appp_custom_scripts() {
    wp_enqueue_script( 'appp-custom-scripts', get_stylesheet_directory_uri() . '/js/app-custom.js', array('jquery'), '1.0.8', true );
}

add_action( 'wp_enqueue_scripts', 'appp_custom_scripts' );
The javascript
Next, open app-custom.js, and add this code.
function apppCustomModal(event) {

    $ = jQuery;

    event.preventDefault();

    $('.gallery-modal-image').attr( 'src',  '' );

    var UpClasses   = 'slide-in-up-add ng-animate slide-in-up slide-in-up-add-active';
    var downClasses = 'slide-in-up-remove slide-in-up-remove-active';

    //get href of button that matches id of modal div
    var ImageURL = $(this).attr('href');

    // need to move .css to css file
    $('#gallery-modal').css('display', 'block').removeClass(downClasses).addClass(UpClasses);

    setTimeout(function() {
        $('.gallery-modal-image').attr( 'src',  ImageURL );
    }, 300 );

}

jQuery(document).on('ready load_ajax_content_done', function($) {
    jQuery('.gallery-icon a').on( 'click', apppCustomModal );
});
This script opens the modal, gets the url of the link that is clicked, and inserts it as the image source.
At the top of this file we are resetting things and defining variables. The up and down classes control the modal animation, we will add and remove those to make the modal open or close.
The image tag in our markup already has the io-modal-close class, which means that when people click on the image, the modal will close.
A couple important things to note: this script fires on the load_ajax_content_done event, which is a custom event in the AppTheme when the page has loaded. It also fires on the ready event, just in case the page is not loaded via ajax.
Also, you’ll see that we did not put our apppCustomModal() function inside the jQuery.on function at the bottom. This is a best practice for extensibility later on.
The CSS
We need to make some tweaks to make this look nice in our app. In your child theme style.css file, add this code.
/* Modal */

#gallery-modal {
    margin-top: 48px;
    padding-top: 0;
}

#gallery-modal .site-header {
    background: transparent;
    box-shadow: none;
}

#content .gallery a img {
    width: 100%;
    max-width: 100%;
}

/* Gallery */

.loggedin-camera-buttons {
    text-align: center;
}

.gallery-item {
    margin-top: 0 !important;
    margin-bottom: 0 !important;
}
Camera button
As a final touch, you can add a camera button at the top of your WordPress page, so that app users can upload their own photos to your gallery.
If you have the AppCamera extension active, simply add the shortcode above your gallery shortcode. Together, it looks like this:
[app-camera]

[gallery link="file" columns="4"]
That’s it! Now you have a nice interactive photo gallery for your app, with user uploads.
Cheers!
“We use modals in AppPresser for a variety of things, including login screens and BuddyPress activity posting. In this tutorial, I’ll show you how to create a custom modal for an image gallery.”
Is there a buddy press model ?
When you have the AppBuddy plugin active there is a login modal and the activity post form is in a slide up modal.
I had to input ID’s of the photos to get this to display them
[gallery link="file" columns="1" size="medium" ids="1670,1667,1664,1661"]
Am I missing something? The photos from app camera go in the uploads folder, this write up seems to imply that it takes all the media from that folder or am I mistaken and the IDs need to be generated somehow?
Hi, the gallery shortcode only displays images that are attached to a page or post by default. If your camera button is on a page, any photos uploaded there will be attached, so they will be displayed in the [gallery].
If the images are not attached, then you will have to add IDs like you did above. If you have any other questions, feel free to email us: https://apppresser.com/contact
Thanks!
Am I missing something? I’ve setup a photo gallery following all the instructions here on one of my apps. It’s using the Ion Theme, and I have a child theme setup. If I have the ajaxify enabled on the link it just spins and nothing happens. If I turn off ajaxify then it goes to the page but nothing fully loads and the app locks up.
I have the .js file created and all the .css additions put in there. Everything used to work on AppPresser v1.0 but since everything was updated and I moved the app to the Ion Theme this portion has broke.
Hi Mike, this tutorial was created for the AppTheme, there were some changes in the Ion theme that may not be compatible.
In style.css you’d have to change these lines to refer to the Ion theme:
Template: apptheme
@import url(“../apptheme/style.css”);
I love it
Am I the only person that can’t seem to get this to work?
This article is a bit outdated, we’d be happy to help you get something working. Shoot us an email: https://apppresser.com/contact
One, I see this article is 3 years outdated, but using this feature, is there any way to manually filter through uploaded photos?