
AppPresser 3 Feature Spotlight: Custom Pages

One of the most powerful features of AppPresser 3 is custom pages.
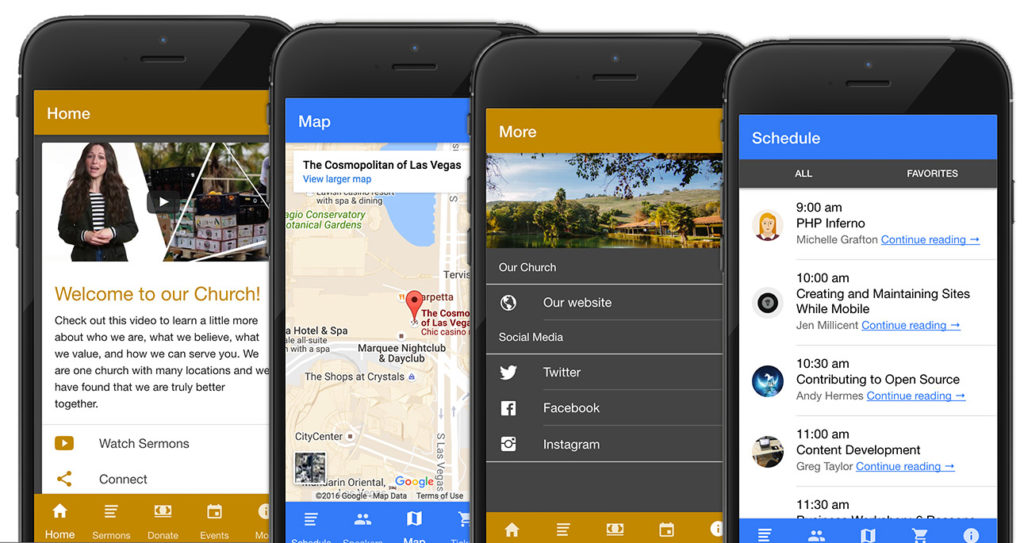
With them, you can make pages that load super fast in the app, that have custom layout and content. For example, a custom Google Map, an intro slider, an app homepage with a video and links to other app pages, a media player, and lots more.
Let’s look at how custom pages work.
Custom HTML Pages
In the app customizer, you can add a new custom page by clicking Custom Pages => Add new page. Choose custom HTML (we’ll look at list pages in another article).
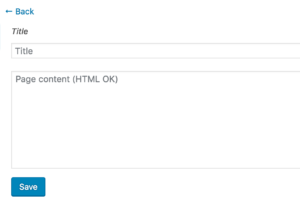 The custom HTML page editor presents you with a title field and a textarea. You can add a title and any content you want here, kind of like the WordPress post editor.
You can add any arbitrary HTML content in the textarea, like images, YouTube videos, HTML tags, iFrames, or Ionic tags.
Video Tutorial
Code samples from the video and more detail can be found below.
Google Maps
First, let’s add a Google Map. Go to maps.google.com, and enter an address. Click “Share,” and copy the embed code.
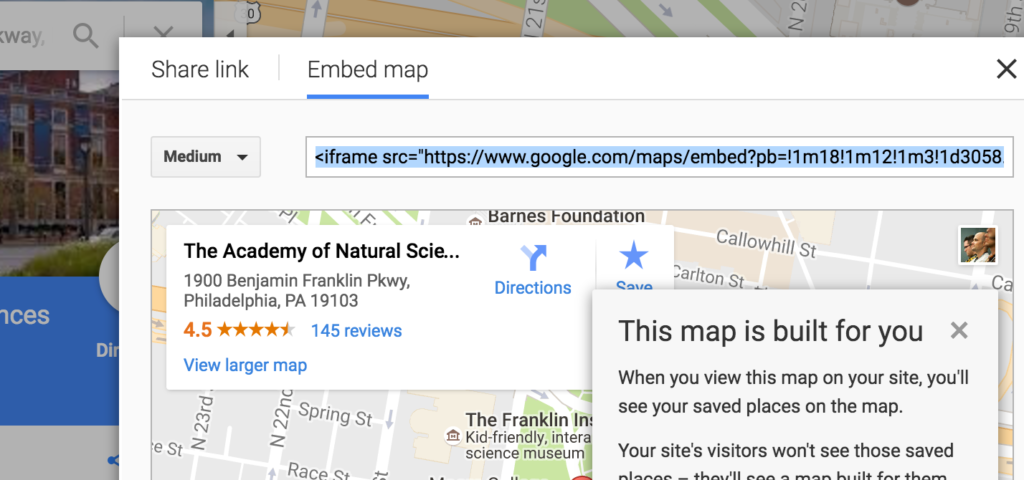
Give the page a title, paste that embed code into the textarea and save.
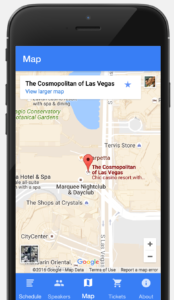
Next, add the Google map page you just created to your app menu, and rebuild your app. It should now appear in your app preview. Custom pages require rebuilding your app because they are actual HTML pages that are generated on our server, and then embedded in your app.
You can do the same for other types of iFrames, such as YouTube videos and more.
Custom Layouts
Custom pages allow you to create custom layouts. Since AppPresser is based on Ionic 2, you can use any Ionic tags in your custom pages alongside your custom HTML.
You can think of Ionic components kind of like Twitter Bootstrap, you get easy-to-use UI items like cards, lists, sliders, grids, and more. You can see all of the available components in the Ionic documentation.
Let’s start with a simple ion-card. This will present our content in a nice padded box.
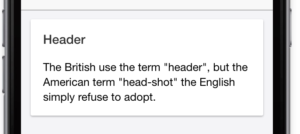
To achieve this, create a new custom HTML page and give it a title. Add the following HTML to the content box:
1 2 3 4 5 6 7 8 | <ion-card> <ion-card-header> Header </ion-card-header> <ion-card-content> The British use the term "header", but the American term "head-shot" the English simply refuse to adopt. </ion-card-content></ion-card> |
After adding that page to your menu and rebuilding, you’ll see that in your preview. Pretty simple right?
Now let’s get a little fancier by using the ion-slides component to create a slider.
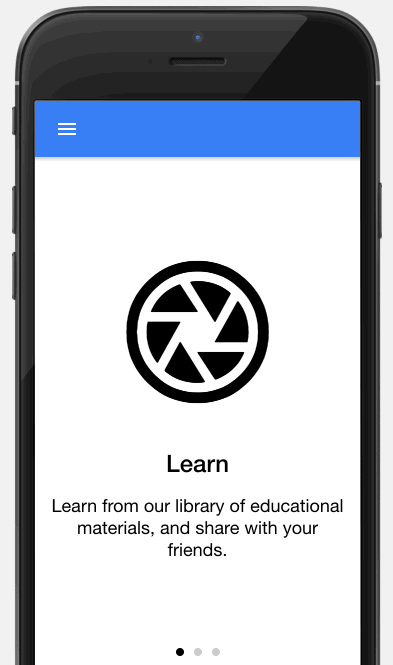
You can do that by adding the HTML below to a custom page, and editing as necessary:
1 2 3 4 5 6 7 8 9 10 11 12 13 14 15 16 17 18 19 20 | <ion-slides [options]="{pager:true}"> <ion-slide> <div class="icon-hero"><ion-icon name="aperture"></ion-icon></div> <h2 class="slide-title">Learn</h2> <p>Learn from our library of educational materials, and share with your friends.</p> </ion-slide> <ion-slide> <div class="icon-hero"><ion-icon name="people"></ion-icon></div> <h2 class="slide-title">Connect</h2> <p>Connect with other app users in our vast app network.</p> </ion-slide> <ion-slide> <div class="icon-hero"><ion-icon name="bulb"></ion-icon></div> <h2 class="slide-title">Ready to Go?</h2> <button ion-button large (click)="openPage(pages.menus.items[0])"> Get Started <ion-icon name="arrow-forward"></ion-icon> </button> </ion-slide></ion-slides> |
After adding that page to your menu and rebuilding, you should get a slider. Hint: if you name the page “Intro”, it will only show once the first time the app user opens the app. Easy app intro slider!
App Home Screen
Custom pages work great for an app home screen because it helps your app load faster.
For the new PressChat app, we wanted a home screen that had an image at the top, with links to other app pages below it. To do this, we used the ion-card component and some icons.
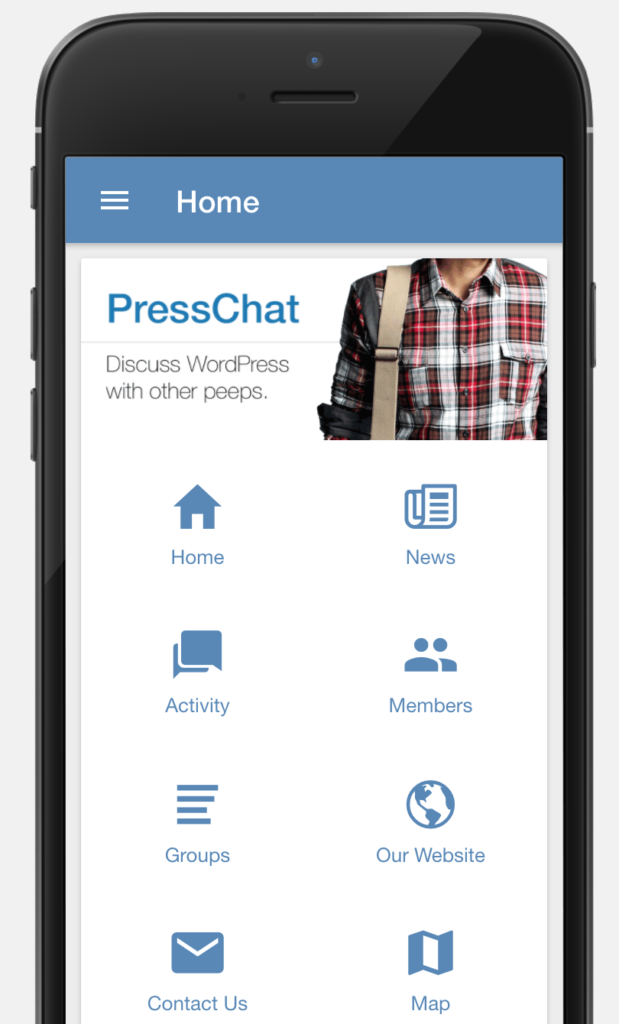
Here is the HTML code:
1 2 3 4 5 6 7 8 9 10 11 12 13 14 15 | <ion-card><img src="assets/presschat-800.png" class="presschat-featured" /><ion-row wrap> <ion-col width-50 *ngFor="let p of pages.menus.items" [ngClass]="p.extra_classes"> <ion-card (click)="openPage(p)" class="menu-card"> <div class="card-title"><ion-icon *ngIf="p.class" name="{{p.class}}"></ion-icon></div> <div class="card-subtitle">{{p.title}}</div> </ion-card> </ion-col></ion-row></ion-card> |
Basically we are getting all of the menu items and displaying them, plus their respective icons. Clicking one will open the app page. You can copy/paste that code into your app and it will display your menu items and icons.
The image uses our app assets feature, which allows you to embed media into the app so it will work offline. View our docs for more information.
Media Player
To add a media player, we just need to make a list of media with some custom code to play the files. This can work great if you have a few audio or video files you want to work offline, but for large amounts of media you’ll want to use a media hosting service.
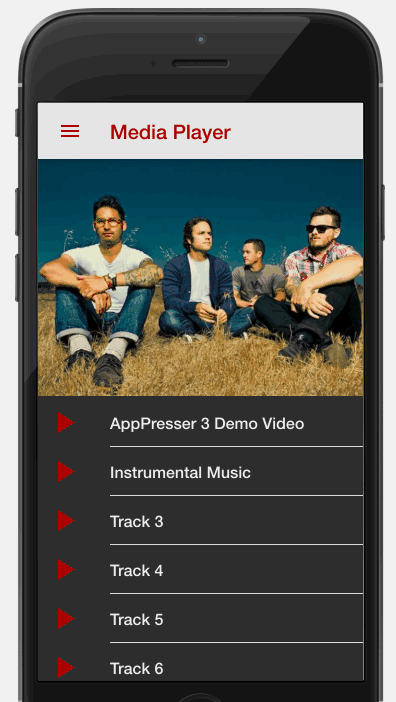
To make a page like this, I used the following code:
1 2 3 4 5 6 7 8 9 10 11 12 | <img src="assets/image.jpg"><ion-list> <ion-item (click)="mediaModal('assets/video.mp4')"><ion-icon item-left name="play"></ion-icon>Play Video </ion-item> <ion-item (click)="mediaModal('assets/audio.mp3','assets/image.jpg')"><ion-icon item-left name="play"></ion-icon>Play Music </ion-item></ion-list> |
You’ll need to change the media links to your own remote url, or to media in your app assets. The media player will play any audio or video file, you can optionally display an image when playing audio files as we did in our example above.
What You Can and Can’t Do With Custom Pages
It’s important to understand that custom HTML pages have nothing to do with WordPress. They exist separately in the app itself, which allows them to load super fast and work offline.
To see a custom page in your app preview, you need to add it to your menu, save, then rebuild the app. This is because we are actually generating the page on the server, then embedding it into the app itself. Making changes to custom pages requires rebuilding and resubmitting if your app is on the app store, so they are not quite as flexible as WordPress pages in this regard.
You can use Ionic UI components like we did above, but not the full Ionic API or custom Angular 2 components. For example, using the form components from Ionic would look nice, but it wouldn’t do anything.
Custom pages do not connect to WordPress, so if you want to use shortcodes, or display WordPress content, use a WordPress page instead.
For more information on the different types of pages you can use with AppPresser, check out our full documentation on pages. In a future article we will discuss WordPress pages, lists, and other content.
Customization is Power
Custom pages are one of the most powerful features in AppPresser 3.
They give you the freedom to design your own layout, and the tools to create great apps. You will love how fast they load, even on slow internet connections or offline. Using Ionic tags allows you to use great app design principles without having to create it all from scratch.
Mixing custom HTML pages into your app alongside your WordPress pages is the key to creating a great experience for your app users. Get out there and make something awesome!
Learn More About AppPresser 3
Get updates and information about AppPresser 3.
Hi.
Great stuff
Can you make a demo for Presschat in Apppresser 3? Give tips and tricks, code-examples and so forth?
Definitely, that’s on my todo list
Does this also work with the latest version of AppPresser (as of 2020)? Can we use the same methods as described here?
AppPresser 4 still has custom pages, with new capabilities and templates. You can check out the docs here: https://docs.apppresser.com/article/288-custom-html-pages