

You don’t need to be a developer-this guide shows how anyone can create and publish a mobile app, step by step.


Start with the Right Plan
Before you dive in, it’s important to pick the right AppPresser plan. All plans include native iOS and Android builds, so no matter which one you choose, you’re starting with a real mobile app. The differences come down to features, testing tools, and publishing support.
If you’re planning to launch your app to the public, send push notifications, or access advanced integrations, the Professional or Advanced plans are your best options. These tiers unlock features like live device testing, store submission support, and custom functionality. If you’re just exploring or building something simple for internal use, the Standard plan may be enough to get you started.
If you want to build apps for clients, or create multiple apps for your own company, the AppPresser Reseller plan may be for you.
- Create up to 10 apps
- Huge discount, only $6.50/mo per app (billed yearly)
- All Core and Professional features
- Add clients or team members to access your app builder
- Apple and Google sign on not included. Can be purchased for $10/mo additional per app.
- In App Purchases not included. Can be purchased for $20/mo additional per app.
- App store certificate creation (and Bitrise Build Server setup) is not included, but can be purchased for an additional $99 per app.
Step 1: Create Your My AppPresser Account
- After purchasing AppPresser, check your email and reset your password.
- Log in at https://myapppresser.com.
- You will be redirected to your site dashboard at
myapppresser.com/your-site-slug. Bookmark this page. This is where you’ll manage your apps, account settings, and downloads.
Step 2: Create Your First App
- Go to your app dashboard at myapppresser.com.
- Click the + New App button.
- Enter a name for your app.
- Choose your platforms (iOS, Android, or both).
- Enter your full WordPress URL (including the
https://). - Click Create App.
Step 3: Set Up Your WordPress Site
This step is essential to connect your WordPress site to your AppPresser app.
1. Install AppPresser Core Plugin
- Log in to your WordPress dashboard.
- Go to Plugins → Add New.
- Search for AppPresser.
- Click Install Now and then Activate.
2. Install JWT Authentication Plugin
- Still under Plugins → Add New, search for JWT Authentication for WP REST API.
- Click Install Now and then Activate.


3. Enter Site Slug and App ID
- After you create your app on myapppresser.com, you’ll receive a Site Slug and App ID.
- In your WordPress dashboard, go to AppPresser → Settings.
- Enter your Site Slug (from the URL:
https://myapppresser.com/mysite/→ slug ismysite). - Enter your App ID (typically a small number).
4. Add Your AppPresser Account Email
- Use the email address associated with your AppPresser purchase.
- Enter it in the Email field under AppPresser Settings to receive plugin updates.
- In AppPresser → Settings, find the JWT Secret Key field.
- Visit https://api.wordpress.org/secret-key/1.1/salt/ and copy the AUTH_KEY line.
- Only copy the string between the apostrophes, not the full line of code.


Previously, AppPresser recommended installing both the AP3 Ion Theme and the AppPresser Bridge plugin. The AP3 Ion Theme was designed to give your WordPress site the same look and feel as a mobile app, but many users preferred to use their own web themes instead. The AppPresser Bridge plugin now serves as the main connection between your app and your WordPress site, allowing you to keep your existing WordPress theme and still have it function correctly in the app. For new setups, you can focus on installing only the Bridge plugin, removing the need to also download and install the AP3 Ion Theme.
- Log into myapppresser.com and select your app.
- In the sidebar, click Connect → Install Plugins.
- Scroll to the bottom and download the AppPresser Bridge plugin.
- Go to Plugins → Add New → Upload Plugin.
- Upload the Bridge plugin
.zipfile and click Activate.
If you still want to use the AP3 Ion Theme for a completely app-styled interface, you can install it, but it’s no longer required for core functionality.
8. Install Any Necessary Extension Plugins
- From your AppPresser account, you can download any needed extensions you may need for your app such as:
- AppCommerce (for WooCommerce)
- AppCommunity (for BuddyPress)
- AppLMS (for LearnDash)
- In WordPress, go to Plugins → Add New → Upload Plugin.
- Upload the
.zipfile for each, and click Activate after installation.


- Double-check that your Site Slug, App ID, Email, and JWT Secret Key are filled in and saved.
- Go back to your app dashboard at myapppresser.com.
- Click into your app, then go to Connect → WordPress URL.
- Enter your full site URL (including
https://) and click Verify. - If successful, you’ll see: “Success! Click here to start customizing your app.”
- If there’s an error, repeat the steps or check the Connect to WordPress Error Guide.
Congrats! You have now connected your WordPress site to AppPresser.
Step 4: Customize Your App
The app customizer is where you will spend a majority of your time, and where you can make your app look and feel like your own. In the App Customizer, you’ll see options to:- Change the app’s color scheme under the Colors tab
- Use the Design tab to select fonts and add custom CSS
- Manage app menus, splash screens, and icons in Settings
- Add or remove pages using either WordPress content or the Page Builder
Each tab updates live in the app preview, but make sure to hit Save after making changes. If you want to push new styling to live apps, use Publish Changes.
Step 5: Add Pages and Menus
To add new pages, go to the Pages tab in the App Customizer. You can either:- Create a WordPress page (linked to your site)
- Create a Custom Page using the Page Builder
If you’re using the Page Builder:
- Go to Custom Pages → Add New Page → Page Builder
- Add a title
- You can now build your layout with common “blocks” which are just elements of your page that you can drag and drop.
- You can include podcast feeds, downloads, login areas, categories, buttons and more


To display your new page in the app:
- Go to the Menu Tab
- Click Add Items and select your new custom page
- You can add icons using the built-in Ionicons selector
If you want to reorder items, just drag and drop.


Step 6: Configure App Settings
Go to the Settings tab in the App Customizer to configure key app features and behavior. This is where you can manage visual branding, menu structure, offline media, native features, and advanced options.
App Branding and Display
- App Icon and Splash Screen: Upload high-resolution PNG files. Use the Icons and Splash Screens section for correct sizes. These images are required for publishing and to maintain brand consistency.
- Status Bar Color: If your app has a dark header, you can check “Status Bar: Light Text” so the status bar text shows in white.
- Header Logo: Upload a PNG logo for the app header bar. Note: this requires a full app rebuild to appear.
Menu Structure and Navigation
- Side Menu / Tab Menu: Choose your default navigation style (side or tabbed menu).
- Auxiliary Menu: Add links that don’t appear in the main tab or side menu but are still accessible (like Help pages or Terms).
- Right Side Menu: Optionally flip the side menu to the right-hand side of the screen.
Language and Localization
- Default Language: Set the primary language for your app (e.g. English).
- Translation Files: Upload a .zip of your i18n translation folder. After uploading, save and refresh to apply it.
- RTL Support: Enable Right-to-Left text direction if your app targets languages like Arabic or Hebrew.
Only enable what you actually use to avoid issues during app store review.
- Native Media and Background Audio: Adds full audio playback support, including podcast feeds and downloaded audio. Required if using Media List blocks or Podcast blocks.
- Enhanced Native Media Player: Improves the user experience for audio and video inside the app.
- Geolocation: Use location services within your app (usually via iframe + WP plugins).
- Camera: Allow users to take or upload photos directly in the app. Required for some BuddyPress or form features.
Offline and External Files
- Offline Files: Upload a zip of files to make images, videos, or PDFs available without an internet connection. These will be placed in a
/filesdirectory inside the app. - Custom Javascript: Upload a JS file to inject additional custom behavior into the app. This feature is “use at your own risk” with no technical support provided. You can only use plain Javascript (no jQuery, Angular, or other libraries) and should keep scripts simple to avoid unexpected results. Code should be wrapped in a self-executing anonymous function and use the provided “ready” helper function to ensure elements are loaded before manipulation. The custom JS interacts with app menu, toolbar, custom HTML pages, and API list pages – not WordPress pages directly. Remember to save your app and rebuild after uploading the .js file to test in browser preview.
Advanced Options
- Hide Share Buttons: Removes the default social sharing icon from the app header.
- Enable MathJax: Renders mathematical equations using MathJax syntax.
- Allow Video Uploads for BuddyPress: Enables direct video uploads inside the app for BuddyPress users.
- Add Audio Recording Usage Description: Used for App Store compliance if your app accesses the mic.
- Disable Automatic Updates: If you don’t want AppPresser to automatically update app files or trigger Bitrise builds, enable this option to manage everything manually.


Step 7: Preview and Test Your App on Real Devices
Testing your app on actual devices is crucial before publishing. Before testing on real devices, make sure you’ve thoroughly tested your app using the browser preview in your AppPresser dashboard. AppPresser uses Bitrise to compile app files and generate the final installable packages for iOS and Android. The build process follows a workflow, a series of automated steps like installing dependencies, bundling files, and digitally signing your app.
- Android & iOS Debug Builds – For basic functionality testing.
- Ad Hoc Builds – For testing integrations like push notifications or social logins.
If a build fails, common causes include:
- Missing or incorrectly configured certificates/provisioning profiles
- Missing permissions in your app settings
- Plugin-related conflicts
You can diagnose issues by reviewing the Bitrise build logs from your dashboard. They show each step of the process and where it failed.
Getting Started with Device Testing
Access Your Testing Dashboard
- From your MyAppPresser.com dashboard, click on your app name
- Navigate to App Customizer → Build and Preview section
- Click on the “Device testing and app stores” dropdown
From this dashboard you can:
- Rebuild the Application Preview
- Test on different devices
- Change the Application Version
- Publish Changes
- Force update workflows and files
Testing on Android Device with Bitrise
Available Android Testing Options
- Android Debug: Standard testing build for general functionality
- Android Ad Hoc: Test social login features and third-party integrations
Starting Your Android Build
- Select your preferred Android testing option from the dropdown
- Click the “Build App” button
- Important: building your app for a device takes 10-15 minutes. It is recommended you only do this once you have fully tested your app in the browser preview, and are ready for app submission.


Using Bitrise Dashboard
If you have a Reseller account, you get access to the Bitrise platform where apps are compiled:
- Reseller accounts get direct access to Bitrise and are expected to handle their own certificate and keystore setup for both iOS and Android. This includes managing all provisioning profiles, signing keys, and related configuration for store submissions.
- Standard accounts can have the AppPresser team manage certificate and keystore setup for a $199 service fee (waived for annual subscriptions on the Standard plan). The team will prepare the files and upload them to Bitrise so you can build and publish.
- Professional and Advanced plans include full store submission setup at no extra cost.
- Regardless of account type or plan, certificates and keystores must be set up correctly before a build can be submitted to the App Store or Google Play.
1. Access Your Bitrise Account
- Click “Visit App in Bitrise” from your AppPresser dashboard
- Log into your Bitrise account
- Important: Coordinate with your team to avoid multiple simultaneous builds
2. Find Your Build
- View your builds list in Bitrise
- Click on the build you want to test
- You’ll see all the processes that run during compilation
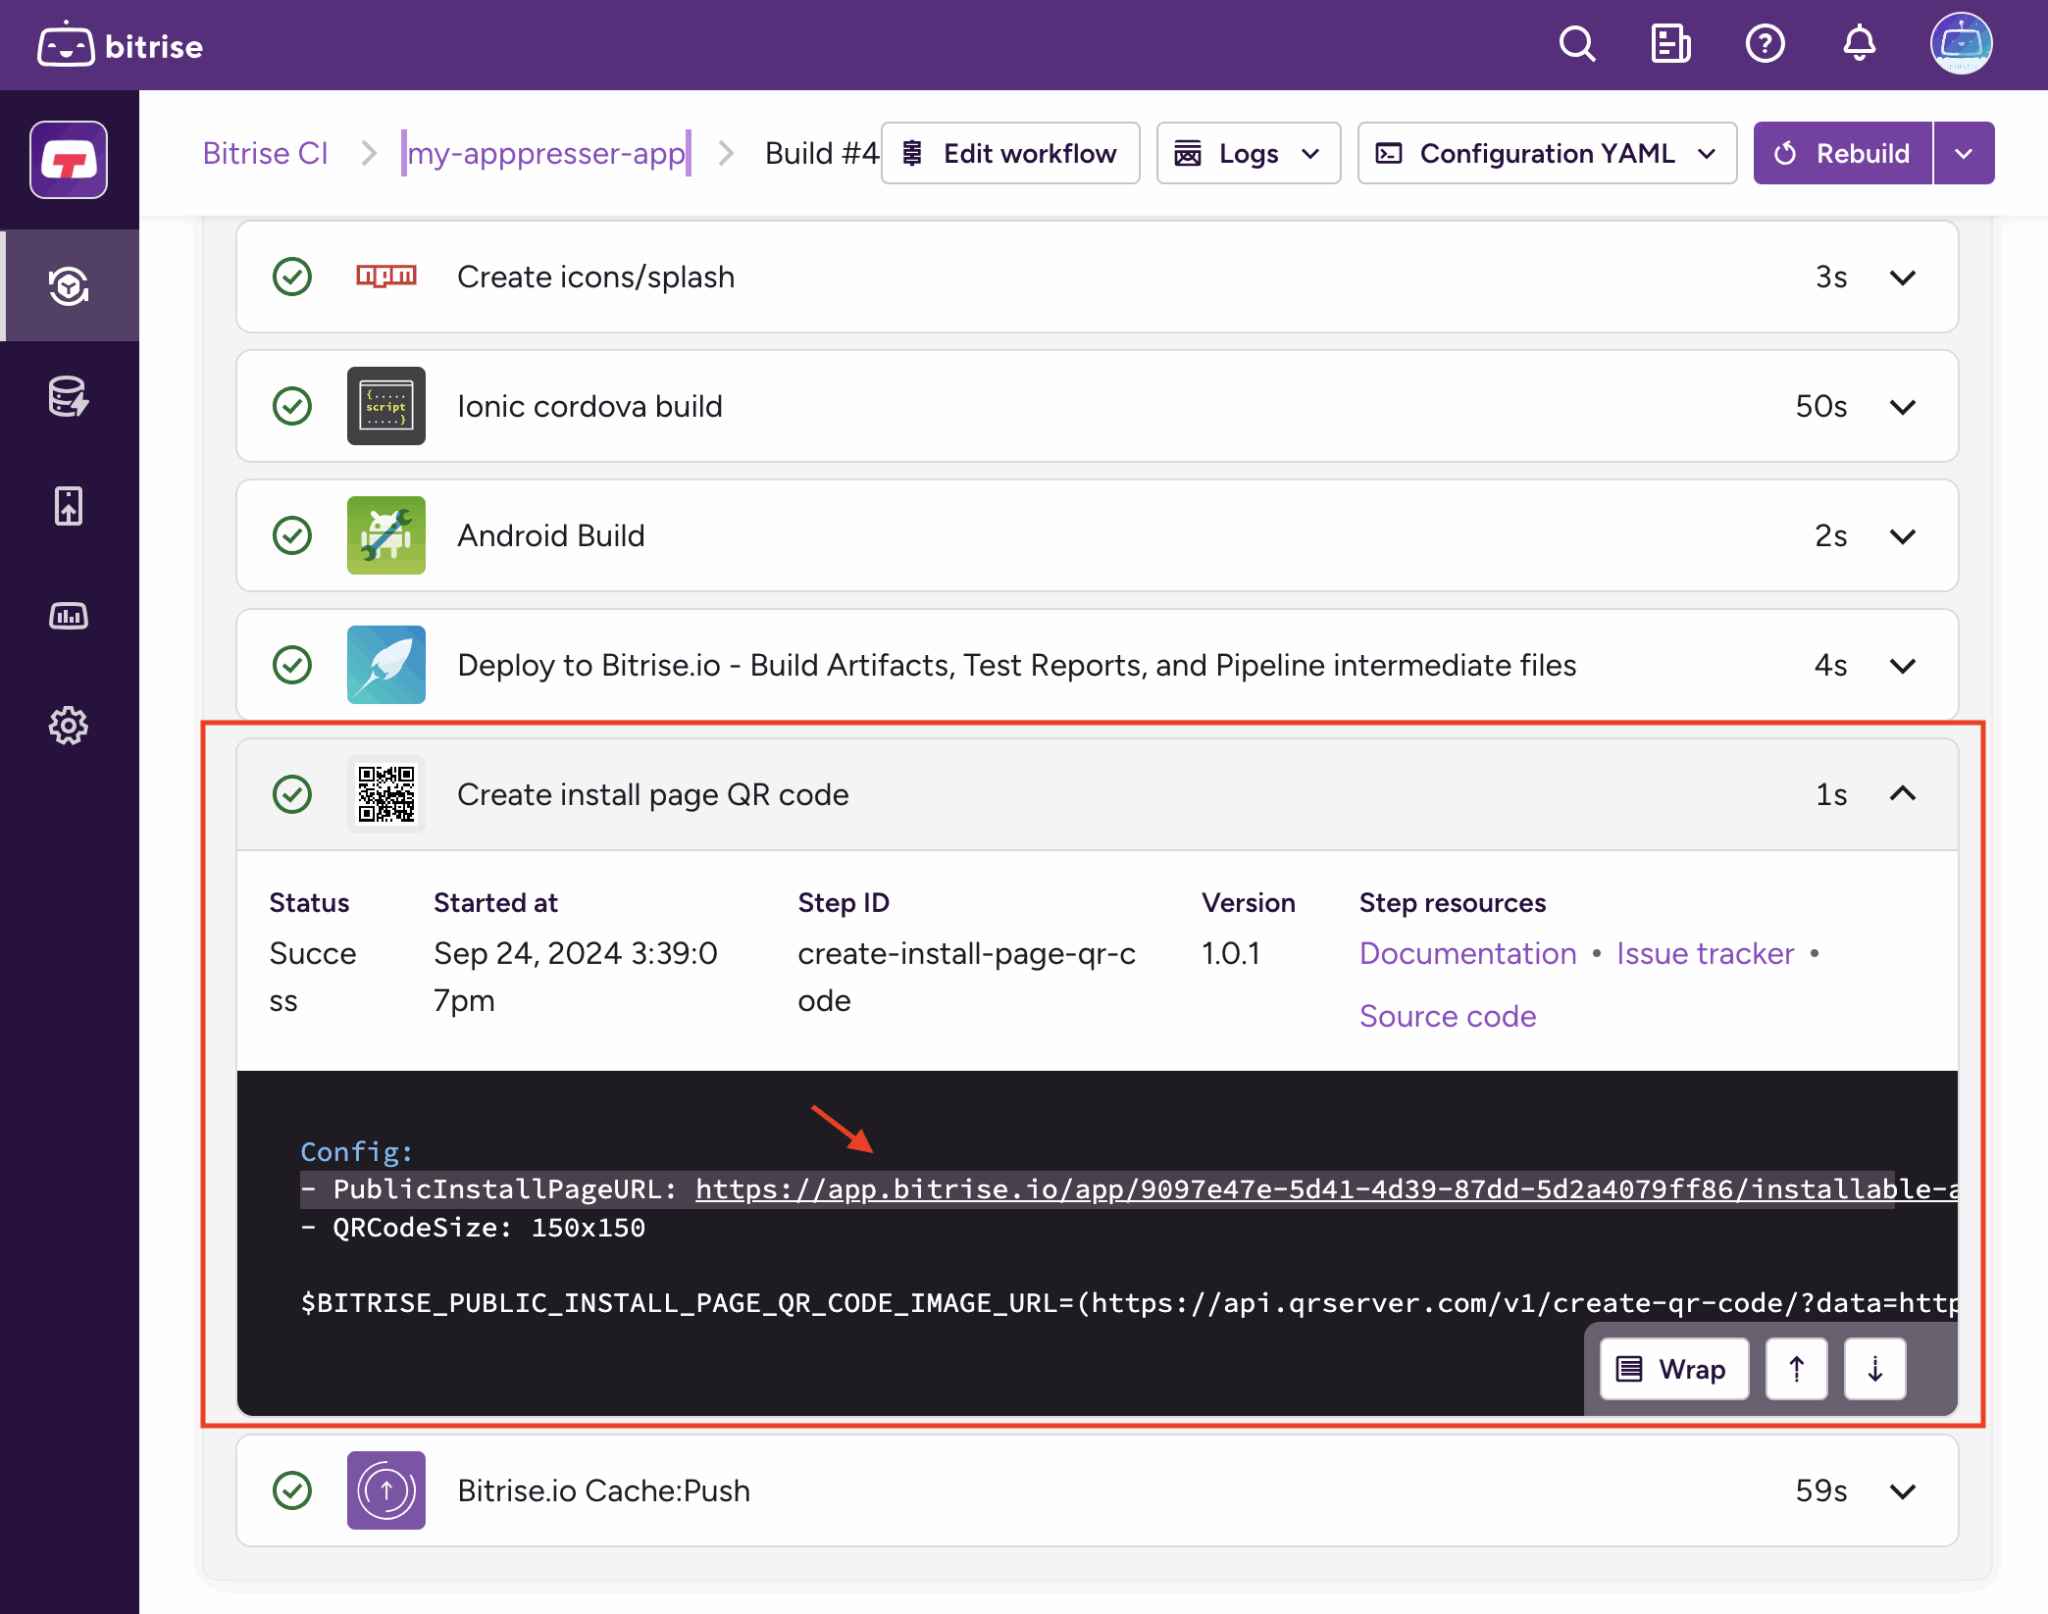
3. Download Your Test Build
- Scroll down to the “Create Install Page QR Code” section
- Open this section to reveal the Public Install Page URL
- Click the link to open a new browser tab with installation instructions
4. Install on Your Android Device
-
- You’ll see a QR code on the installation page
- Scan the QR code with your Android device
- Click the “Download” button to install the
app-debug.apkfile - Note: Your device may require you to enable “Unknown Sources” or “Developer Mode”


iOS Device Testing
Testing on iOS devices requires additional setup and an active AppPresser subscription.
Prerequisites for iOS Testing
- Active AppPresser subscription
- AppPresser must generate and install your certificates
- Critical: Your iOS device UDID must be added to your provisioning profile before certificate generation.
To complete this step:
- Connect your iOS device to a computer and open iTunes (on Windows/macOS Mojave and earlier) or Finder (on macOS Catalina and later).
- Select your device. Then, click on the “Serial Number” field – it will change to display the UDID.
- Right-click and copy the UDID, or press
Cmd + C/Ctrl + C. - Go to Apple Developer account and log in.
- Navigate to Certificates, IDs and Profiles → Devices, then click the + icon to add a new device.
- Enter a name for your device and paste the UDID.
- Click Continue, then Register.
This must be done before AppPresser can generate your certificates. If the UDID isn’t registered in your provisioning profile ahead of time, your app build won’t be installable on that device.
Available iOS Testing Options
- iOS Debugging: Standard iOS testing build
- iOS Ad Hoc: Test push notification features
Installing Your iOS Test App
To install the app on your device, click the installation link that was emailed to you after a successful build, and follow the directions on the installation page. If the app downloads but does not install, your device UDID was not included in your profile. You can also install via QR code as described below.
iPads may require some extra steps, please see below.
Method 1: QR Code (Recommended for iPad)- Click the installation link from your email
- Click “Share” to show the QR code
- Scan with your iOS device and install
Method 2: Direct Download
- Use Safari only
- Go to iPad Settings → Safari → Turn OFF “Request Desktop Website”
- Visit install page in Safari and refresh
- Click “check device compatibility” and allow profile
- Go to Settings → Profile Downloaded and install the profile
- Return to install page in Safari → Refresh → Click Install
If installation fails:
- Add your device UDID to your Apple Developer account
- Create a new provisioning profile with your device
- Send the profile to AppPresser support
- Rebuild your app and try again
What to Test
Before moving to publication, thoroughly test these areas:- Navigation: Menu items, page loads
- Content: WordPress posts/pages display properly
- User Features: Login/logout, registration, profiles
- Media: Images, video, audio
- Offline Mode: Functionality without internet
- Push Notifications: Use Ad Hoc builds to test
- Performance: Load times, scrolling
- Device Compatibility: Screen sizes/orientations
- Social Features: Social logins via Ad Hoc builds
Step 8: Publishing Your App to App Stores
Publishing is available on Professional and Advanced plans.Prerequisites
- Must be on a Professional or Advanced plan
- App must be fully tested and functional
- Developer accounts for:
- iOS: $99/year
- Android: $25 one-time
- You will also need to generate screenshots for your app store listings, and they must be a certain size.
iOS App Store Setup and Submission
1. Apple Developer Program Setup
- Log in to your Apple Developer account
- If you haven’t already, enroll in the Apple Developer Program ($99/year)
- Complete identity verification and wait for approval
2. Create App Store Listing
- Make sure your Apple developer account is paid, approved, and any agreements are accepted.
- Visit App Store Connect and log in.
- Click the plus button to add a new app.
- Fill out all required fields including:
- App name, primary language, and bundle ID
- Pricing and availability
- Screenshots for all required device sizes (must follow Apple’s resolution guidelines)
- Save the listing as a draft.
- Once your .ipa build is ready (provided by AppPresser), go back to App Store Connect, go to the Build section, click the plus icon, select your uploaded build, and assign it to the listing.
- Submit your app for review.
3. Generate App-Specific Password
- After approval, generate an app-specific password (instructions here)
- Send this password to AppPresser support so we can manage your certificates
4. Certificate Setup Process
- Fill out all fields in App Stores tab
- Save → Click “Request Certificate Setup” (will appear if all fields are filled out properly)
- Provide 2FA code within 2 minutes when prompted
- AppPresser will generate all of the certificates required to test and submit your app, but do note: we will require your 2-factor authentication code within 2 minutes when we create them. (Reseller plans do not include this service)


5. Submit to App Store
- Go to Build and Preview
- Expand “Device testing and app stores”
- Select “Submit to iOS App Store Connect”
- Increase your version number
- Click “Build App”
- Wait 15-20 minutes
- You’ll get email notification
- Wait for Apple to process your submission
- Submit for review (1-7 days)
Google Play Store Setup and Submission
1. Initial Setup- Visit Google Play Console and log in.
- Pay the $25 one-time registration fee if you haven’t already.
- Complete your account verification.
- Click Create App at the top right and fill out the basic info (app name, default language, app type, free/paid).
- Fill out the required fields under the “Main Store Listing” section, including title, short and full description, screenshots, category, and contact info.
- Note: Some areas of the store listing require that the
.apkfile is uploaded first. To generate this file, go to your AppPresser Build and Preview tab, select Submit to Google Play, and start the build. You will receive a link via email to download the.apk, which you can then upload to the Google Play Console. - If you’re a business customer, AppPresser handles your keystore certificates. Otherwise:
- Follow this guide to create your own keystore.
- Add it to Bitrise using this guide.


2. Generate and Submit Your First Release
For Google Play, the first app submission must be done manually. As part of your subscription, we handle this step for you. Once your app is live, future updates can be submitted automatically through your AppPresser dashboard.
First-Time Submission (Manual)- Contact our support team and let us know you’re ready for your first Google Play release.
- We’ll build your app and take care of submitting it to Google Play on your behalf.
- Make sure your Google Play Console listing is complete with all the required fields, graphics, and details so we can attach the build and publish it properly.
Subsequent Releases (Automatic)
- Make any app changes via WordPress or the App Customizer.
- Increase your version number in the dashboard-this is required or the build will fail.
- Go to the Build and Preview tab.
- Select Submit to Google Play and click Build App.
- The build takes about 15-20 minutes. You’ll get an email when it’s done.
- The new version will automatically roll out to the Production track and be live or testable within 24 hours.
To enable automated updates, you’ll need to provide us with a Google Play Services API Key. Once that’s set up, you can push new versions with just a few clicks.
Congratulations! Your app is now live on Google Play.Managing App Updates and Resubmissions
Version Management and Submitting App Updates- Always increase your version number before submitting a new build to the app stores.
- Use semantic versioning (e.g., 1.0.0 → 1.0.1 for bug fixes, 1.1.0 for new features).
- Update the version number in your AppPresser dashboard before building.
To submit an app update:
- Make your changes in WordPress or the AppPresser Customizer.
- Go to the Build and Preview tab in your AppPresser dashboard.
- Select the appropriate store submission option (e.g., Submit to Google Play or Submit to iOS App Store Connect).
- Click Build App and wait for the build to complete.
- Once the build is ready:
- For iOS: Go to App Store Connect, select your app, assign the new build, and resubmit for review.
- For Android: Go to Google Play Console → Production → Create Release, upload the new
.aabor.apk, enter release notes, and rollout.
Handling Rejections
1. For iOS- Fix the issues called out by Apple’s review team.
- Increase your app version.
- Rebuild your app and resubmit.
- Common rejection reasons: missing privacy policy, unused permissions, or broken functionality.
2. Android
- Issues are usually related to policy violations or technical errors.
- Fix the flagged problems.
- Increase your version number.
- Rebuild and resubmit your app.