API Driven List Pages are a powerful new feature in AppPresser 3 that uses the WP-API to pull in content from your WordPress site.
The end result is super fast WordPress posts in your app that can be stored offline. For example, you can pull in your latest posts filtered by category, a list of events from a custom post type, or even a list of your site’s pages.
If you aren’t familiar with the WP-API, it basically outputs your WordPress content in text form to be consumed by other applications. You can use it to pull a list of posts to your mobile app, send data to WordPress, and more. As of version 4.7, WP-API is part of WordPress core, so you don’t need to install a plugin, it’s just there automatically.
Let’s look at how these API list pages work in AppPresser 3.
Requirements
Before you create a list page, you must have a WordPress website running version 4.7 or later. If you are on 4.6 or lower, make sure you have the WP-API plugin installed and activated.
In your WordPress site, go to Plugins => Add New, and search for Rest API. Install and activate this plugin. Make sure the plugin title is: WordPress REST API (Version 2)
Once the plugin is activated, you should be able to navigate to mysite.com/wp-json and see data there. If not, the plugin is not installed correctly.
Limitations of List Pages
API lists display read-only post content, they do not work with custom plugins or special content.
For example, an embedded form, slider, or custom gallery plugin will not work through the API. If you have anything other than read-only content, you will want to use this type of list instead.
Create a List Page
To create a list page, first login to your myapppresser.com dashboard. Click into your app, and then visit the App Customizer. Go to Custom Pages => Add New.
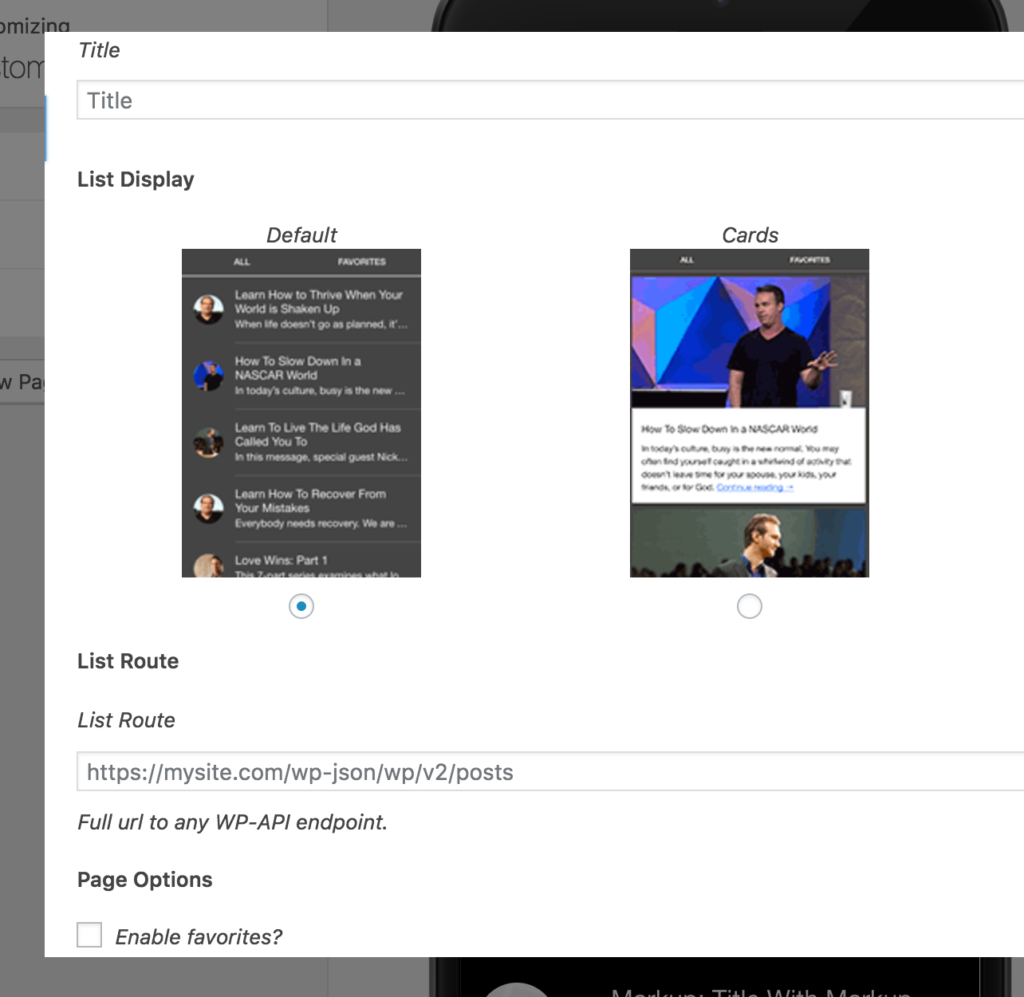
Choose “list” from the dropdown, and you should see some options.

The default list shows your post title and excerpt, with a small featured image. A card list shows a larger image above the post title, making it look like a square card.
The list route is where you will enter the full url to your WP-API endpoint. Let’s look at that in more detail.
List Routes
A list route is any API endpoint with collection data, such as posts or pages. Here is a list of example endpoints:
- https://mysite.com/wp-json/wp/v2/posts
- https://mysite.com/wp-json/wp/v2/pages
- https://mysite.com/wp-json/wp/v2/media
- https://mysite.com/wp-json/wp/v2/comments
- https://mysite.com/wp-json/wp/v2/categories
To show a list of your most recent posts, you could add the post endpoint to the list route field and save. (Make sure you add this page to your menu and save to see it in the preview. Note: non-https routes will not work in the preview, but are fine in the app on a device.)
Some endpoints (such as users) require authentication. AppPresser does not have a way to handle authenticated endpoints at this time.
The endpoints listed above are the defaults included in WordPress core, but you can also add your own endpoints. For example, https://mysite.com/wp-json/apppresser/v1/apps. We won’t cover how to do that in this article, but you can view the WP-API docs for help.
You’ll probably want to show more than just a normal list of posts, so let’s look at how to customize your list pages.
Custom Post Types
Custom post types and post metadata do not show up in the API by default. You can add custom post types using some custom code in a plugin.
The easiest thing to do is to use the “show_in_rest => true” argument when registering your post type, as shown here.
If you need to add a CPT to the API after it’s already registered, you can do that like this:
<?php
add_action( 'init', 'appp_post_type_rest_support', 999 );

function appp_post_type_rest_support() {

	global $wp_post_types;

	//be sure to set this to the name of your post type!
	$post_type_name = 'events';
	if( isset( $wp_post_types[ $post_type_name ] ) ) {
		$wp_post_types[$post_type_name]->show_in_rest = true;
		$wp_post_types[$post_type_name]->rest_base = $post_type_name;
		$wp_post_types[$post_type_name]->rest_controller_class = 'WP_REST_Posts_Controller';
	}

}
After adding the ‘events’ post type above, we could add our list route like this: http://mysite.com/wp-json/wp/v2/events
That would display a list of events in our app.
What if you want to change the display of the list, for example, to add an event date? We can do that with template hooks.
Template Hooks
Template hooks allow you to insert custom content anywhere in the post list or post detail pages.
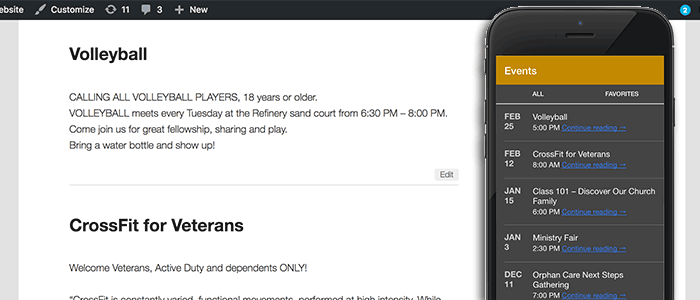
For example, since we are displaying our ‘events’ custom post type, let’s display the event date. The date is stored as post meta, with the key event_date. We will need to get that date and insert it before each post title.
First, we need to tell the API to add our custom code when our app looks for events.
<?php
/**
* Add a callback for the events post type
*/
add_action( 'rest_api_init', 'appp_register_template_hook' );
function appp_register_template_hook() {
    register_rest_field( 'events', // any post type registered with API
        'appp',
        array(
            'get_callback'    => 'appp_get_hook_data',
            'update_callback' => null,
            'schema'          => null,
        )
    );
}
The code above doesn’t do anything yet, it just sets things up. Next, we need to add our data to the response.
<?php
/**
 * Get the value of a meta field field
 *
 * @param array $object Details of current post.
 * @param string $field_name Name of field.
 * @param WP_REST_Request $request Current request
 *
 * @return mixed
 */
function appp_get_hook_data( $object, $field_name, $request ) {

	$data = [];
	$data['post_list']['above_title'] = '<span class="event-date">' . get_post_meta( $object['id'], 'event_date', 1 ) . '</span>';

	return $data;
}
The code above is our callback and actually inserts our code into the API response when we are looking for events. You’ll see that we are getting the post meta for event_date, and adding it to $data[‘post_list’][‘above_title’]. Our app will look for that information and include it above our titles.
If we add some custom CSS, we can make it look nicer. We put this in the app customizer under Colors -> Custom CSS:
.event-date {
    float: left;
    font-weight: bold;
    color: #ccc;
    width: 40px;
    overflow: hidden;
    display: block;
    height: 45px;
    text-transform: uppercase;
    white-space: normal;
    margin-right: 15px;
}
Here is the end result:
Other ideas for template hooks would be video or audio on the post detail page, product price, larger images, or custom messages.
You can add custom data anywhere, even on post detail pages. For a list of template hooks, please see our documentation.
Bonus: Custom Route Parameters
You might wonder how you filter posts by category, author, etc.
The WP-API allows you to show custom results by adding parameters to your query. For example, to show a certain category, you would add this url as your route:
https://yoursite.com/wp-json/wp/v2/posts?categories=40
The ’40’ at the end is the category term ID. You can do the same for tags by changing the parameter to ?tags=XX.
There are other parameters available, such as author, orderby, exclude, and more. For a full list, please see the “Arguments” section here.
You can string parameters like this:
https://yoursite.com/wp-json/wp/v2/posts?categories=40&author=1&exclude=214
To display this in your app, you would put that full url as the list route in your custom page.
When Not to use API Lists
You can do a lot of custom stuff with API lists, but they aren’t always the best solution.
They will never display your custom plugin content, such as a Gravity Form or Facebook comments. They are best used for read-only content like magazine articles, events, etc. AppPresser has a different types of page to handle custom plugin content, called WordPress post lists. The disadvantage with those is that they don’t load quite as fast or work offline.
AppPresser has multiple page types to handle anything you want to do, the power is in your hands. API lists are an exciting new feature you can start adding to your apps today, have fun!